• Skip to primary navigation
  • Skip to main content
  • Skip to primary sidebar
  • Skip to footer

Slice of Jess

Changing the way you eat, one slice at a time.

  • About
  • Press
  • Recipes
  • Travel & Dining
  • Collaborate
    • Collaborate
    • Recipe Development
    • Photography
    • MEDIA KIT
    • Privacy Policies
  • Contact Us

FIVE Ingredient Garlic Naan Homemade Flour Tortillas

December 27, 2020 By Jessica Leave a Comment

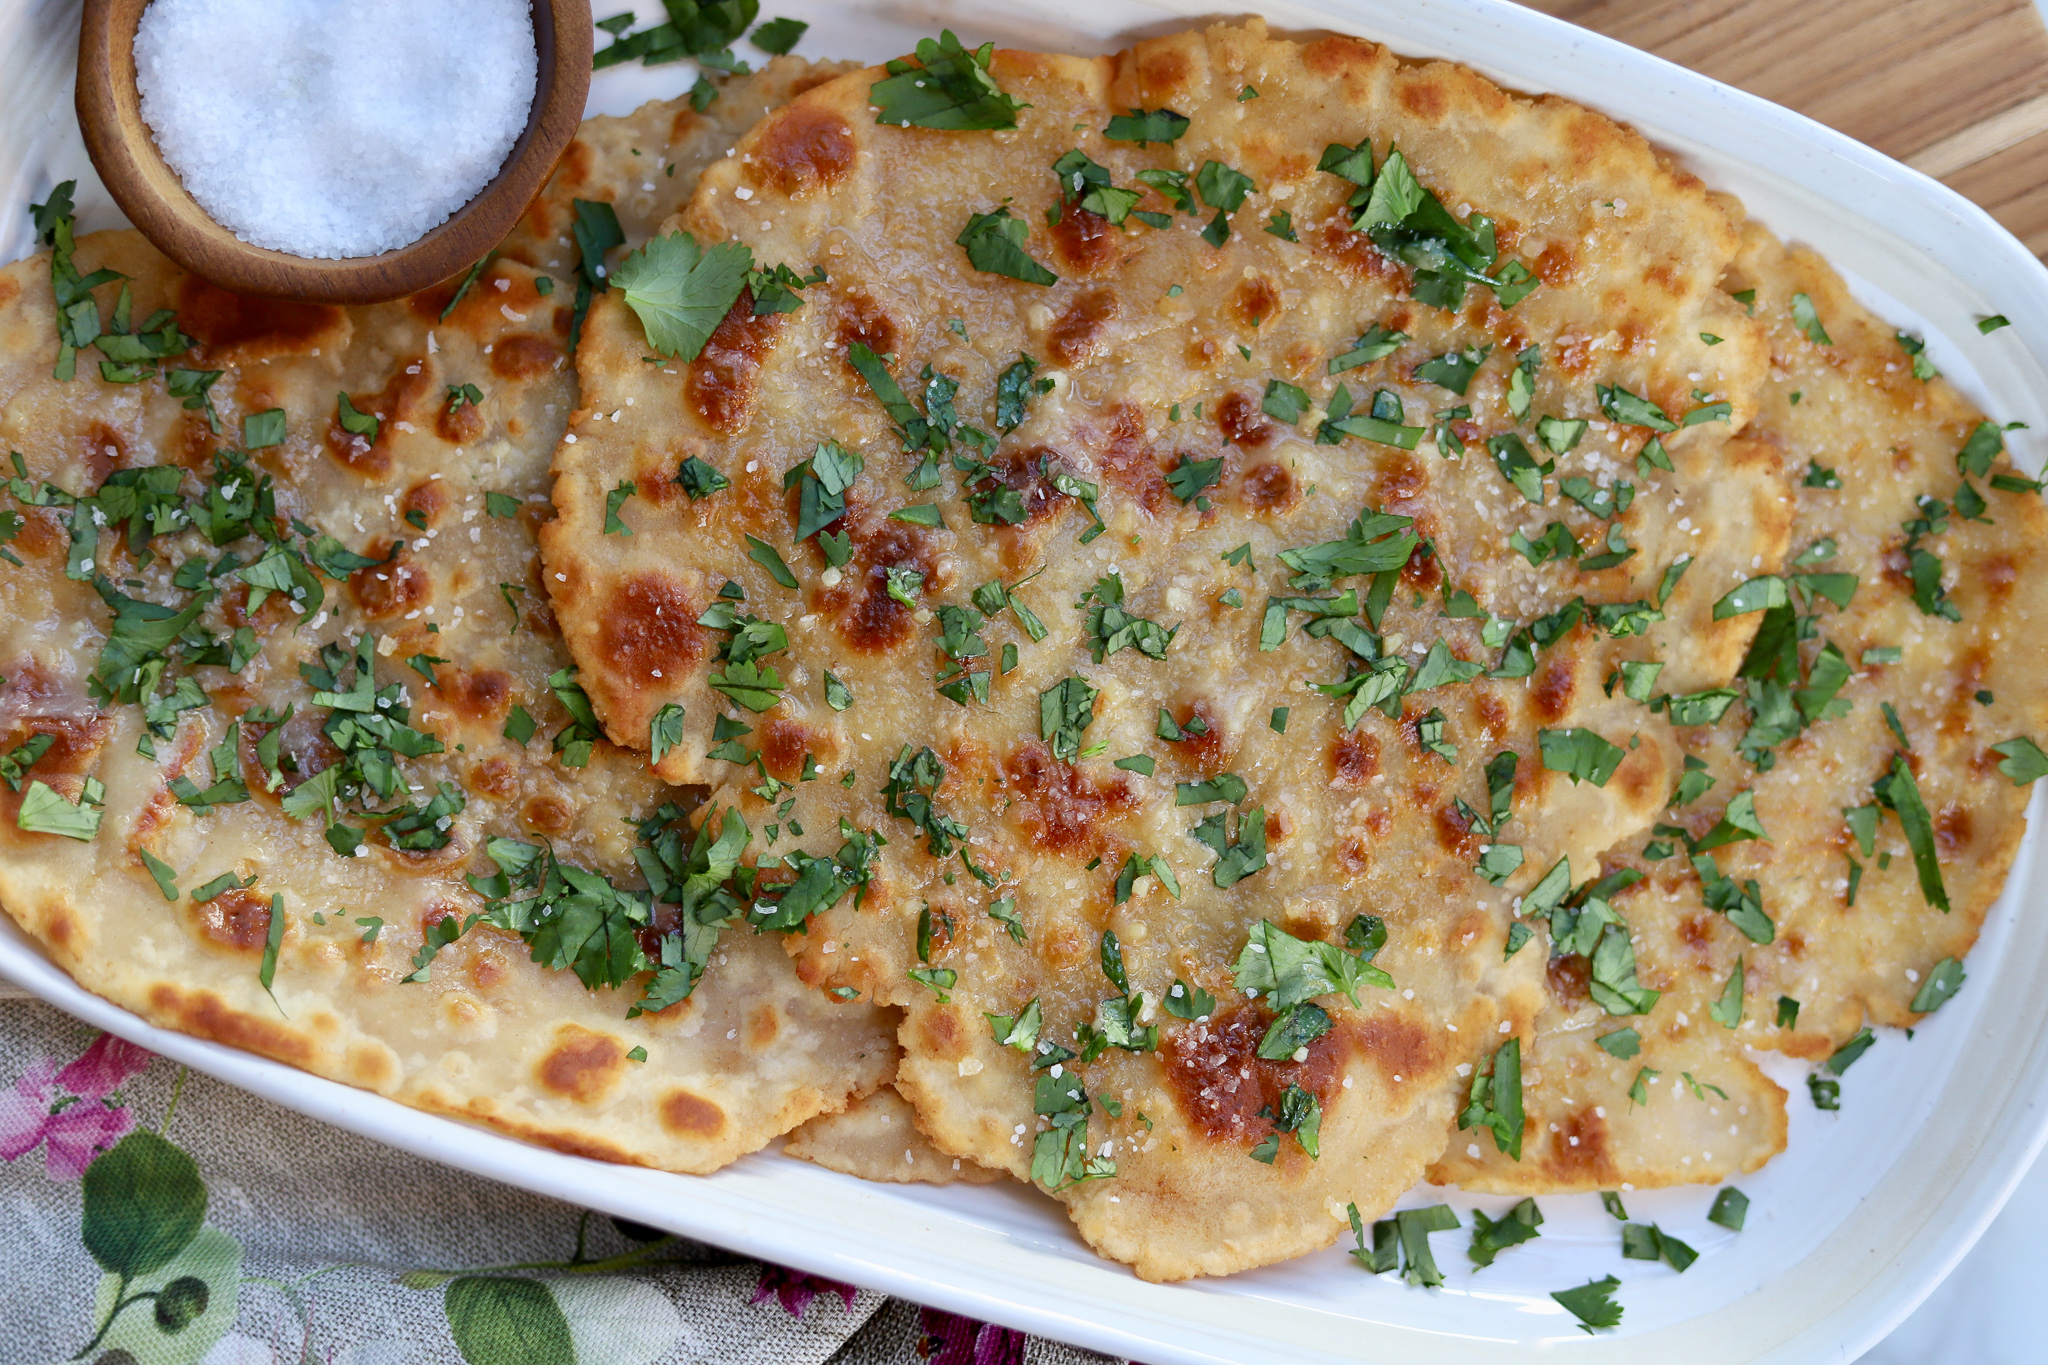
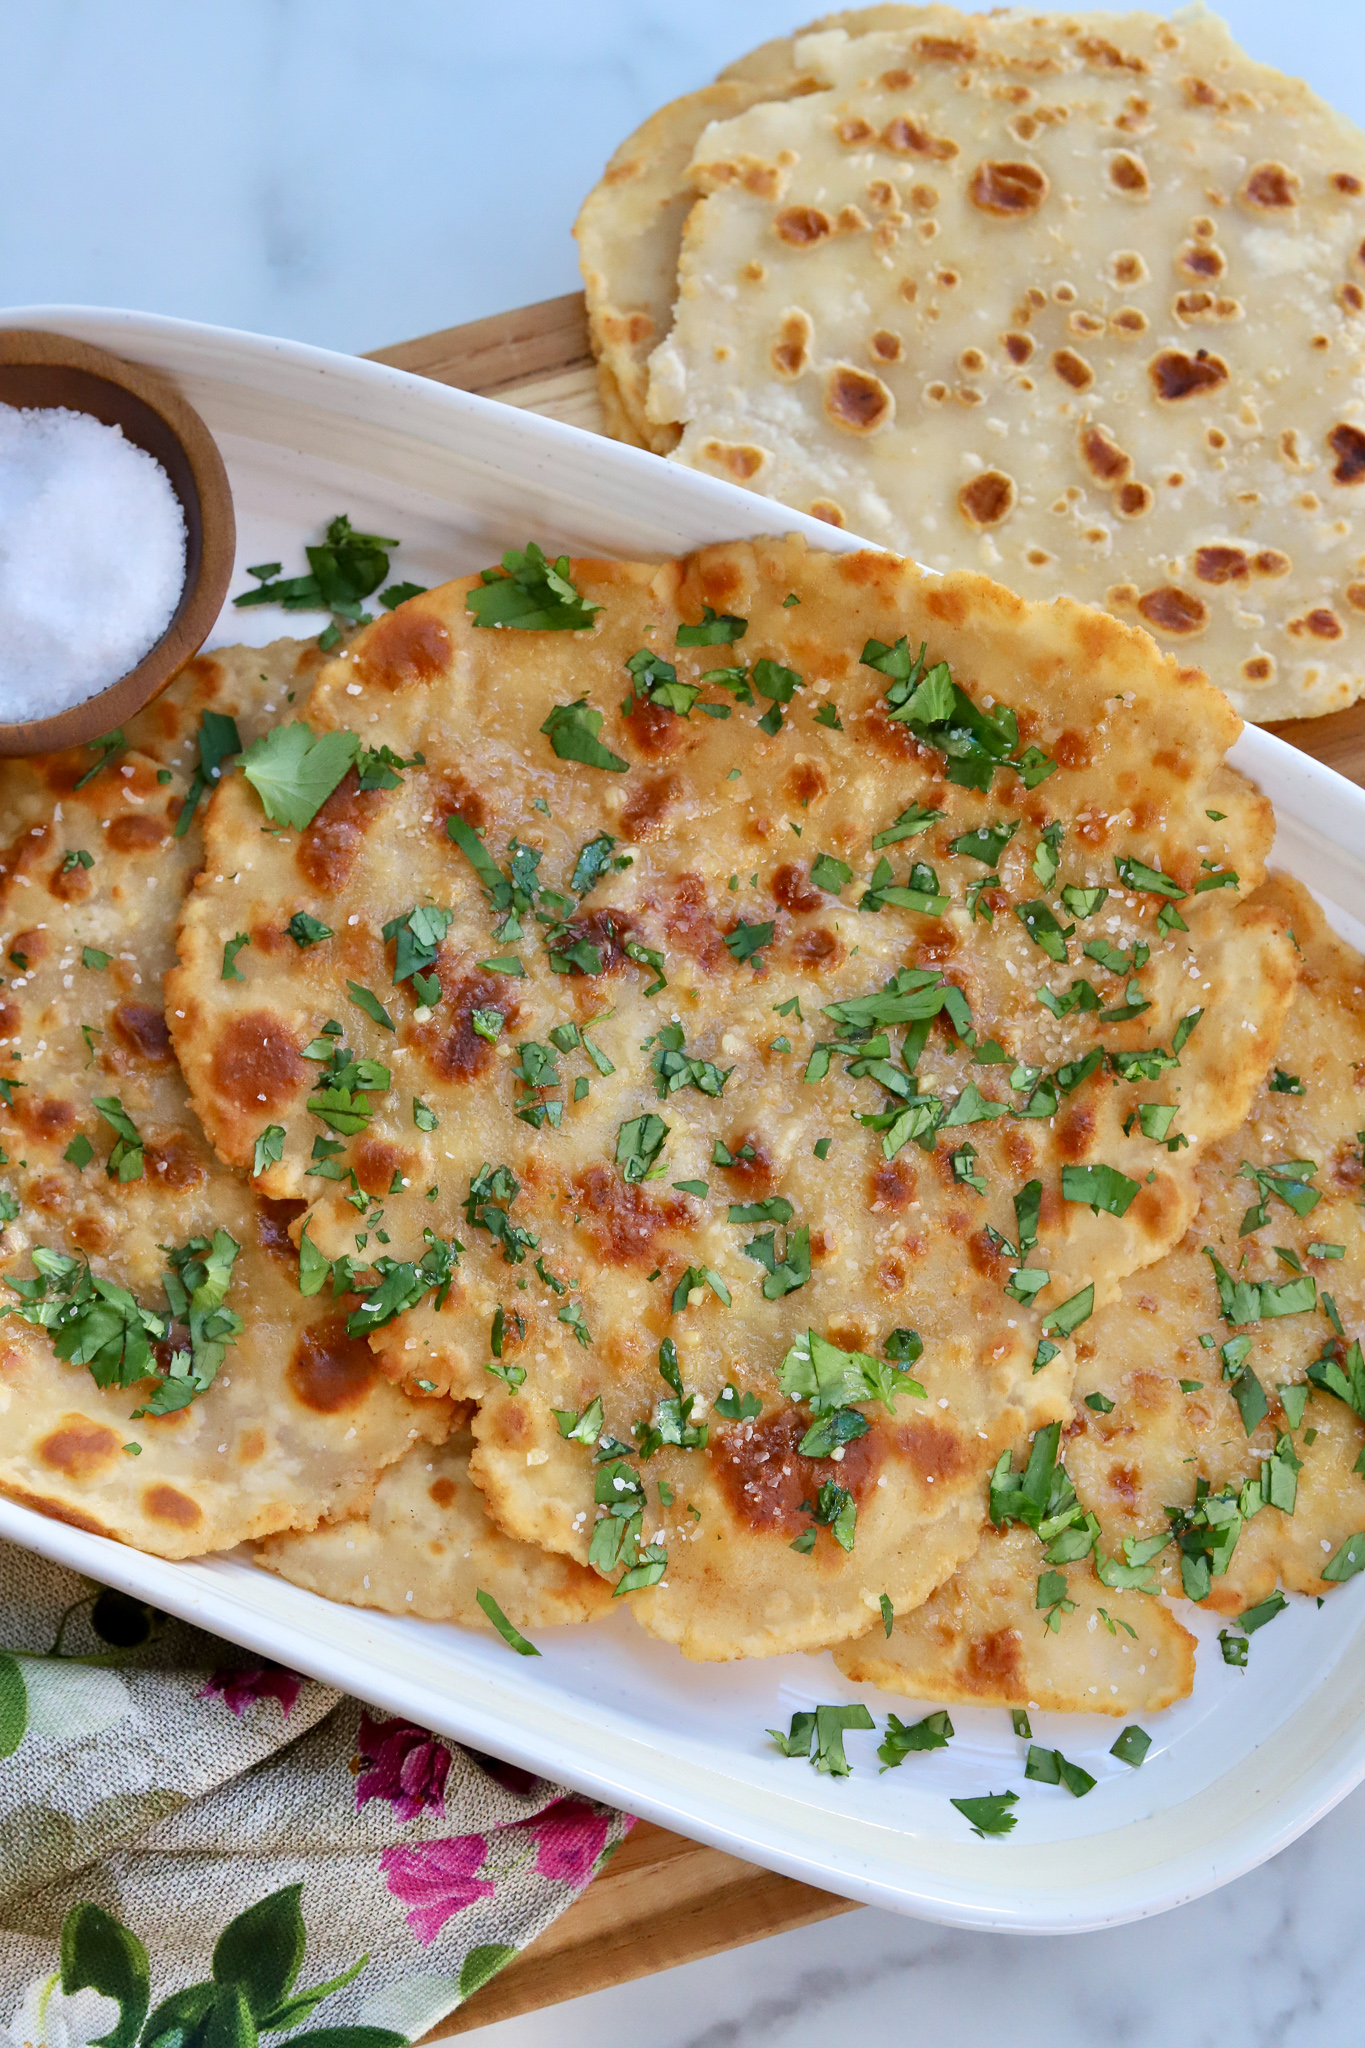
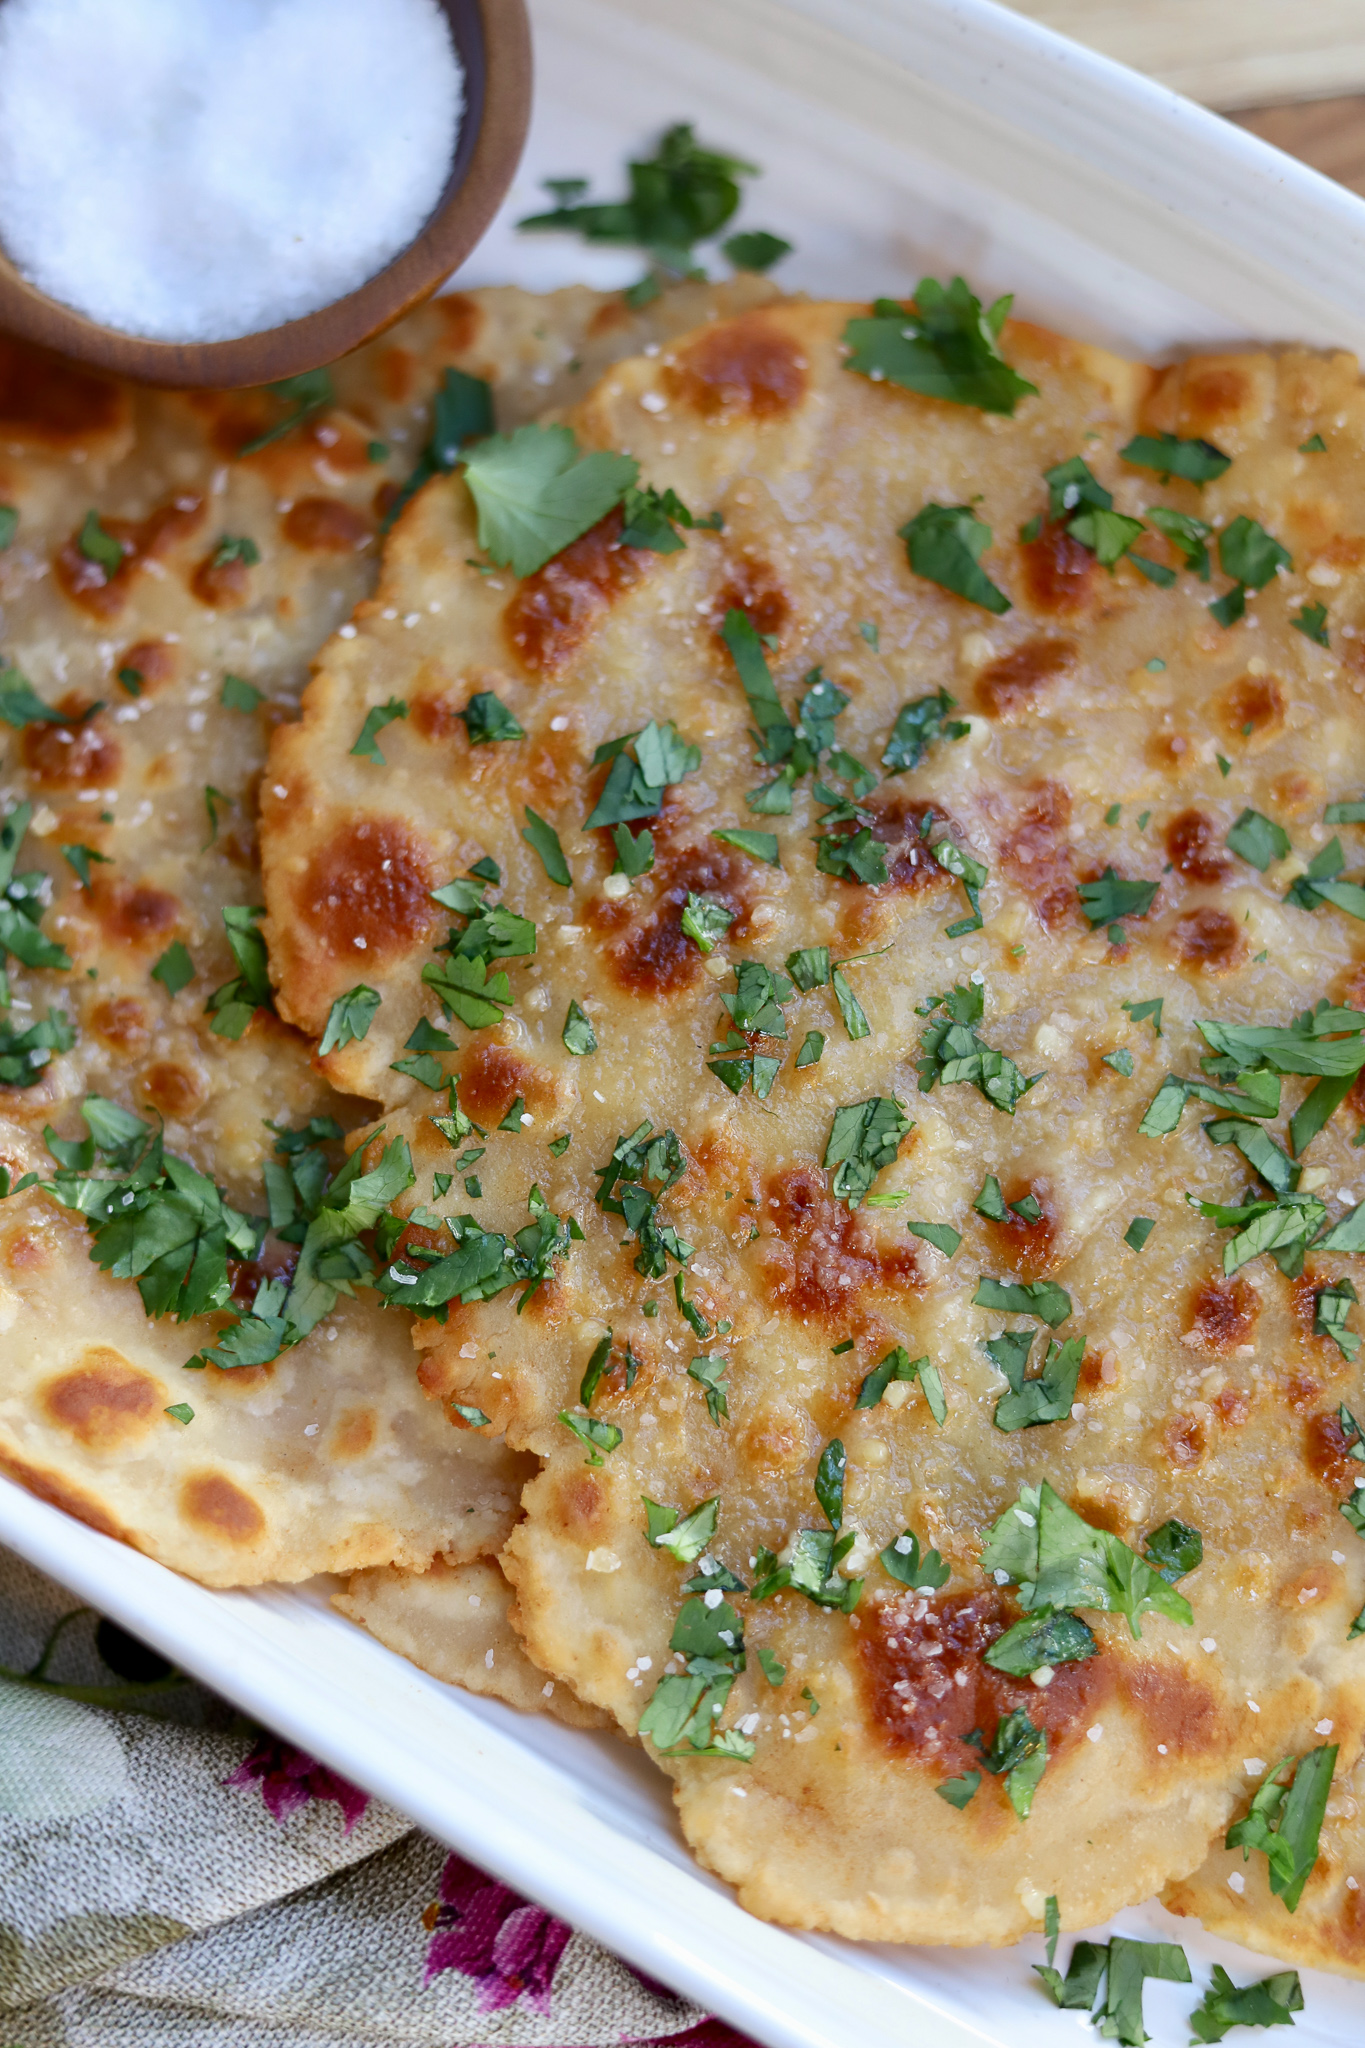
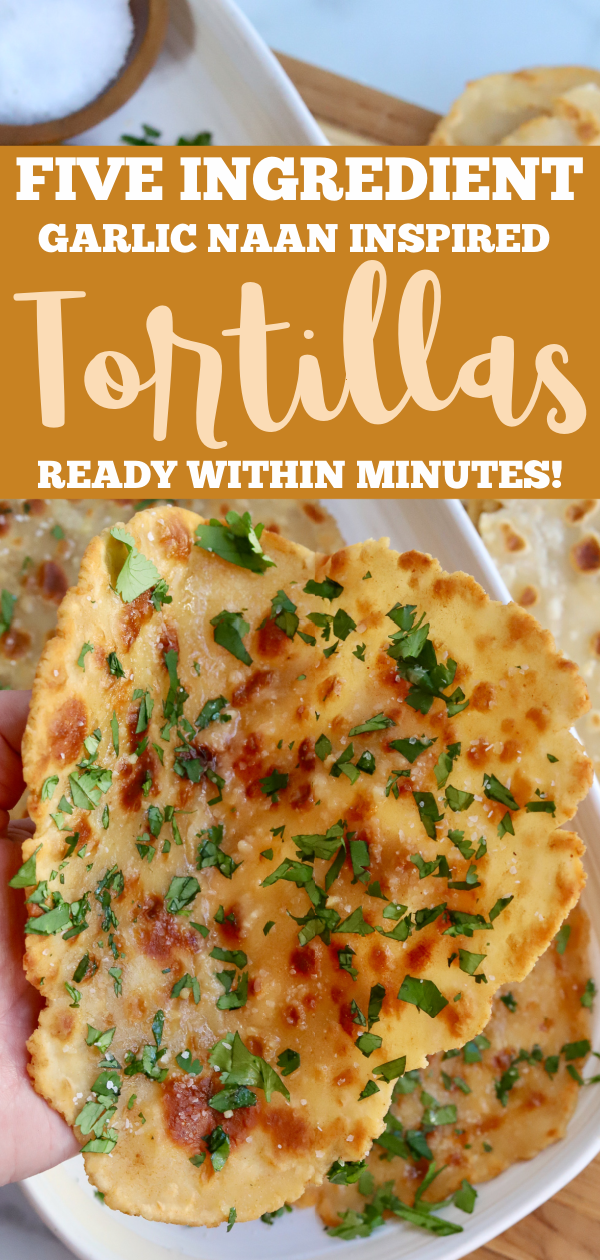
These Homemade Flour Tortillas are soft, chewy and slathered in garlic butter and fresh herbs. So easy to prep and they’re ready in minutes!

Homemade Flour Tortillas

I’ll be the first to admit that I am NOT a baker or bread expert. However, these tortillas are fool-proof! Enjoy them on their own or with dips like hummus, baba ganoush and whipped feta! They’re also great wrapped around some eggs, carne asada and black beans. I’ve even transformed them into a breakfast pizza and it was legendary.

Homemade Flour Tortillas

INGREDIENTS FOR HOMEMADE FLOUR TORTILLAS:

The base recipe for these tortillas is actually just TWO ingredients! However, with the addition of spices, butter and herbs you’ve got yourself a killer recipe. I’d like to think this is the perfect fusion of flour tortillas and garlic naan bread. So grand! All you’ll need is:

  • All-Purpose Flour
  • Full Fat Greek Yogurt
  • Melted Butter
  • Garlic
  • Fresh Cilantro 

If you have them on hand, I also recommend adding a dash of garlic powder, onion powder and smoked paprika to the flour dough. About 1/2 tsp. each should do the trick! The spices aren’t mandatory ingredients but they sure are tasty. 

Homemade Flour Tortillas

HOW TO MAKE TORTILLAS FROM SCRATCH:

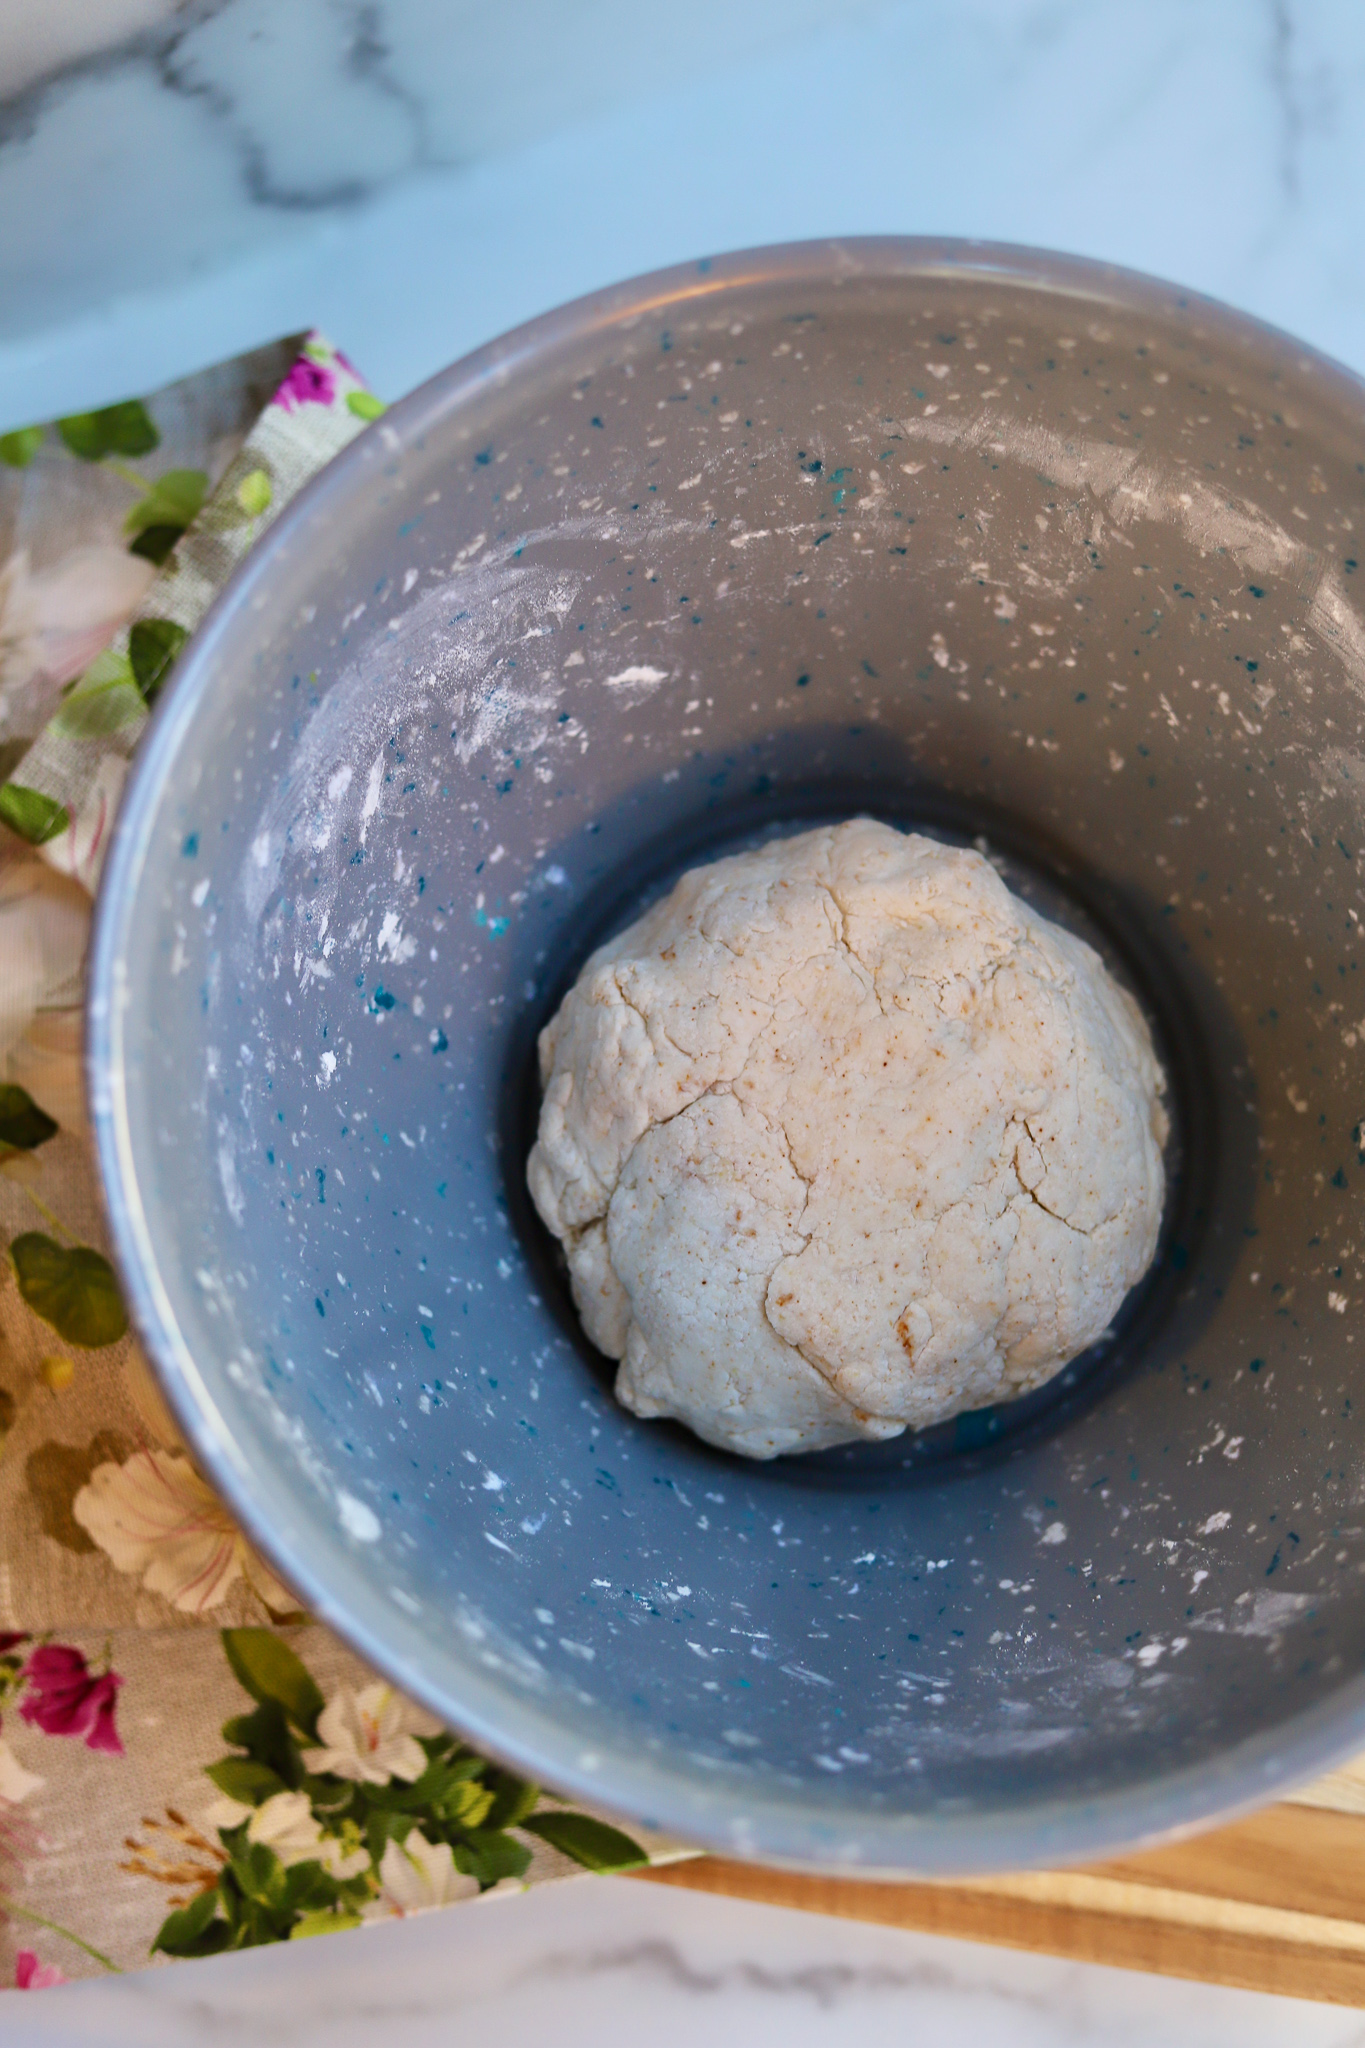
First you’ll start by mixing the flour and Greek yogurt together in a large bowl. The dough will look crumbly, but once you start to work it together with your hands a ball will form. Allow the dough to rest for 5 minutes or so in the refrigerator. 

Homemade Flour Tortillas

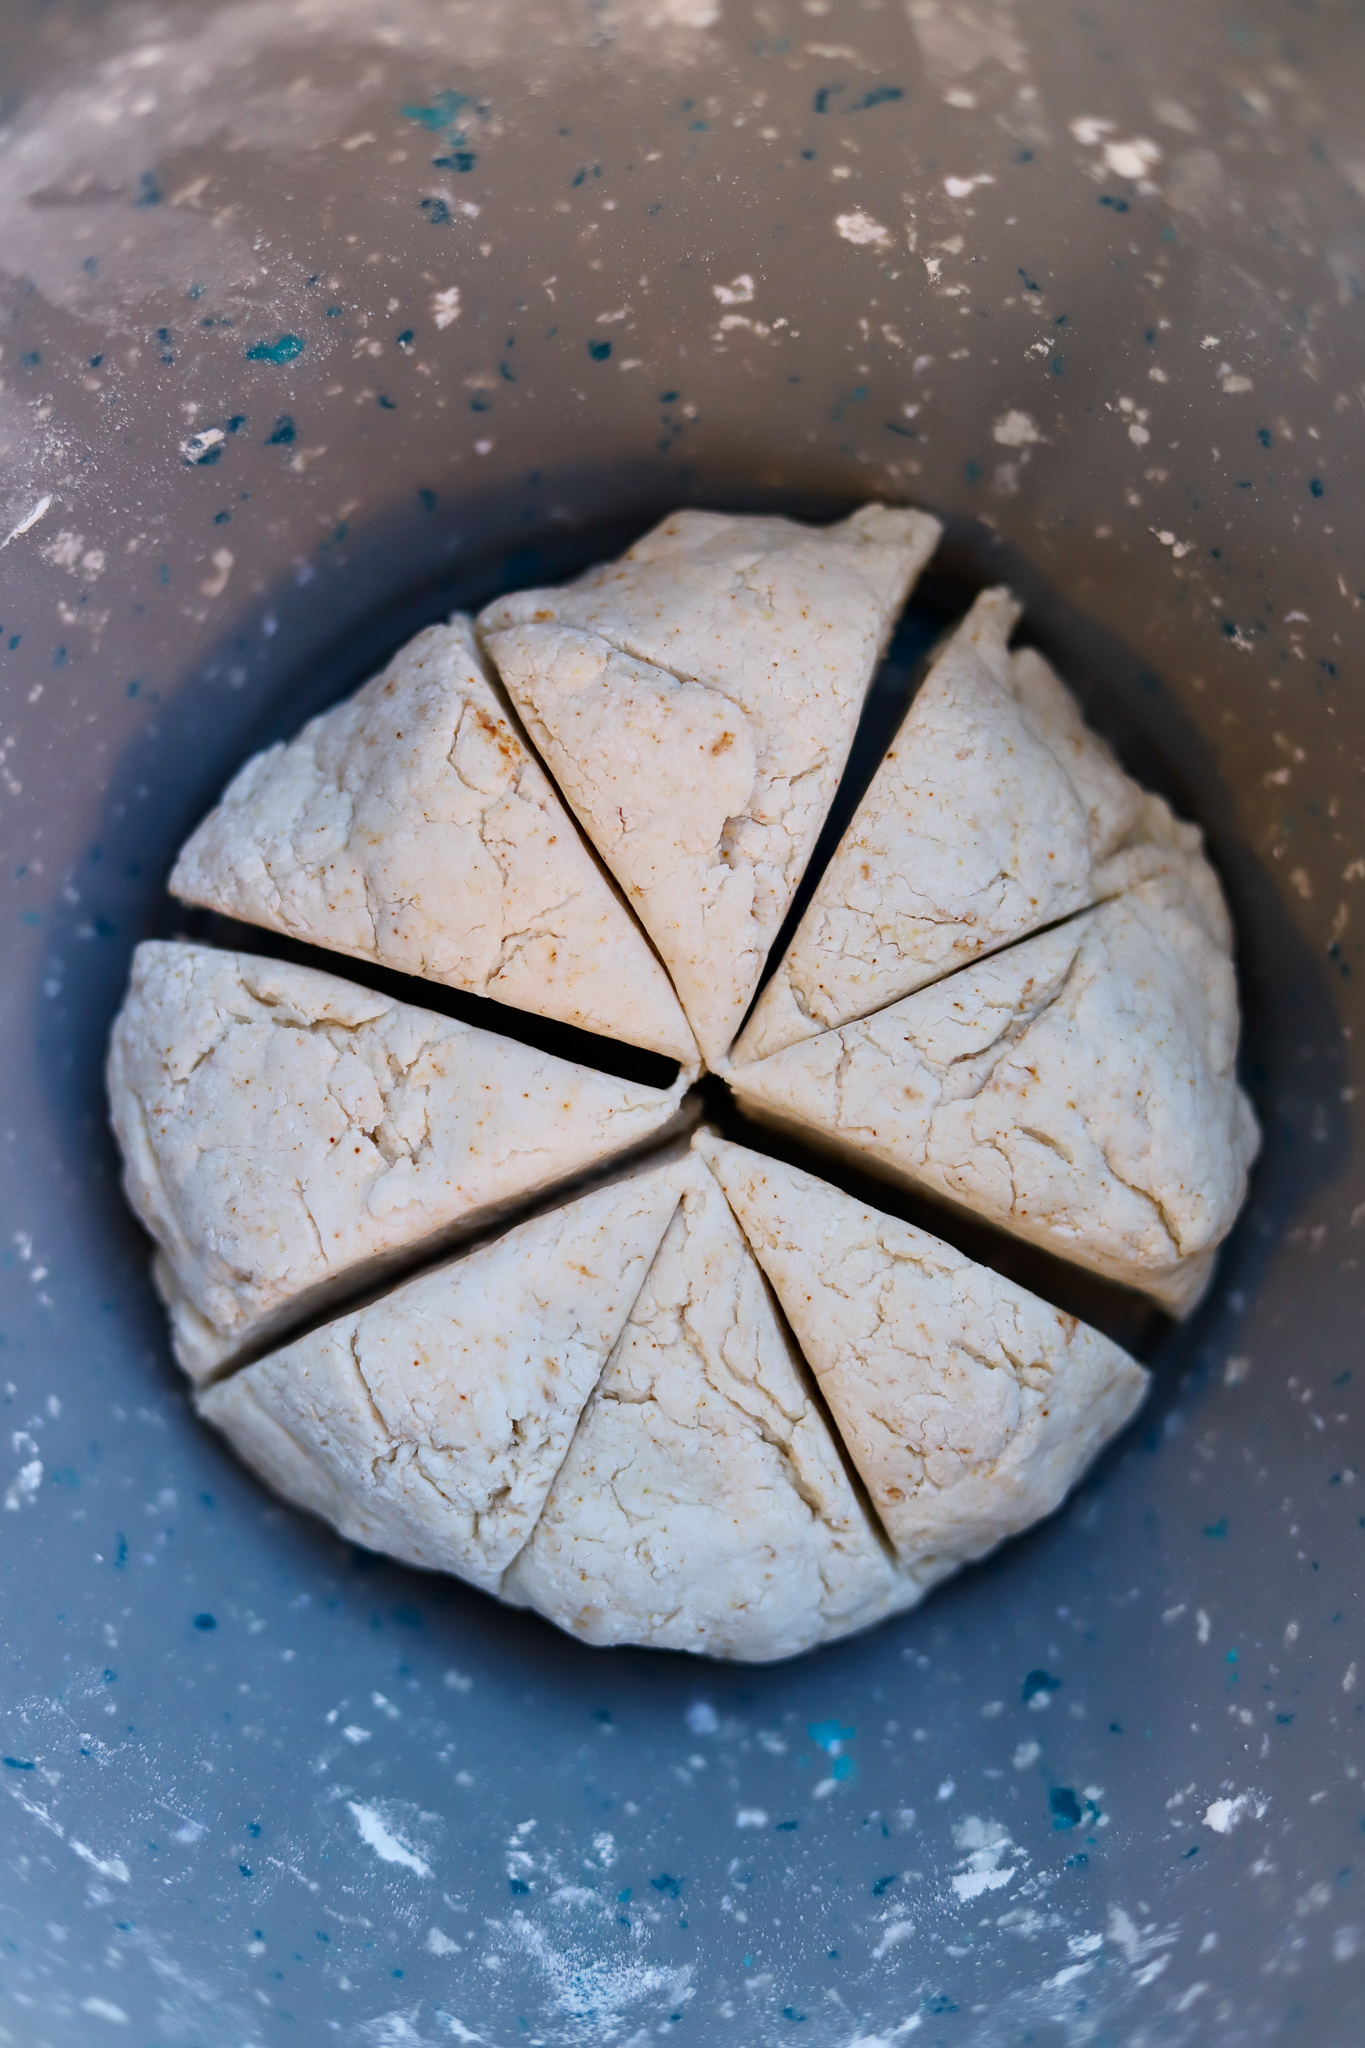
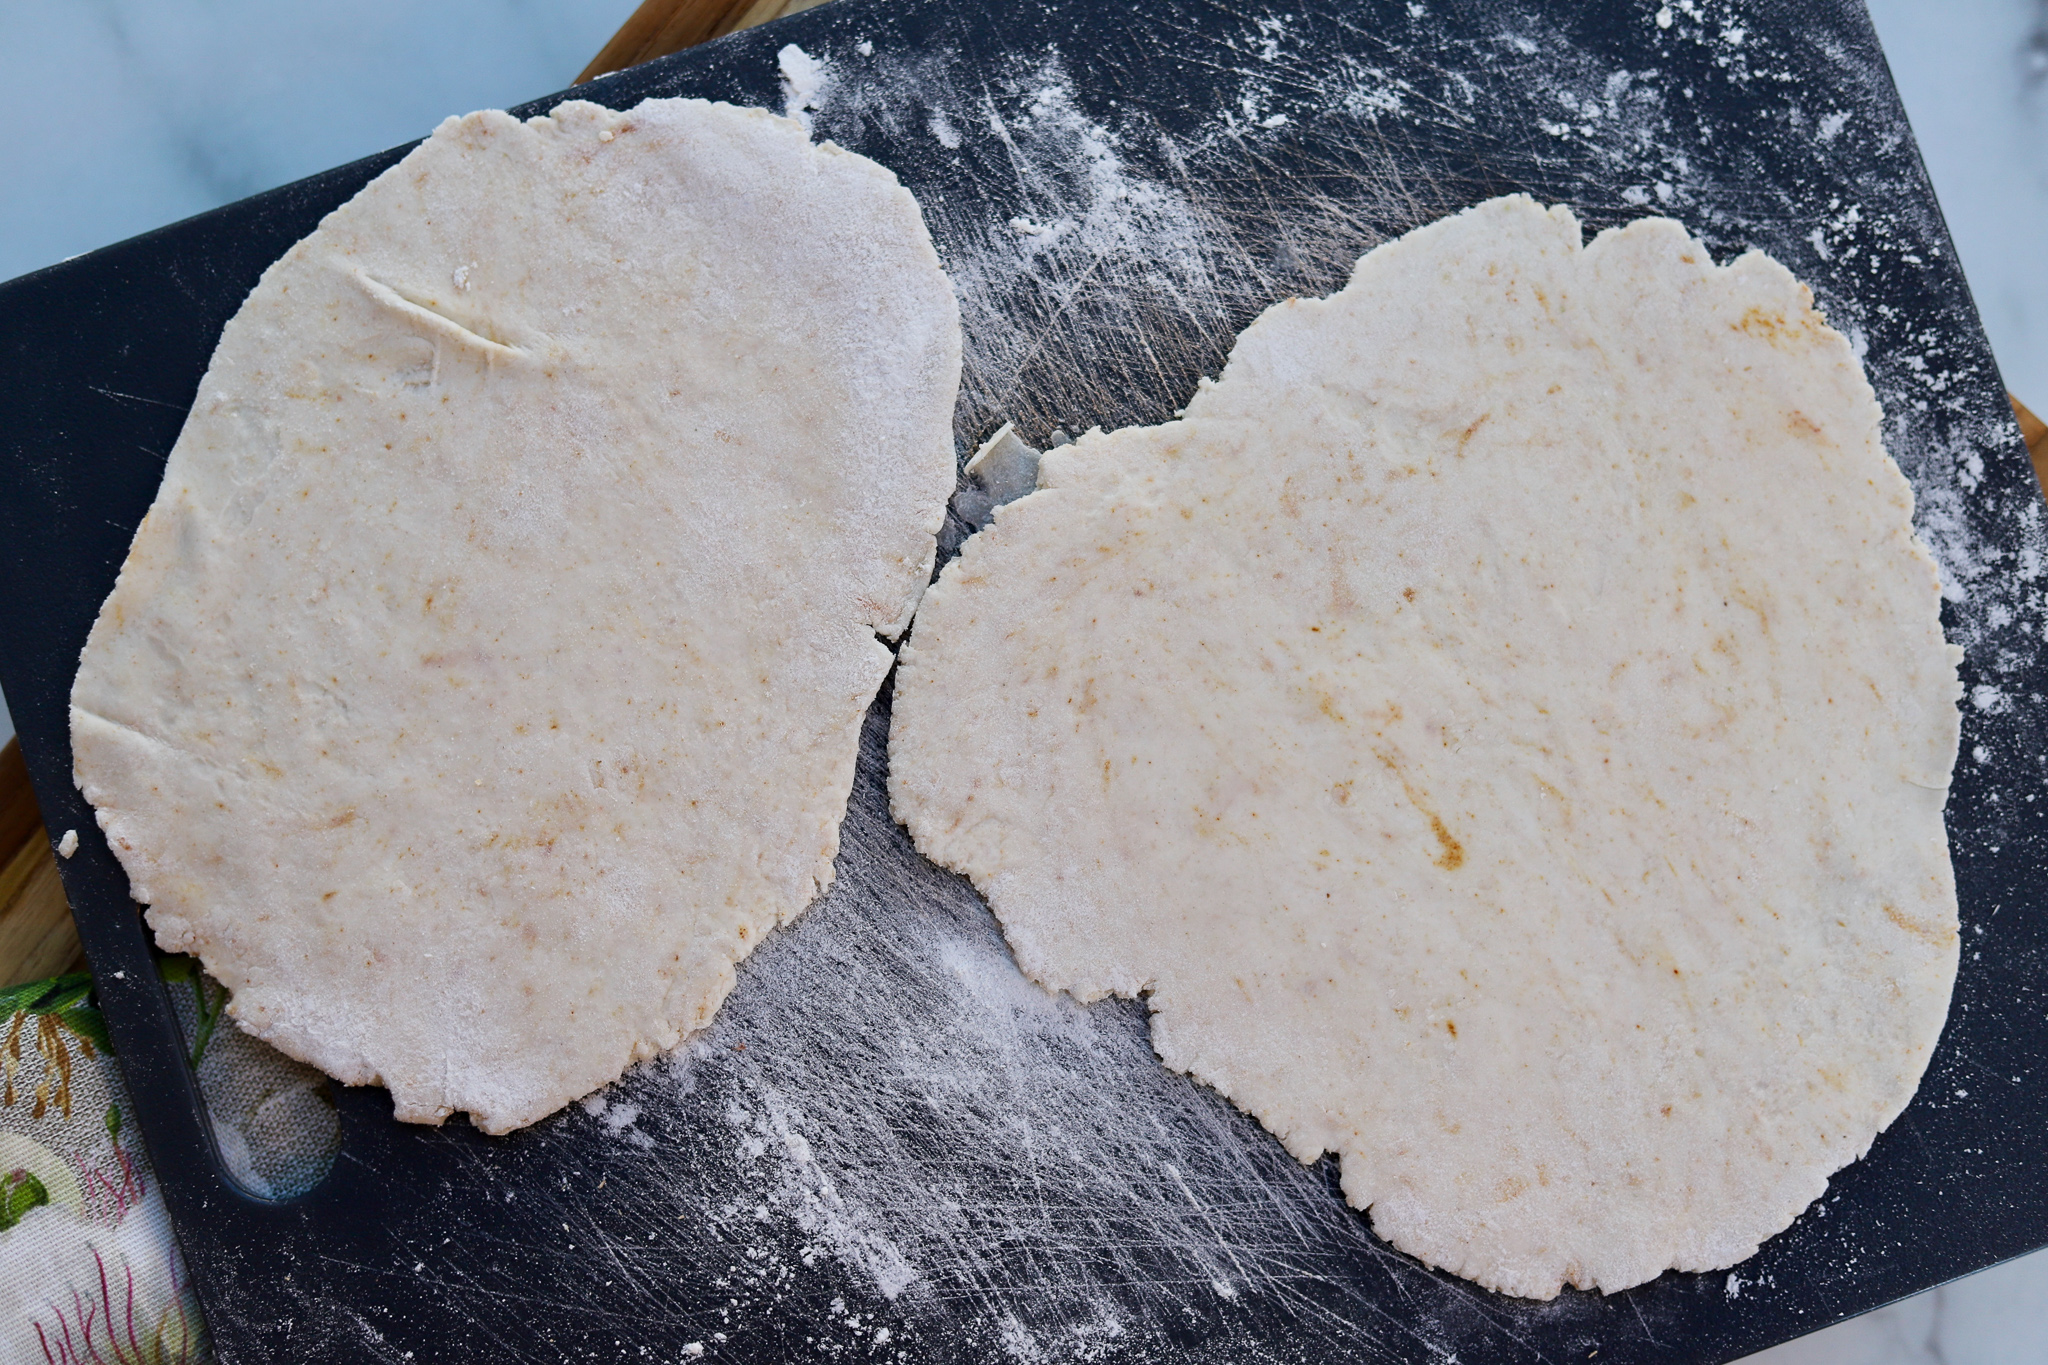
Cut the dough ball into 8 equal sized sections with a pastry cutter or a sharp knife . Using a rolling pin, flatten out each section on a flour dusted cutting board (Psst: make sure to flour your rolling pin as well so the dough doesn’t stick!). Don’t worry about the tortillas turning out perfectly round, I actually prefer the rustic-edge look. I feel like they look and taste more authentic that way. 😉

Homemade Flour Tortillas

Warm up a frying pan over medium heat. Add a dab of butter and cook one tortilla at a time for about 30 seconds on each side, or until brown little spots appear. Personal Note: I add a little butter when I flip the tortilla. This way each side has a golden, crispy crust and they’re chewy in the middle. Place the cooked tortillas in a clean dishcloth to keep warm while you prepare the rest. 

OTHER RECIPES YOU MIGHT ENJOY:

The Best Mexican Enchiladas, Ever (Rojas + Verde)

My Grandma’s Super Easy Recipe For German Bierocks

BLT Flatbreads with White Garlic Pizza Sauce

Homemade Flour Tortillas

FIVE Ingredient Garlic Naan Homemade Flour Tortillas
 
Print
Prep time
10 mins
Cook time
8 mins
Total time
18 mins
 
Serves: 8 Tortillas
Ingredients
FOR THE TORTILLAS:
  • 2 cups All-Purpose Flour
  • 1 cup Full Fat Greek Yogurt
  • ½ tsp. Kosher Salt, optional
  • ½ tsp. each of Garlic Powder, Onion Powder & Smoked Paprika, optional
FOR THE GARNISHES:
  • 3 Tbsp. Butter, melted
  • 2 cloves Garlic, minced
  • 3 Tbsp. Fresh Chopped Cilantro
  • Kosher Salt, optional as needed
Instructions
  1. Mix flour and greek yogurt (along with optional salt + spices) in a large bowl until dough forms. Allow the dough to rest in the refrigerator for about 5 minutes.
  2. Divide into 8 equal sized sections.
  3. Using a flour-dusted rolling pin, carefully roll out each section on a floured cutting board until flat.
  4. Heat a large skillet over medium heat. Add a dab of butter and cook one tortilla at a time for about 30 seconds on each side, or until brown little spots appear.
  5. Place cooked tortillas in a clean dishcloth to keep warm while you prepare the rest.
  6. Melt the butter and mix together in a small bowl with the minced garlic. Brush each tortilla with garlic butter sprinkle with freshly chopped cilantro and optional kosher salt before serving. Enjoy immediately.
3.5.3251
 

NOTES ON THIS RECIPE: 

  • With such minimal ingredients, make sure you are using a nice quality flour for this recipe. You will also need to make sure you are using 4% or higher fat Greek yogurt. Non-fat does not work well in this recipe. 
  • If you plan on making these ahead of time, cook them accordingly but do not add the garlic butter or cilantro. Once cooked, allow them to cool completely to room temperature before transferring them to a ziplock bag for storage. They will keep in the refrigerator for up to 4 days. When ready to eat, simply heat them up in a skillet over low heat. Brush them with garlic butter, cilantro and optional salt before serving. 
  • Serve these as a side dish with Crockpot Indian Butter Chicken, Butternut Squash Chicken Curry (VIDEO) or in place of regular tortillas when making quesadillas or Mexican Pizzas!

Homemade Flour Tortillas

THANK YOU FOR THE SOCIAL LOVE! ARE WE FRIENDS YET ON THE GRAM? 🙂

View this post on Instagram

A post shared by Applegatarians 🥓🥓🥓 (@applegate)

View this post on Instagram

A post shared by Pete and Gerry's Organic Eggs (@peteandgerrys)


PIN THIS FOR LATER:


Homemade Flour Tortillas

Filed Under: Appetizers & Sides, Breakfast & Brunch, Vegetarian

Previous Post: « BLT Flatbreads with White Garlic Pizza Sauce
Next Post: Air Fryer Garlic Cheddar Drop Biscuits »

Reader Interactions

Did you make this recipe?

Tag @sliceofjess on Instagram & hashtag #sliceofjess.

Share this...
Share on facebook
Facebook
Share on pinterest
Pinterest
Share on twitter
Twitter
Share on linkedin
Linkedin

Leave a Reply Cancel reply

Your email address will not be published. Required fields are marked *

Rate this recipe:  

Primary Sidebar

Hey there, Jess here. Welcome to a slice of my kitchen! Here you'll find tidbits of my everyday life, home cooked meals and travel guides. Thanks for stopping by!

Join Our Email List!

Recent Posts

  • Golden Caramelized Mushroom Toast with Arugula June 5, 2023
  • Open-Faced Chicken Caprese Sandwich June 1, 2023
  • Skillet Gochujang Chicken Thighs May 23, 2023
  • Scratch-Made Air Fryer Chicken Nuggets May 16, 2023
  • Crispy Sushi Rice with Sunny Eggs May 10, 2023

Check Out My Insta :)

sliceofjess

🏡: San Francisco ➡️ Charlotte, NC
📬: Inquiries: Jess@SliceOfJess.com
⤵️: 100’s of Killer Home Cookin’ Meals

Jess Bentley | Recipe Gal
Toasted sourdough topped with whipped cottage chee Toasted sourdough topped with whipped cottage cheese, golden and garlicy sautéed mushrooms, arugula, and fresh herbs is the best way to start your Monday!
.
BLOG —> https://sliceofjess.com/golden-caramelized-mushroom-toast-with-arugula/
.
INGREDIENTS:
1 tbsp. Olive Oil
1 tbsp. Butter
8 oz. Baby Bella Mushrooms, sliced
1 tbsp. Worcestershire
3 Garlic Cloves, minced
1 Sprig Fresh Thyme
¼ cup White Wine
1 cup Fresh Arugula
1 - 2 tsp. Salt, or more to taste
2 Slices of Sourdough Bread, toasted
1 cup Cottage Cheese
1 tbsp. Italian Parsley, minced
.
DIRECTIONS:
1. Add the olive oil and butter to a large skillet over medium-high heat. Once melted, add the sliced mushrooms and begin to sauté.
2. Once slightly caramelized on one side, toss to flip and add the Worcestershire, garlic cloves, and fresh thyme sprig. Continue to sauté until both sides are golden brown.
3. Deglaze the pan with white wine and continue to cook until absorbed. Once finished, fold-in the fresh arugula. It will wilt quickly. Season with salt, to taste.
4. While the mushrooms are finishing up, toast the sourdough slices and whip the cottage cheese in a food processor.
5. To assemble, place the toasted slices on a plate and top each one with half of the whipped cottage cheese, then half the mushroom mixture, and sprinkle with Italian parsley for garnish. Enjoy immediately.
If you know me at all, you’re well aware that I If you know me at all, you’re well aware that I heart sandwhiches. So when I discovered a new-to-me type of bread at my local @earthfare, I knew I had to make something yummy with it! I’m seriously in awe every time I shop there.
.
They’ve got a couple of super yummy summer kick-off events happening soon. See you there? June 3rd in Fort Mill and June 17 in Concord!
.
BLOG —> https://sliceofjess.com/open-faced-chicken-caprese-sandwich/
.
FOR THE CHICKEN:
6 oz. Grilled Chicken Breasts
1 tsp. Salt
1 tsp. Pepper
1 tsp. Paprika
1 tsp. Granulated Garlic
2 tbsp. Olive Oil
.
TO ASSEMBLE THE SANDWICHES:
2 Thick Slices of Bread, toasted
1 cup Arugula
4 oz. Burrata, cut in half
4 tbsp. Tomato Confit
2 tbsp. Aged Balsamic Drizzle
Fresh Chives, optional garnish
.
DIRECTIONS:
1. Place the chicken in a sealable bag and season with ingredients listed. Rub together until coated and allow to marinate for at least 10 minutes.
2. Toast the bread and set aside until you’re ready to assemble.
3. Cook the chicken on the stove top or grill until internal temperature reaches 165F. Allow to rest, covered in foil on a cutting board, for at least 10 minutes before slicing.
4. Assemble in the following order: 1 slice of bread, ½ cup of arugula, 2 ounces burrata, 2 tablespoons tomato confit, 1 tablespoon of aged balsamic, and a sprinkle of chives. Repeat with second sandwich and enjoy immediately.
.
#earthfare #sponsoredpost #earthfarepartner
Honestly, you can never go wrong with a tomato san Honestly, you can never go wrong with a tomato sandwich for lunch! While today’s version isn’t traditional, it sure was tasty. Freshly sliced & lightly toasted peasant bread, homemade truffle mayo (made with @dukes_mayonnaise, obviously), arugula, heirloom tomato, salt + pepper.
Happy #NationalHamburgerDay 🍔These sliders are Happy #NationalHamburgerDay 🍔These sliders are a solid mix of sweet, sour, and spicy… the ultimate trifecta!
.
BLOG—> https://sliceofjess.com/kimchi-burger-sliders-with-gochujang-chili-mayo/
.
CRUNCHY RAMEN SLAW:
6 oz. Uncooked Ramen Noodles
¼ cup Sesame Seeds
¼ cup Slivered Almonds
6-8 oz. of bagged Cabbage or Slaw Mix
1 head Green Onions, sliced
¼ cup Canola Oil
4 tbsp. Soy Sauce
¼ cup Rice Vinegar
2 tbsp. Sugar
.
SLiDER BURGERS:
1 lb. Ground Beef
1 tsp. Ground Ginger
1 tsp. Garlic Powder
½ tsp. Onion Powder
Salt + Pepper, to taste
12 Slider Buns
Kimchi, as needed for garnish
Fresh Jalapeños, to taste
.
GOCHUJANG CHILI MAYO
½ cup Mayonnaise
1½ tbsp. Gochujang Chili Sauce
.
DIRECTIONS:
.
CRUNCHY RAMEN SLAW:
1. Crush the uncooked ramen noodles and add those to a skillet with the almonds and sesame seeds. Brown in 1-2 tablespoons of canola oil over medium to low heat, making sure not to burn. Set aside.
2. In a large bowl, add slaw mix and sliced green onions.
3. In a small saucepan, add soy sauce, canola oil, sugar, and rice vinegar. Heat over low heat for several minutes until sugar is fully dissolved. Allow it to cool.
4. Add the crunchy ramen mixture to the bowl and top with dressing.
.
SLIDER BURGERS:
1. Mix ground beef with spices until well combined.
2. Form ball with 2-3 tablespoons of ground beef mixture and then flatten into burger patty.
3. Cook over medium high heat in grill pan or griddle for 3-4 minutes per side.
.
CHILI MAYO:
1. Mix the mayo and chili sauce until combined.
.
ASSEMBLE
1. Smear a nice dollop of mayo on both sides of the bun. Layer the bottom bun with your burger, a few pieces of kimchi, a few slices of jalapeños, and top with a solid heap of your ramen slaw.
Absolutely loving these Gochujang Chicken Thighs f Absolutely loving these Gochujang Chicken Thighs for summer.
.
BLOG —> https://sliceofjess.com/skillet-gochujang-chicken-thighs/
.
FOR THE CHICKEN MARINADE:
3 tbsp. Gochujang
3 tbsp. Brown Sugar
2 Garlic Cloves, minced
2 tbsp. Liquid Aminos
1 tbsp. Toasted Sesame Oil
1 tsp. Rice Vinegar
1 tsp. Onion Powder
1 tsp. Paprika
¼ tsp. Salt
2 lb. @smfchicken Chicken Thighs
1 tbsp. Butter
.
FOR GARNISH:
1 tbsp. Chopped Fresh Cilantro + Stems if desired
1 tsp. White Sesame Seeds
Fresh Jalapeño Slices, optional
.
DIRECTIONS:
1. Combine all the ingredients for the chicken marinade in a large Ziplog bag. Massage to combine and allow to marinate in the refrigerator for at least 30 minutes. This can also be marinated overnight.
3. Heat a cast iron skillet over medium-high heat. Remove the chicken thighs from the marinade, and shake off any excess sauce. Allow the butter to melt in the skillet and then add the chicken.
3. Cook the chicken for 10 - 15 minutes, making sure to flip halfway through. Be sure to check that the internal temperature is 165F before removing from heat.
4. Set the chicken on a cutting board or plate to rest for at least 5 minutes. Afterwards, slice and enjoy immediately.
#mysmfchicken #smfpartner
Have you ever made your own chicken nuggets at hom Have you ever made your own chicken nuggets at home? It couldn’t be simpler! Grab some ground @smfchicken, mix with pantry staples, and pop those babies in the air fryer. So fresh, so crunchy, so satisfying.
.
BLOG —> https://sliceofjess.com/scratch-made-air-fryer-chicken-nuggets/
.
INGREDIENTS:
1 Bread Slice
3 tbsp. Heavy Cream
1 tsp. Garlic Powder
2 tsp. Dried Minced Onion
1 tsp. Paprika
2 tsp. Salt
1 lb. @smfchicken Ground Chicken
1 Egg
1 cup Crushed Cornflakes
¼ cup Grated Parmesan
3 tbsp. Melted Butter
Fresh Parsley, optional for garnish
.
DIRECTIONS:
1. Preheat air fryer to 400F.
2. Add the bread, heavy cream, garlic powder, dried minced onion, paprika, and 1 teaspoon of salt to a large mixing bowl. Allow to soak for 1 - 2 minutes, or until the bread has absorbed the liquid.
3. Gently combine the soaked bread with the ground chicken.
4. Crush the cornflakes and mix together with the parmesan cheese in a large bowl. Whisk the egg in a separate bowl and set aside.
5. Form the chicken into nuggets and coat with the egg first, then the cornflake mixture.
6. Place the nuggets in the air fryer and brush the top of each one with melted butter. Air fry at 400F for 8 - 10 minutes, flipping halfway through. Nuggets are done when internal temp is 165F.
7. Garnish with fresh parsley, if desired, and serve with your preferred dipping sauce.
.
#mySMFchicken #SMFpartner
Do you see the rice dancing in the skillet? Crispy Do you see the rice dancing in the skillet? Crispy Sushi Rice is one of my favorite things! Crunchy, chewy, sweet, and savory. All the things!
.
BLOG —> https://sliceofjess.com/crispy-sushi-rice-with-sunny-eggs/
.
INGREDIENTS:
1 tbsp. Toasted Sesame Oil
1 cup Leftover Sushi Rice
2 Eggs
1 tbsp. Gochujang Hot Sauce (or favorite hot sauce)
2 tbsp. Sliced Scallions
½ Fresh Jalapeño, sliced
2 tsp. White Sesame Seeds
Salt, to taste
*See notes on how to make Sushi Rice in the blog
.
DIRECTIONS:
1. Pour the sesame oil in a large skillet over medium-high heat. Add the rice and stir to coat.
2. Let the rice to sit, unstirred, for 4 - 5 minutes to allow it to crisp on the bottom. Then toss and create two wells for the eggs.
3. Crack the eggs into the wells and cover for 2 - 3 minutes, or until the whites are set but the yolks are still runny.
4. Top with gochujang hot sauce, scallions, jalapeño slices, sesame seeds, and a touch of salt. Enjoy immediately.
It’s officially salad season! Here’s an oldie It’s officially salad season! Here’s an oldie but goodie… give my Spicy Chickpea Cucumber version a try.
.
BLOG —> https://sliceofjess.com/spicy-chickpea-cucumber-salad-recipe/
.
INGREDIENTS:
1 can Chickpeas, drained & rinsed
½ Large English Cucumber, thinly sliced
1 Fresh Jalapeño, seeded & sliced
½ small Red Onion, thinly sliced
1 clove Garlic, minced
2 tbsp. minced Fresh Cilantro
2 tbsp. chopped Fresh Dill
3 tbsp. Olive Oil
2 tbsp. White Wine Vinegar
½ tsp. Paprika
½ tsp. Cayenne
1 tsp. Kosher Salt
¼ tsp. Freshly Cracked Black Pepper
Pinch of Chili Flakes, optional garnish
(See blog for Pita Chips recipe)
.
DIRECTIONS:
1. Toss all ingredients in a large mixing bowl until well combined.
2. Refrigerate for at least an hour to let flavors blend.
3. Garnish with additional cilantro, dill and red pepper flakes, if desired before serving.
4. Store leftovers in a sealed container, refrigerated, for up to 3 days.
Heart me a delicious and easy Focaccia recipe. I d Heart me a delicious and easy Focaccia recipe. I don’t bake very often these days, but this sheet pan masterpiece might change that fact.
.
BLOG —> https://sliceofjess.com/homemade-focaccia-bread-recipe/
.
INGREDIENTS:
1¾ Warm Water
1 package Active Dry Yeast
1 tbsp. Maple Syrup
5 cups Bread Flour
2 tbsp. Course Sea Salt
1 cup Extra Virgin Olive Oil
1 tbsp. Chopped Rosemary
1 tbsp. Chopped Thyme
.
DIRECTIONS:
1. Whisk together the warm water, yeast, and maple syrup in a bowl. Set aside at room temperature for 15 minutes.
2. Add the flour, 1 tablespoon of course sea salt, ½ cup olive oil, and the yeast mixture to a stand alone mixer (KitchenAid) fitted with a dough hook. Mix on a low speed until a dough forms, about 5 minutes. Scrape down the sides, if needed.
3. Lightly coat a large mixing bowl with olive oil. Transfer the dough and cover with plastic wrap. Set the bowl in a warm place for 1 hour. The dough should double in size.
4. Drizzle a sheet pan with ¼ cup olive oil. Transfer the dough and cover with plastic wrap. Set it back in the warm place for another hour. It should double in size again.
5. Preheat the oven to 425F. Using your fingers, press the dough out to evenly fit the sheet pan. Pop any large bubbles and create holes through the dough with your fingertips.
6. Sprinkle with freshly chopped rosemary, thyme, 1 tablespoon of course sea salt, and drizzle with remaining olive oil.
7. Bake for 25 minutes, or until golden brown. Allow to cool slightly, then cut into portions and serve.
Can never go wrong with a classic… . BLOG —> h Can never go wrong with a classic…
.
BLOG —> https://sliceofjess.com/how-to-make-spanish-rice-at-home/
.
INGREDIENTS:
¼ cup Vegetable Oil
2 cups Long Grain Rice
4 Garlic Cloves, minced
3 cups Chicken Stock
15 oz. Tomato Sauce
1 tbsp. Chicken Boullion
1 tsp. Cumin
8 - 10 Cilantro Stems
1 tsp. Salt
Juice of ½ Lime
.
DIRECTIONS:
1. Add the oil to a frying pan over medium-high heat. Sauté the rice until golden brown, about 5 - 8 minutes, then transfer to a large stock pot. Add the minced garlic to the frying pan and cook for 1 minute.
2. Pour in the sautéed garlic, chicken stock, tomato sauce, chicken bouillon, cumin, and mix in the cilantro stems to the rice in the large stock pot. Simmer for 25 - 30 minutes, or until the liquid has absorbed.
3. Remove the cilantro stems and season with salt and lime juice. Add more to taste, if needed. Serve immediately.
Delicious weekend vibes with these Korean Ground C Delicious weekend vibes with these Korean Ground Chicken Nachos. That is all.
.
BLOG —> https://sliceofjess.com/korean-ground-chicken-nachos/
.
FOR THE CHICKEN:
2 tbsp. Sesame Oil
4 Garlic Cloves, minced
1 tbsp. Brown Sugar
2 tbsp. Liquid Aminos
¼ tsp. Ground Ginger
1 lb. @smfchicken Ground Chicken
.
SPICY DRIZZLE:
2 tsp. Sriracha
2 tsp. Mayonnaise
1 tsp. Lime Juice
.
TO ASSEMBLE THE NACHOS:
4 cups Tortilla Chips
8 oz. Monterey Jack, shredded
1 cup Kimchi
Fresh Cilantro, as desired
1 tbsp. White Sesame Seeds
1 tbsp. Red Pepper Flakes, optional
.
DIRECTIONS:
1. Add the ingredients for the chicken to a large skillet. Break apart the meat and sauté until browned and slightly crispy, about 10 - 15 minutes.
2. Meanwhile, whisk together all ingredients for the Sriracha drizzle and set aside in the refrigerator until you’re ready to serve.
3. Preheat oven to 400F. Layer half the tortilla chips, cheese, and kimchi. Repeat a second layer. Bake for 5 minutes, or until cheese has melted.
4. Top with cilantro, sesame seeds, red pepper flakes, and a drizzle of the spicy sauce. Enjoy immediatly.
#mysmfchicken @smfchicken #smfpartner
We’re hosting family for the next few days, so I We’re hosting family for the next few days, so I’ve been cooking up a storm. These Banh Mi Sliders are a fun afternoon app that feeds a crowd. Happy Weekending, friends!
.
BLOG —> https://sliceofjess.com/fully-loaded-lemongrass-banh-mi-burger-sliders/
.
FOR THE GROUND BEEF PATTIES:
• 1 lb. @verdefarms 85/15 Ground Beef
• 4 Garlic Cloves, minced
• 1 tsp. Grated Ginger
• 2 tsp. Lemongrass Purée
• 1 tbsp. Soy Sauce
• Juice + Zest of 1 Lime
• 2 tbsp. Butter
.
FOR THE SLIDERS:
• 6 French Rolls, toasted
• ½ cup Mayonnaise
• 1 tbsp. Habanero Sauce
• Pickled Carrots & Radish, as needed
• ½ English Cucumber, thinly sliced
• ¼ cup Fresh Cilantro, or more if desired
• 2 Jalapeño Peppers, thinly sliced
.
DIRECTIONS:
1. PREP THE SLIDER PATTIES: Mix the ground beef with minced garlic, grated ginger, lemongrass, soy sauce, zest and juice of 1 lime. Divide into six patties and set aside.
2. COOK THE SLIDERS: Add the beef patties to a large skillet over medium heat with a couple tabs of butter. Cook each patty for 4 - 5 minutes, flipping halfway through. I prefer mine medium-well, so the internal temperature should be between 150 - 155F. Toast the buns during this time, if desired.
3. TO ASSEMBLE: Mix the mayonnaise and habanero sauce together in a small bowl. Slather both sides of the toasted slider rolls with the spicy mayo. Then add the cooked patties to each bottom half and top each with pickled carrots, radish, fresh cucumber, cilantro, and jalapeño slices. Top each with second half of the buns and enjoy immediately.
#verdefarms #grassfedbeef #grassfed #organicbeef #thefreshmarket
You can’t live in the south without a yellow squ You can’t live in the south without a yellow squash casserole in your cooking rolodex. This one is my healthier version for spring and summer.
.
BLOG —> https://sliceofjess.com/lightened-up-yellow-squash-casserole/
.
INGREDIENTS:
½ Baguette, sliced and toasted (1 cup crumbled)
½ cup 2% Cottage Cheese
2 tbsp. Olive Oil
1 Yellow Onion, finely sliced
½ Yellow Bell Pepper, minced
2 Garlic Cloves, minced
3 Yellow Summer Squash, sliced into rounds
1 tsp. Salt
1 tsp. Red Pepper Flakes
1 Egg
⅓ cup Shredded Monterey Jack
½ cup Grated Parmesan
2 tbsp. Chopped Italian Parsley
1 tsp. Dried Basil
2 tbsp. Butter, sliced into small chunks
.
DIRECTIONS:
1. Place the toasted baguette in the food processor and pulse until crumbled. Pour out into a bowl and set aside.
2. In the same processor, add the cottage cheese. Pulse until whipped. Place in the refrigerator until you’re ready to use.
3. Add olive oil, onions, and bell pepper to a large skillet over medium-high heat. Sauté until softened, about 5 minutes. Then add the garlic and continue to cook until fragrant, about 1 minute. Remove from the pan.
4. Using the same pan, add the yellow squash rounds. Saute for 10 minutes, or until softened. Then season with salt and red pepper flakes. Mix both the onion mixture and squash in a large baking dish until well combined.
5. Place the whipped cottage cheese in a bowl and mix together with an egg, ¼ cup parmesan, fresh parsley, and dried basil.
6. Fold the cottage cheese mixture and half of the breadcrumbs with the squash in the baking dish. Top with shredded cheese, remaining breadcrumbs, and parmesan. Randomly add small chunks of butter throughout.
7. Bake in a 350F oven for 25 minutes, or until the casserole is set and the top is golden. Serve immediately with fresh parsley for garnish.
I’m a big fan of chickpeas, so finding newish wa I’m a big fan of chickpeas, so finding newish ways to serve them is super fun for me. These North African Chickpea Patties in Spicy Braai Sauce are crunchy on the outside, and have pillowy interior. So good.
.
BLOG —> https://sliceofjess.com/north-african-chickpea-patties-in-spicy-braai-sauce/
.
INGREDIENTS:
1 cup Fonio
15.5 oz. Chickpeas, drained
¼ Yellow Onion
3 Garlic Cloves
¼ cup Italian Parsley Leaves
1 tbsp. Liquid Aminos
1 Habanero Pepper
1 tbsp. Chicken Bullion
1 tsp. Paprika
½ tsp. Salt, or more to taste
Cilantro, for garnish
.
DIRECTIONS:
1. Cook the Fonio according to packaged directions and set aside.
2. Add all remaining ingredients, except for the cilantro, to a large food processor with the cooked Fonio. Pulse until smooth, scraping down the ingredients if needed. Place into the refrigerator for 10 minutes to rest and slightly harden.
3. Oil a baking sheet and form the batter into 15 patties.
4. Bake in a 450F preheated oven for 20 - 25 minutes, making sure to flip halfway through.
5. Garnish with cilantro and serve immediately with Spicy Braai Sauce.
We love this Egg and Avocado Crostini for weekend We love this Egg and Avocado Crostini for weekend brunch. They’re a low-fuss, easy-to-make combo of spring and summer flavors!
.
BLOG —> https://sliceofjess.com/how-to-make-crostini-with-egg-and-avocado/
.
INGREDIENTS: 
1 Baguette
1 tbsp. Olive Oil
3 Eggs
3 tbsp. Milk
1 tbsp. Butter
Salt + Pepper
1 Avocado
1½ tsp. Lemon Juice
½ cup Chopped Tomatoes
½ cup Shredded Parmesan
.
DIRECTIONS:
1. PREHEAT oven to 350° F. Slice baguette into about 16 slices. Lay slices on greased baking sheet; brush tops with olive oil. Bake for about 5 minutes or until lightly browned and toasted.
2. BEAT eggs and milk in bowl until blended. Melt butter in small skillet set over medium-low heat; swirling pan to coat bottom.
3. POUR egg mixture into skillet. As eggs start to cook, push, pull and fold eggs with spatula frequently until all egg is cooked and no liquid remains. Remove from heat. Season with salt and pepper.
4. MASH together avocado, lemon juice and pinch of salt in separate bowl; spoon over slices of baguette to cover most of the surface on top. Spoon scrambled eggs over avocado.
5. TOP with chopped tomatoes and sprinkle with Parmesan.
Happy #NationalGrilledCheeseDay! Happy #NationalGrilledCheeseDay!
Looking for a way to use up all those leftover #ea Looking for a way to use up all those leftover #easter eggs? Some of the BEST recipes are made with the simplest of ingredients. Perfectly boiled eggs are chopped and folded together with mayonnaise, Dijon mustard, celery, jalapeño, green onions, herbs, and spices. Serve it on a toasted waffle for the ultimate sweet & savory experience.
.
BLOG —> https://sliceofjess.com/the-most-delicious-egg-salad-sandwich-recipe/
.
FOR THE EGG SALAD:
• 8 Eggs
• 4 tbsp. Mayonnaise
• 1 tsp. Dijon Mustard
• 1 tsp. Smoked Paprika
• Dash of Garlic Powder
• ½ rib Celery, finely diced
• 1 tbsp. Chopped Green Onions (2 spears)
• ½ Jalapeño, seeded & chopped
• 1 tsp. Chopped Dill
• Salt + Pepper, to taste
.
FOR THE SANDWICH:
• 8 Toasted Waffles (or bread of choice)
• Lettuce, as needed
• Mayonnaise, if preferred
.
DIRECTIONS:
1. Add eggs to a saucepan and fill with cold water. Bring to a boil, cover and immediately turn off the heat. Allow eggs to cook for 10 - 12 minutes.
2. Take the eggs out of the water and place them in an ice bath to stop the cooking process.
3. Peel eggs and cut them in half. Separate the egg yolks and mix them with mayonnaise, dijon mustard, smoked paprika, and garlic powder.
4. Roughly chop the egg whites, jalapeño, celery, green onions and dill. Fold into the yolk mixture. Season with salt and pepper, to taste.
5. Serve egg salad on your favorite waffles or sliced bread with lettuce and additional mayonnaise, if preferred.
Happy Easter Weekend, friends! If you need a quick Happy Easter Weekend, friends! If you need a quick, festive, and easy recipe for entertaining… this is it!
.
BLOG —> https://sliceofjess.com/mini-bacon-onion-quiche-in-phyllo-shells/
.
INGREDIENTS:
30 Mini Phyllo Shells, 1 ½ inches in diameter
3 Eggs
⅓ cup Half and Half
¾ cup Shredded Cheddar Cheese
2 tbsp. Real Bacon Bits
1 tsp. Dried Minced Onion
Fresh Chives, for garnish
.
DIRECTIONS:
1. Place phyllo shells on baking sheet. In a mixing bowl, beat together eggs, half and half, cheese, bacon bits and onion.
2. Spoon 2 teaspoons of filling into each fill-o shell. Bake at 375ºF until quiches puff and turn slightly brown or about 15-20 minutes.
3. Garnish with fresh chives, if desired.
The bird is the word… Heart me some Chicken Picc The bird is the word… Heart me some Chicken Piccata. This here is my air fryer version and it’s freaking spectacular.
.
BLOG —> https://sliceofjess.com/air-fryer-lemon-chicken-piccata/
.
FOR THE CHICKEN:
2 @smfchicken Breasts, sliced in half
1 tsp. Salt
1 tsp. Black Pepper
2 Eggs
1 cup Finely Crushed Cornflakes
3 tbsp. Grated Parmesan
Cooking Spray, as needed
.
FOR THE WHITE WINE SAUCE:
¼ cup Salted Butter
3 Garlic Cloves, minced
2 tbsp. All-Purpose Flour
½ cup Dry White Wine
½ cup Chicken Broth
¼ cup Lemon Juice
3 tbsp. Capers, drained
Fresh Parsley, for garnish
.
DIRECTIONS:
1. Cut the chicken in half, lengthwise. Sprinkle all sides with salt and pepper.
2. Whisk together the eggs in a large bowl and set aside. 3. Crush the cornflakes and mix together with the parmesan in a second bowl. Dip the chicken in the eggs and then the cornflakes - making sure to press down so they’re coated well.
4. Preheat the air fryer to 375F. Spray the interior of the air fryer or the chicken directly so it doesn’t stick. Air fry for 6 - 8 minutes, turning over halfway if needed. Check to make sure the internal temp is 165F.
5. While the chicken is cooking, make the sauce. Melt butter in a sauté pan and then add the garlic. Continue to sauté until fragrant, about 1 minute. Next add the flour and whisk together with the butter until slightly browned.
Pour over the white wine and chicken broth to deglaze. Then add the lemon juice and simmer for 2 - 3 minutes. Finish with the capers and pull off the heat.
6. Plate the chicken with a heavy drizzle of the white wine sauce and garnish with fresh parsley. Enjoy immediately.
Good-for-your-soul-fantastic. Wishing everyone a f Good-for-your-soul-fantastic. Wishing everyone a flavorful weekend!
.
BLOG —> https://sliceofjess.com/lemon-garlic-butter-noodles/
.
INGREDIENTS:
1 lb. Dry Pasta Noodles
½ cup Reserved Pasta Water
1 stick Unsalted Butter
4 Garlic Cloves, sliced
½ Lemon, juiced
1 tsp. Salt, or more to taste
4 tbsp. Fresh Parsley, chopped
.
DiRECTIONS:
1. Cook pasta according to package directions for al dente. Before draining, make sure to reserve at least ½ cup of the pasta water and set aside. Return the pasta to the pot.
2. Slice the butter into smaller pieces and add to the drained pasta. Allow to slightly melt and then add the reserved pasta water, garlic, and lemon juice. Mix until well combined.
3. Taste, and add salt to desired personal preferences. Just before serving, sprinkle with freshly chopped parsley.
Load More... Follow on Instagram

Footer

Popular Posts

Buddha Bowl
Instant Pot Chicken
Cream Cheese Wontons
Copyright Slice of Jess ©2023