• Skip to primary navigation
  • Skip to main content
  • Skip to primary sidebar
  • Skip to footer

Slice of Jess

Changing the way you eat, one slice at a time.

  • About
  • Press
  • Recipes
  • Travel & Dining
  • Collaborate
    • Collaborate
    • Recipe Development
    • Photography
    • MEDIA KIT
    • Privacy Policies
  • Contact Us

Butter Rum No Bake Cheesecake Jars

July 17, 2019 By Jessica 4 Comments

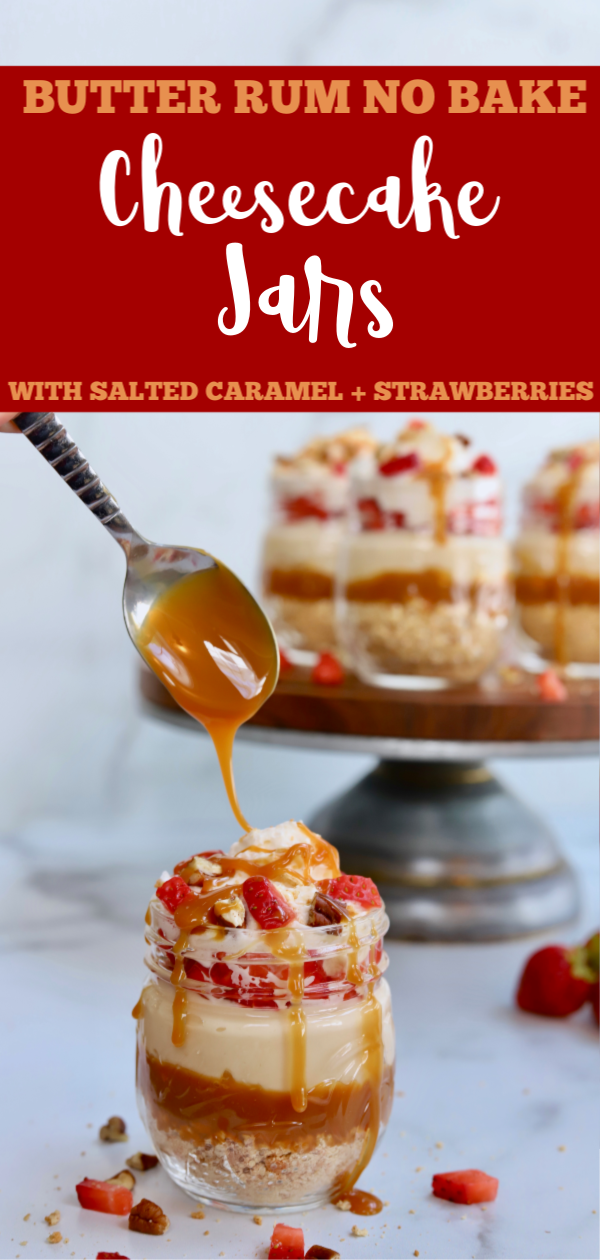
Whip up a batch of these Butter Rum No Bake Cheesecake Jars in a matter of minutes! They’re incredibly easy to make and the perfect addition to any party.

No Bake Cheesecake

I’ve always been a fan of rich, smooth, creamy cheesecake. Haven’t you? It’s one of my favorite desserts to order when we go out to a restaurant and I practically love every single flavor. Seriously, I’ve never met a cheesecake I didn’t like (and devour).

A traditional cheesecake that’s baked in the oven can be quite intimidating to make at home. You start to worry about it cracking down the middle or having the crust perfectly slide out of the pan. Oh, and not to mention all that time you end up spending in the kitchen prepping it. Good grief. No, thank you.

Per the usual, my recipe for these no bake cheesecake jars is ridiculously simple. They look and taste phenomenal and you can even make them in advance. Easy-peasy!

No Bake Cheesecake

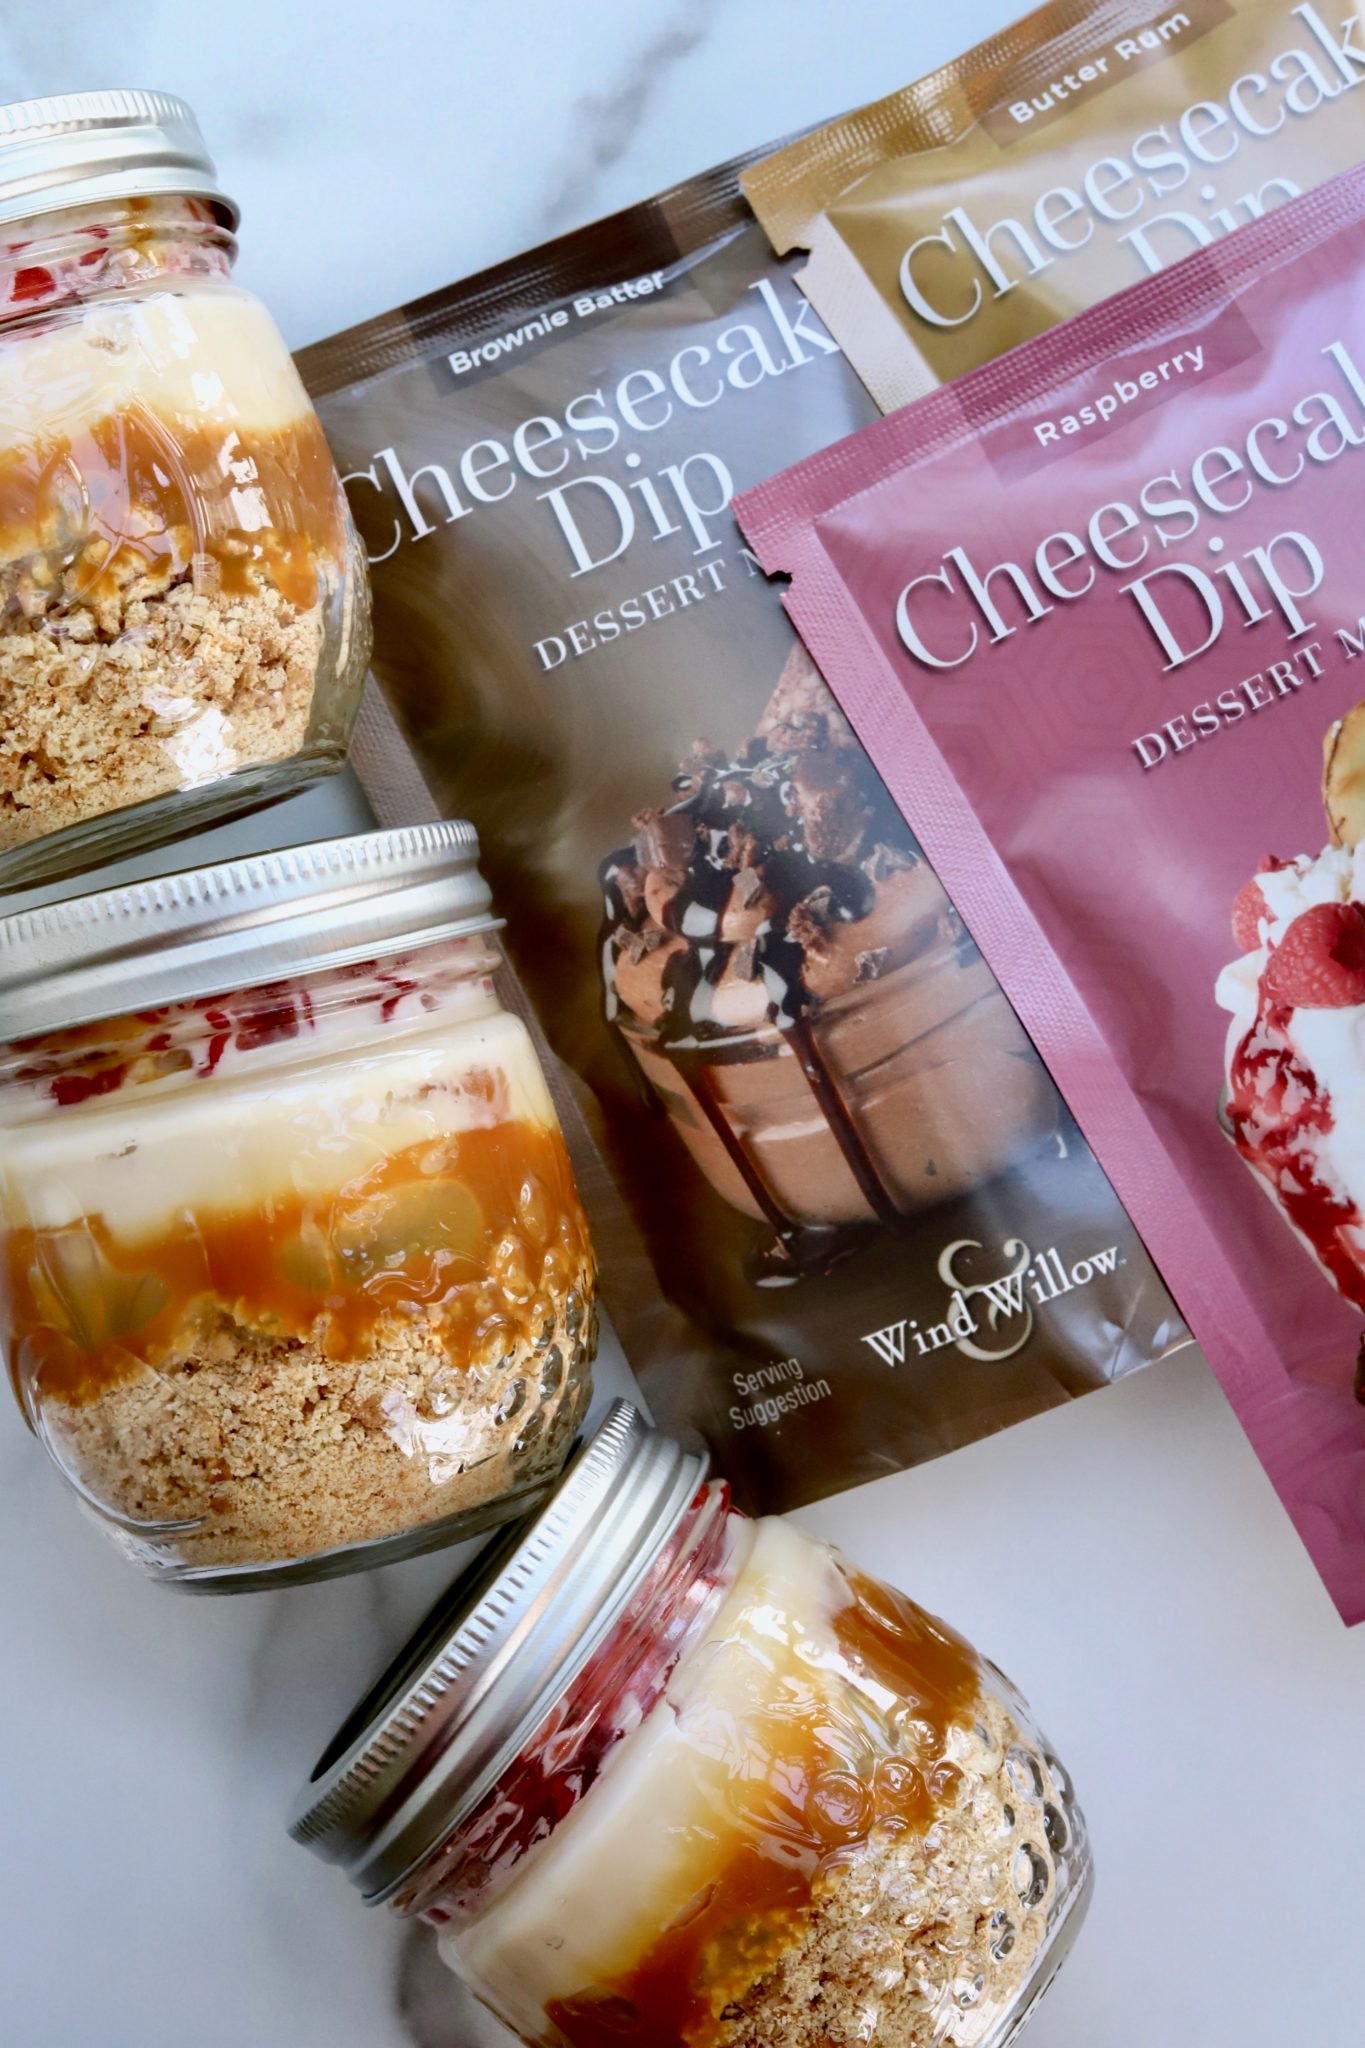
My secret behind these mini cheesecake jars is Wind & Willow’s line of cheesecake dip mixes. They come in three delicious varieties: Butter Rum, Raspberry, and Brownie Batter. Simply mix your flavor of choice with 8-ounces of cream cheese and poof, you’re all done! No baking (or worrying) required.

No Bake Cheesecake

NOTES ON MAKING NO-BAKE CHEESECAKE JARS:

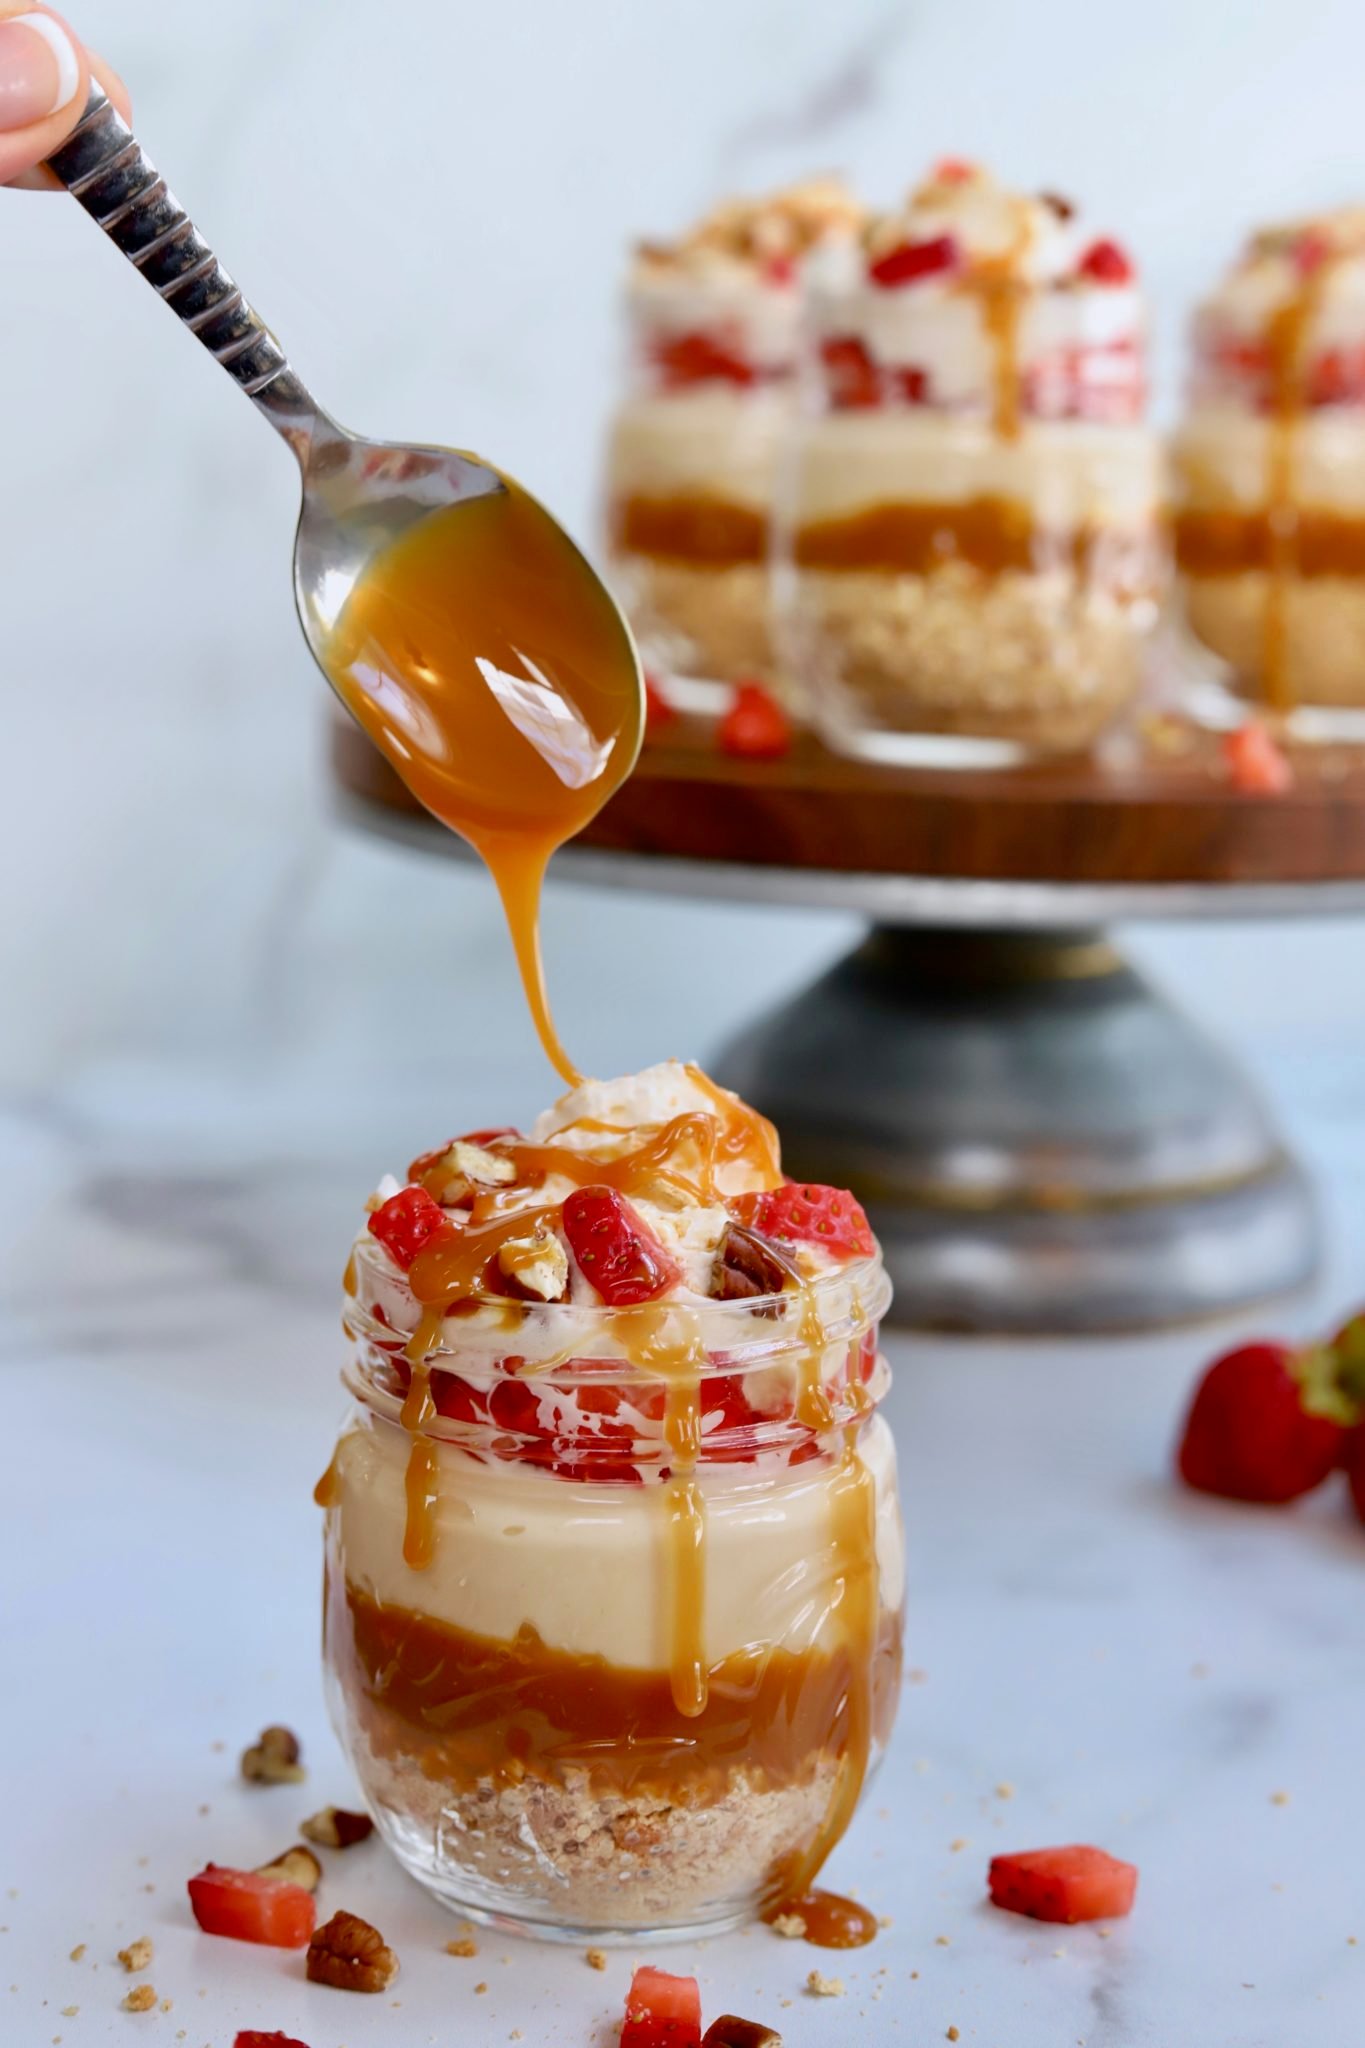
  1. Make a batch of my Super Simple Salted Caramel Sauce. This isn’t a mandatory ingredient… but it’s super tasty and adds an extra layer of yumminess. Warning: it’s dangerously addicting and you’ll always want a jar in your fridge for special occasions (or daily use, no judgement here!).
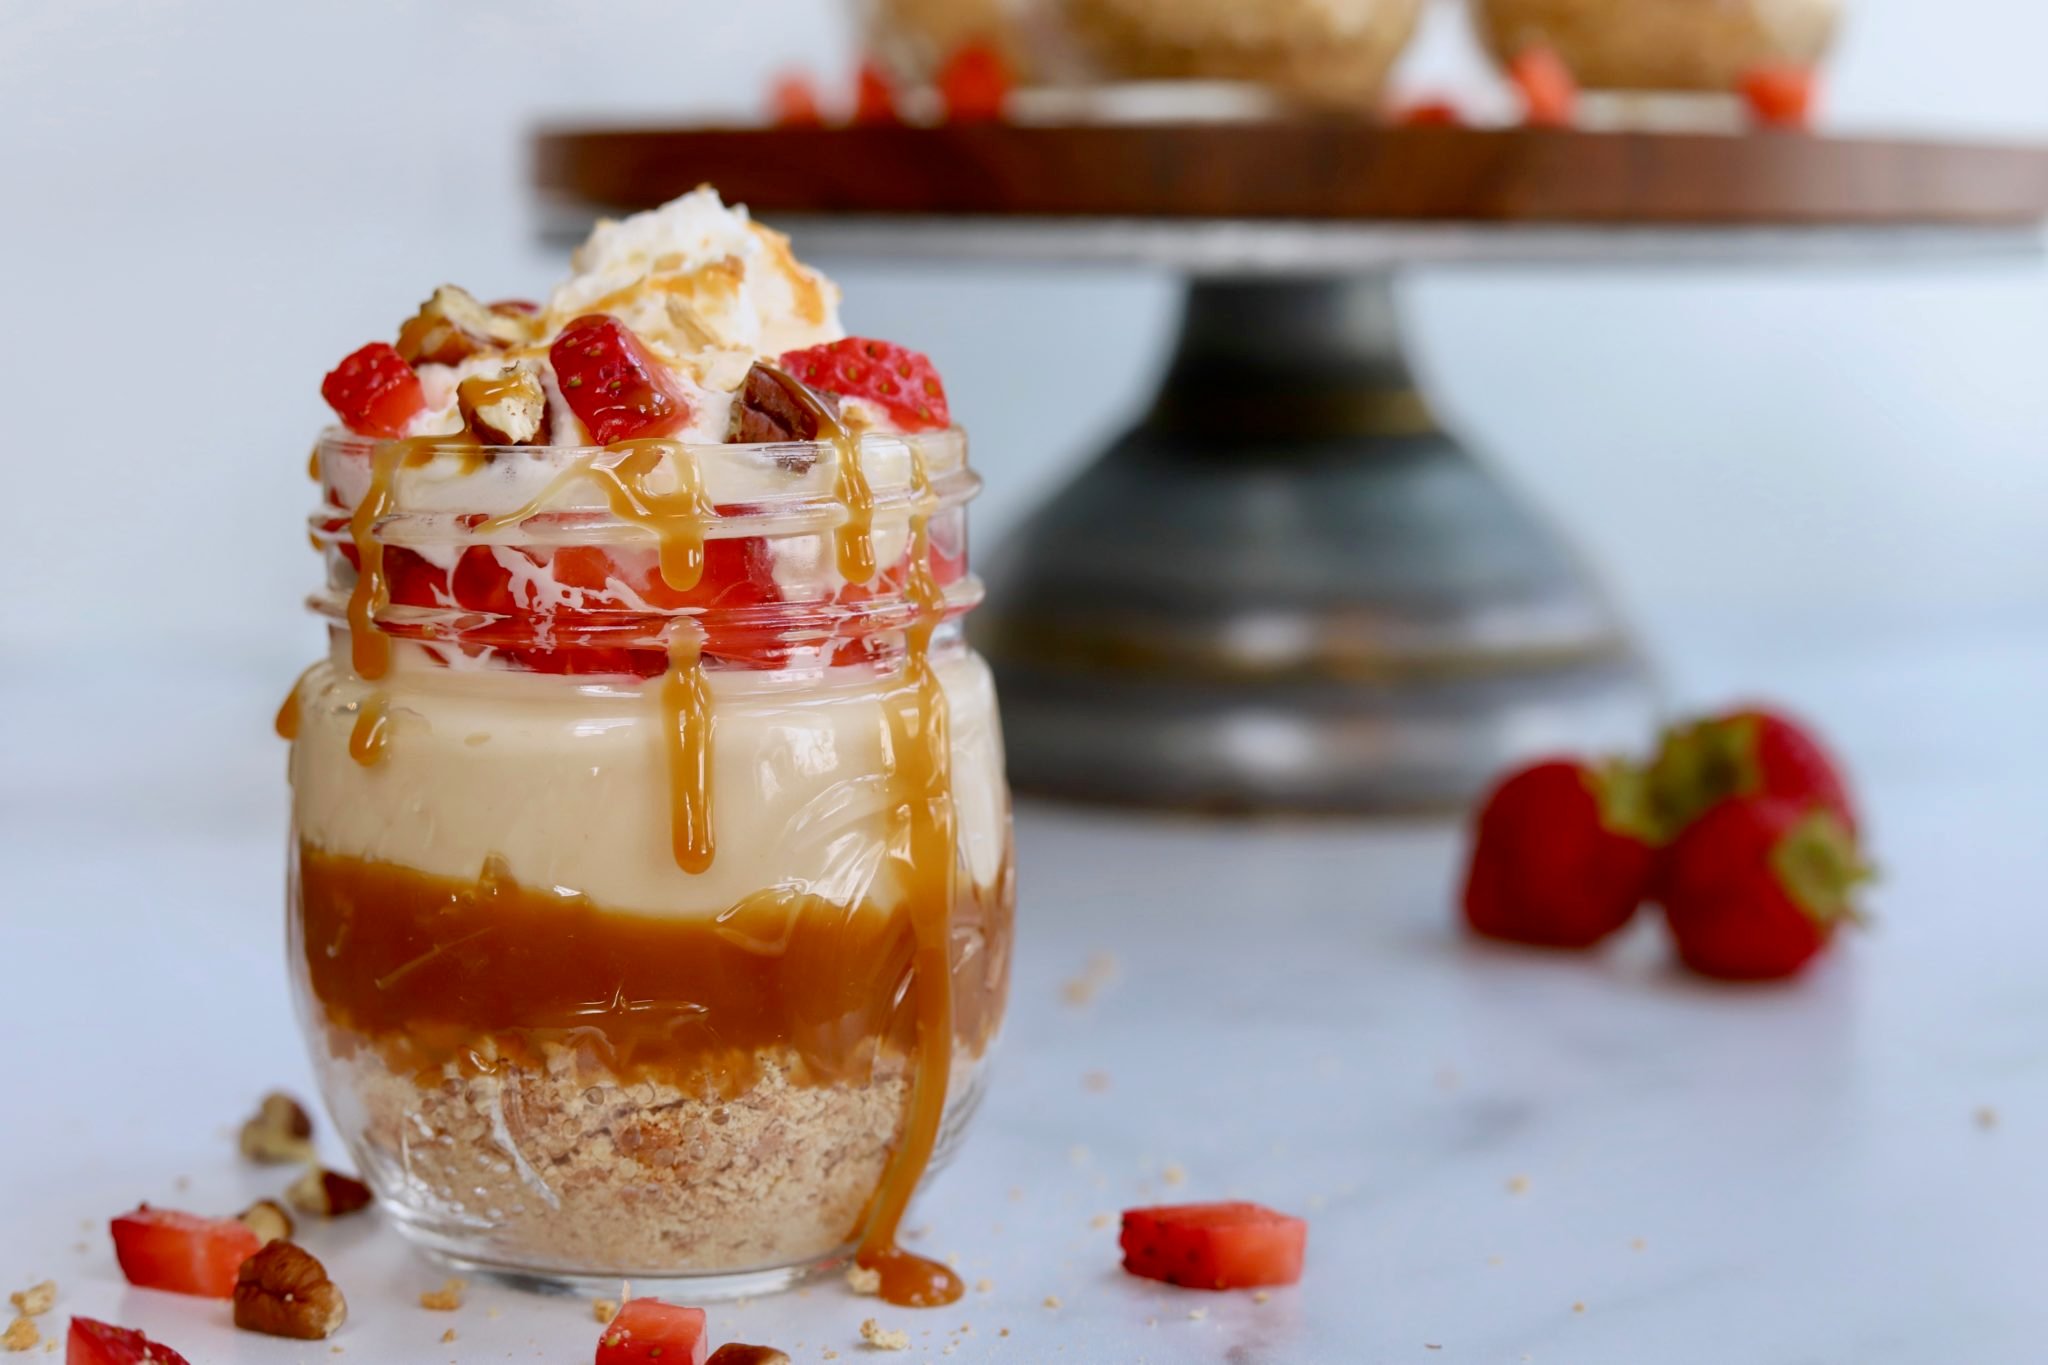
  2. Crush 1 package of graham crackers to create a crust at the bottom of the jar. You can do this by hand (with a ziplock bag + rolling pin… whack!) or by pulsing them in a food processor. Either way does the trick.
  3. Whip up the no bake cheesecake layer by mixing 8-ounces of cream cheese with Wind & Willow’s Butter Rum Cheesecake Dip Mix. You can do this by hand or with a stand-alone mixer. I like my cheesecake extra thick, so I did not add the 2 Tbsp. water that’s recommended on the packaging.
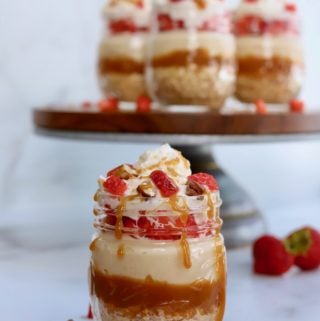
  4. Grab your favorite glass containers. If you’re making these for a picnic or outdoor occasion, sealable canning jars are a great option.
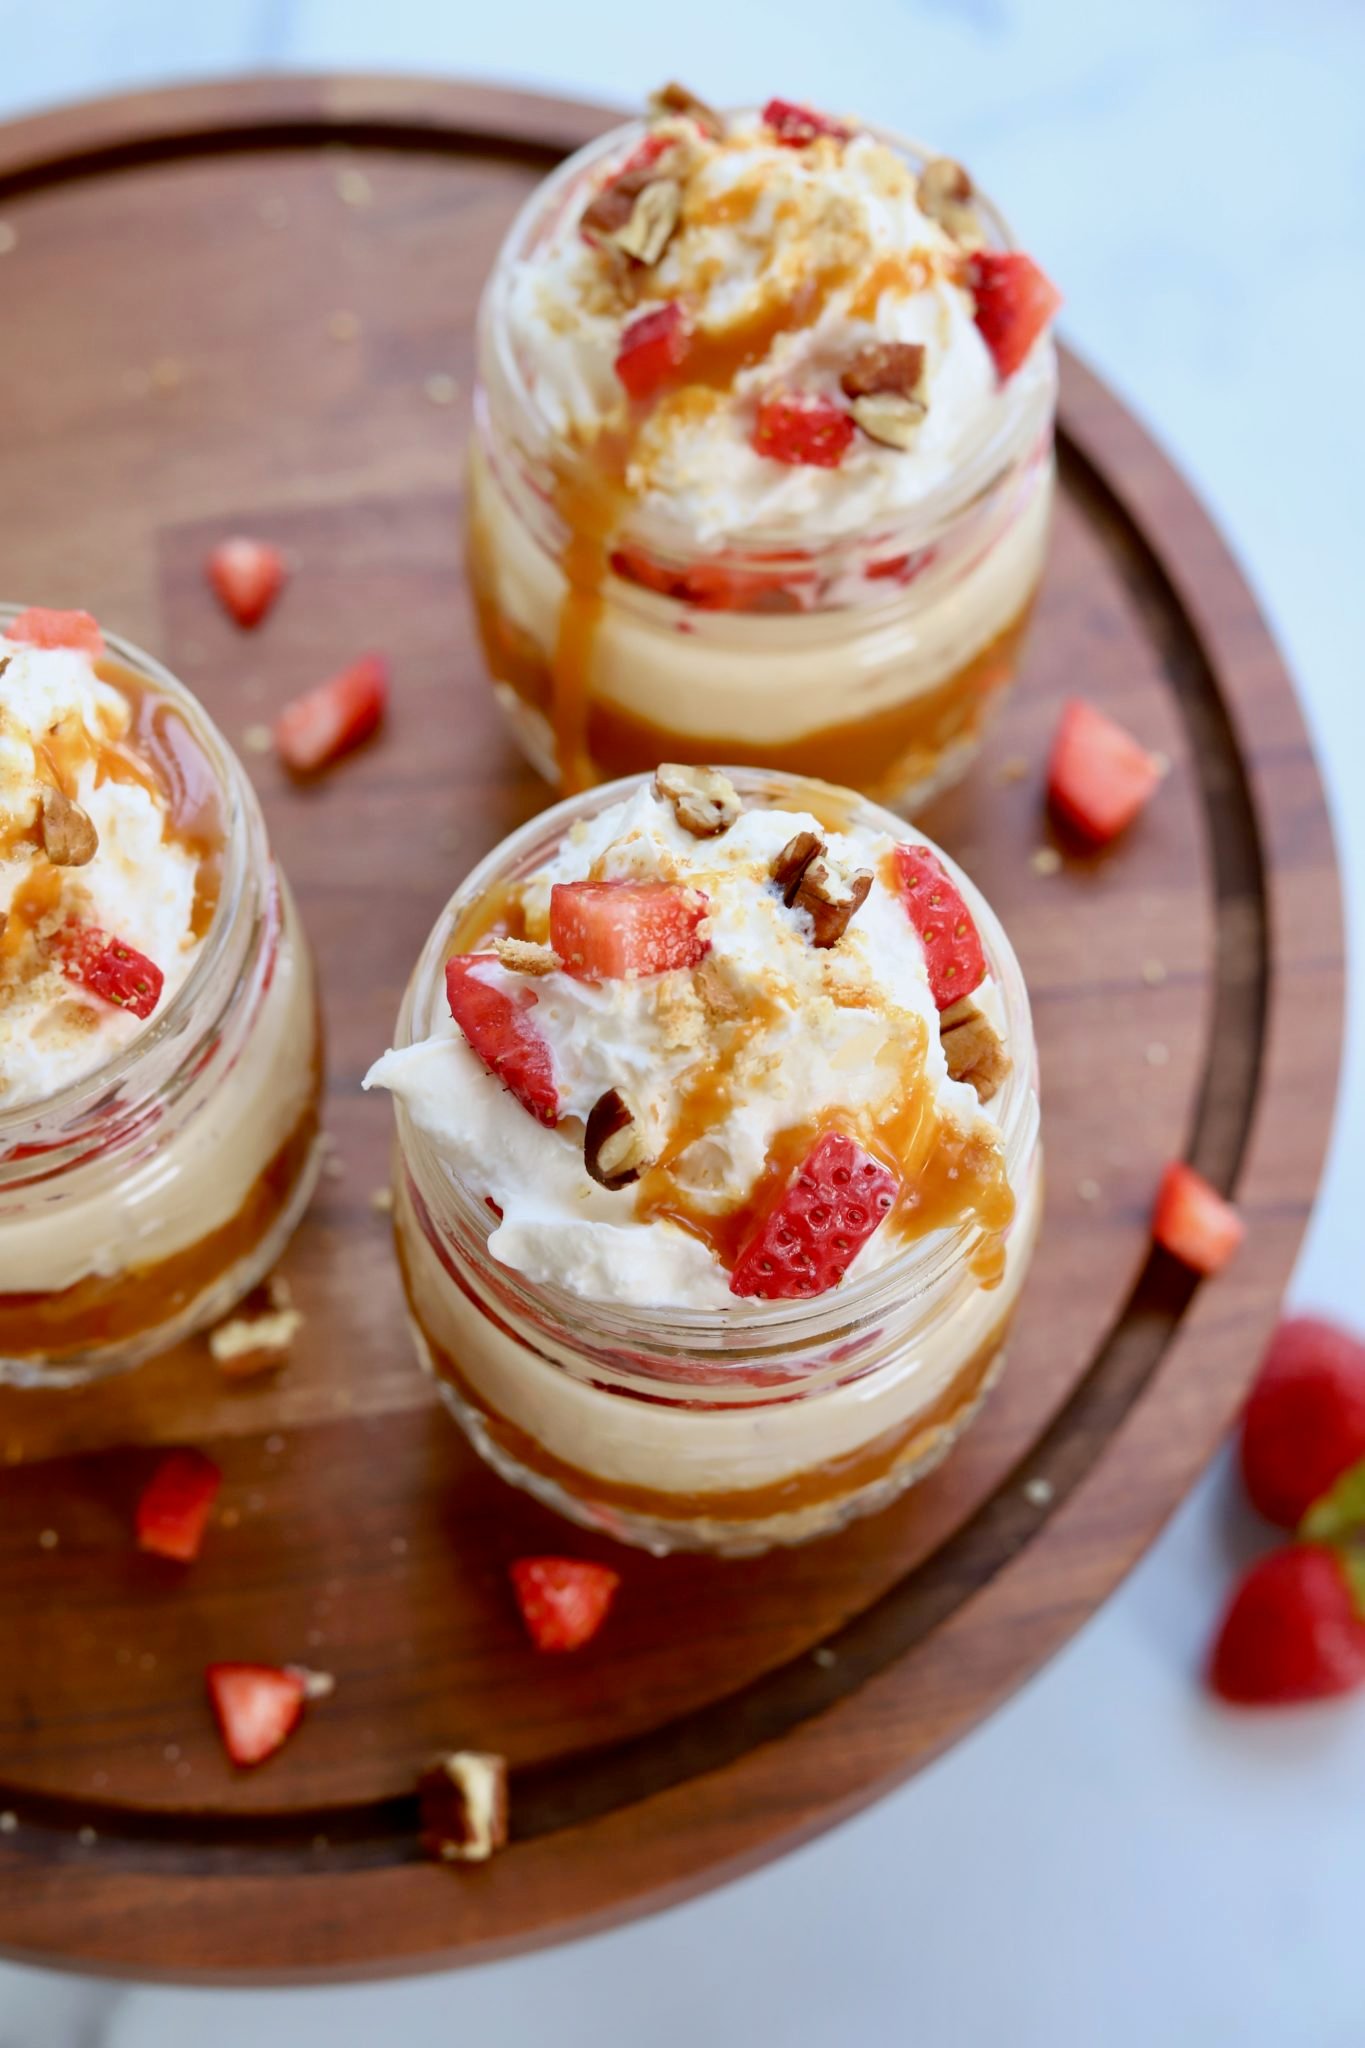
  5. Start the layering! Simply do so in this order: graham cracker crumbs, salted caramel sauce, no bake butter rum cheesecake dip, fresh strawberries, and whipped cream. If you’re making these ahead of time, simply skip the strawberry and whipped cream layer and add those right before serving.
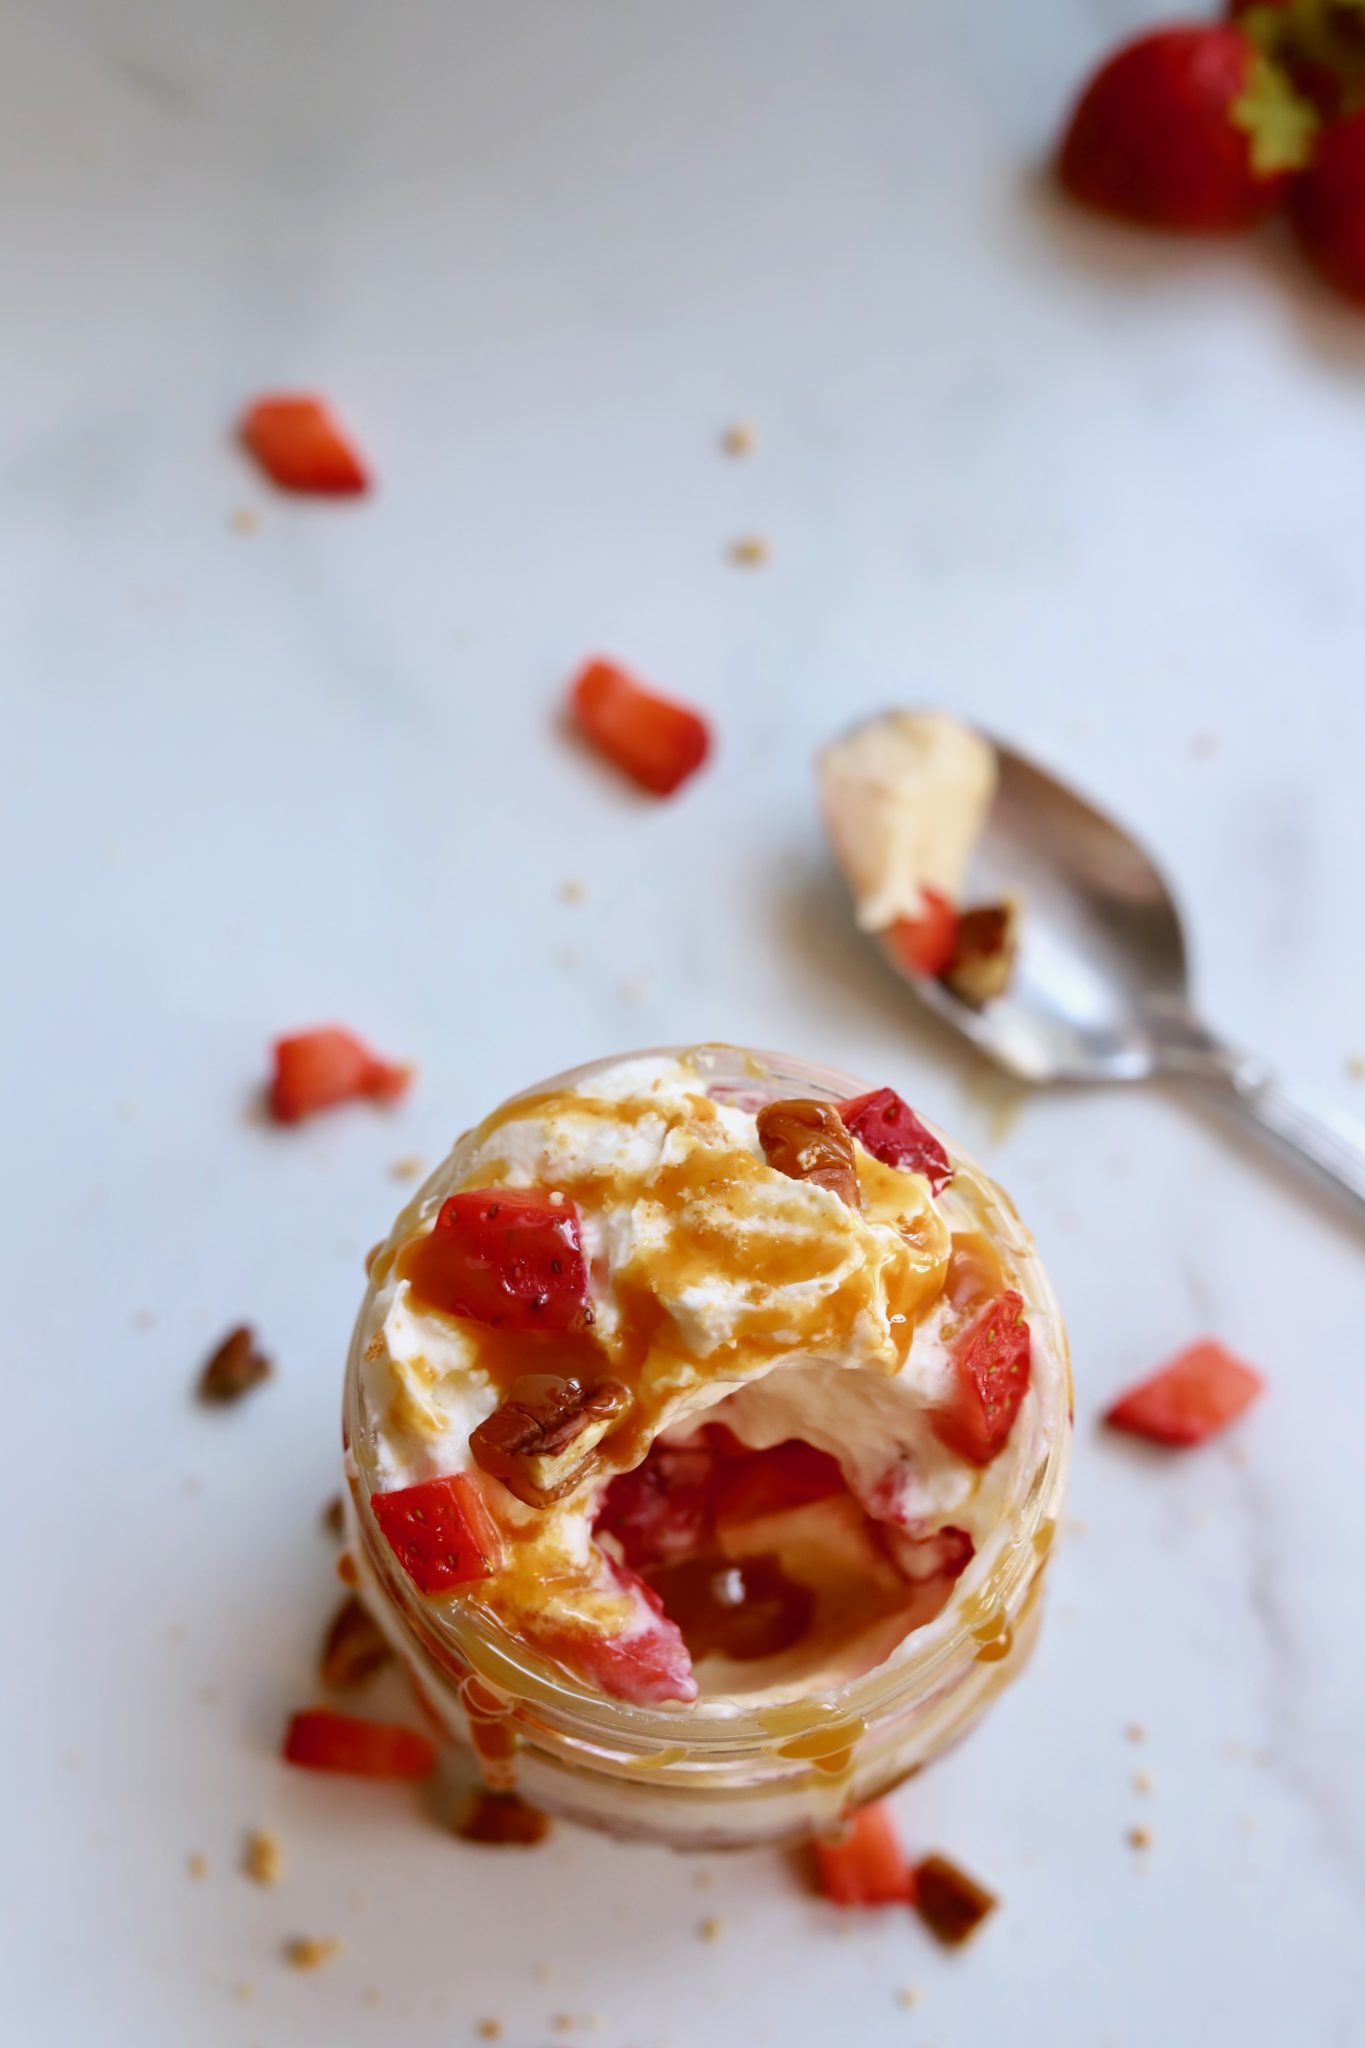
  6. For an optional garnish, we topped ours with more strawberries, roasted pecans, a heavy drizzle of salted caramel sauce, and a sprinkle of graham cracker crumbs.

No Bake Cheesecake

OTHER COMBINATIONS THAT ARE FUN TO TRY:

  • Raspberry Cheesecake + Fresh Raspberries + White Chocolate Chips
  • Brownie Batter Cheesecake + Swirls of Peanut Butter + Banana Slices
  • Rum Butter Cheesecake + Toasted Coconut Flakes + Fresh Blackberries

No Bake Cheesecake

5.0 from 1 reviews
Butter Rum No Bake Cheesecake Jars
 
Print
Serves: 4 Small Jars
Ingredients
  • 1 package Wind & Willow Cheesecake Dip Mix
  • 8 ounces Cream Cheese
  • Salted Caramel Sauce, as needed
  • 1 sleeve Graham Crackers, crushed into crumbs
  • 6 - 8 Fresh Strawberries, diced
  • Whipped Cream, as needed
OPTIONAL GARNISHES:
  • Chopped Pecans
  • More Strawberries
  • Salted Caramel Sauce
  • Graham Cracker Crumbs
Instructions
  1. Make Salted Caramel Sauce and set aside to cool.
  2. Crush graham crackers.
  3. Mix Wind & Willow Butter Rum Cheesecake Dip with 8-ounces of cream cheese. Continue to mix for at least 2 minutes, or until the dip mix and cream cheese are well combined.
  4. Evenly pour graham cracker mix among 4 jars or containers.
  5. Next you'll layer the jar with salted caramel sauce, no bake cheesecake, strawberries, and finish with whipped cream.
  6. As an optional garnish, sprinkle each cheesecake jar with more strawberries, salted caramel sauce, roasted pecans, and graham cracker crumbs.
  7. Enjoy immediately.
3.5.3251
 

No Bake Cheesecake

WANT MORE DESSERTS? CLICK HERE!

This post is sponsored in partnership with Wind and Willow. Per the usual, all opinions here are mine alone and I would never recommend a product or ingredient that I did not immensely enjoy myself.

Thank you for supporting the brands that support SliceOfJess.com! 


PIN THIS FOR LATER: 


No Bake Cheesecake

Filed Under: Sweet Things & Dessert

Previous Post: « How To Toast Coconut Flakes At Home
Next Post: Truff Meatball Hoagie with Southern Buttermilk Slaw »

Reader Interactions

Did you make this recipe?

Tag @sliceofjess on Instagram & hashtag #sliceofjess.

Share this post!
Share on Facebook
Facebook
Tweet about this on Twitter
Twitter
Pin on Pinterest
Pinterest
Email to someone
email

Comments

  1. Anna

    July 19, 2019 at 12:03 pm

    Wow… these look incredible! I can’t wait to try them. Thanks for sharing.

    Reply
    • Jessica

      July 19, 2019 at 12:04 pm

      I’m so excited for you to try them! I know you’ll love these as much as my family does. Thanks for stopping by, enjoy!

      Reply
  2. ANNE CRICK

    July 11, 2020 at 2:05 pm

    I CAN’T GET THIS – WHAT DO YOU RECOMMEND? 1 package Wind & Willow Cheesecake Dip Mix

    Reply
    • Jessica

      July 18, 2020 at 2:14 pm

      Hey Aanne! You can purchase their cheesecake dip mixes on their website. 🙂 However, I would think you could also substitute this with Jello Cheesecake Mix or Vanilla Pudding. Let me know how it turns out!

      Reply

Leave a Reply Cancel reply

Your email address will not be published. Required fields are marked *

Recipe Rating


Rate this recipe:  

Primary Sidebar

Hey there, Jess here. Welcome to a slice of my kitchen! Here you'll find tidbits of my everyday life, home cooked meals and travel guides. Thanks for stopping by!

Join Our Email List!

Recent Posts

  • How To Make Confit Garlic On The Stovetop August 7, 2022
  • Creamy Mushroom Sauce for Legit Everything August 3, 2022
  • Zucchini Pasta with Peas, Herbs and Burrata August 2, 2022
  • Pan Fried Chimichurri Rice Cake Recipe July 30, 2022
  • One Pan Mexican Rice Casserole with Ground Beef July 29, 2022

Check Out My Insta :)

sliceofjess

🍔: Recipe Development | Photographer
🏡: Charlotte, NC
📬: Jess@SliceOfJess.com
⤵️: 100’s of Killer Home Cookin’ Meals

Jess Bentley | Food & Travel
If there’s a staple I’m going to make for the If there’s a staple I’m going to make for the week, it’ll be confit garlic. It’s grand on toast, inside sandwiches, with pasta… you name it!
.
BLOG —> https://sliceofjess.com/how-to-make-confit-garlic-on-the-stovetop/
.
INGREDIENTS:
• 30 Peeled Garlic Cloves
• 1 tbsp. Black Peppercorns
• 2 tsp. Red Chili Flakes
• 1 tsp.. Dried Thyme
• 2 small Bay Leaves
• 2 cups Olive Oil
• Fresh Herbs, if desired
.
DIRECTIONS:
1. Add all ingredients to a large saucepan over medium heat. Bring to a low simmer (do not boil) and cook for 30 minutes.
2. Use a slotted spoon to transfer the garlic to a mason jar. Add enough oil to cover, and store in the refrigerator for up to 2 months.
Hola, flavor town! My South American inspired rice Hola, flavor town! My South American inspired rice cake recipe is packed with fresh herbs, flavorful veggies, and spicy aji amarillo paste. Mmmmmm!
.
BLOG —> https://sliceofjess.com/pan-fried-chimichurri-rice-cake-recipe/
.
FOR THE RICE CAKES:
• 3 cups Leftover Chimichurri Rice (recipe on blog)
• 1 Egg
• 5 oz. Queso Fresco, crumbled
• 4 oz. Monterey Jack cheese, grated
• ¼ cup Italian or Plain Breadcrumbs
• 1 tbsp. Olive Oil
• I tbsp. Butter
.
FOR GARNISH:
• 1 tbsp. Fresh Cilantro, minced
• 1 tbsp. Fresh Italian Parsley, minced
• 1 Lime, cut into wedges
• Tomatillo Salsa Verde (recipe on blog)
.
DIRECTIONS:
1. Allow rice to fully cool before prepping the rice cakes.
When you're ready to make, mix the cooled rice with the egg, queso fresco, Monterey Jack cheese and the breadcrumbs.
2. Roll into 1-inch patties and pan fry in olive oil and butter for 2 - 3 minutes on each side. Allow them to cool on a stack of paper towels.
3. Enjoy immediately with fresh herbs, limes, and your favorite dipping sauce.
Hooray for the abundance of summer produce! This i Hooray for the abundance of summer produce! This is an awesome way to use up all our backyard-grown veggies. Bring on the Zucchini Pasta with Burrata!
.
BLOG —> https://sliceofjess.com/zucchini-pasta-with-peas-herbs-and-burrata/
.

FOR THE ZUCCHINI PASTA:
• 2 tbsp. Olive Oil
• 2 tbsp. Butter
• 4 cups Diced Zucchini, (3 - 4 medium sized)
• 1 Sweet Onion, thinly sliced
• 3 Garlic Cloves, minced
• 1 cup Heavy Cream, warmed
• ½ cup Fresh Oregano, stems removed
• ½ cup Fresh Italian Parsley, stems removed
• 20 Fresh Basil Leaves
• 1 tsp. Kosher Salt
• 1 tsp. Freshly Ground Black Pepper
• 1 cup Grated Parmesan Cheese
• 2 cups Frozen Peas, thawed
• 1 lb. Fusilli Pasta
• ½ - ¾ cup Reserved Pasta Water
.
FOR PLATING:
• 8 oz. Burrata
• Red Pepper Flakes, to taste
• Shredded Parmesan Cheese, as desired for garnish
• 1 Loaf Crusty Bread, for serving
.
DIRECTIONS:
1. Add the olive oil and butter to a large skillet over medium heat.
2. Once melted together, add the zucchini and onion. Cook until softened and caramelizing, about 10 minutes.
3. Add the garlic and cook for another minute or two, or until fragrant (but not browned!).
4. Warm the heavy cream and allow the softened veggies to cool for a few minutes. While the veggies cool, go ahead and cool your pasta according to packaged directions in salted water. When draining, make sure to reserve a cup of pasta water.
5. Transfer the veggies + cream to a high-speed blender along with the herbs, salt, pepper, and parmesan cheese. 6. Blend until well incorporated and smooth.
7. Add the zucchini sauce back to the skillet that you cooked it in along with a splash or two of pasta water.
Mix together and then add the cooked pasta to the same skillet. Toss together until pasta is coated.
8. Transfer the zucchini pasta to a serving platter. Nestle the burrata, cut in half, top with red pepper flakes, shredded parmesan and serve with crusty bread.
Cheesy, savory, super fulfilling and incredibly ea Cheesy, savory, super fulfilling and incredibly easy to make… I’m so excited to share my famous recipe for Mexican Rice Casserole in collaboration with @redgoldtomatoes and @thefeedfeed! Seriously, your whole family is gonna swoon at first bite 🍅!
.
BLOG —> https://sliceofjess.com/one-pan-mexican-rice-casserole-with-ground-beef/
.
FOR THE MEXICAN RICE CASSEROLE:
• 1 lb. Ground Beef
• 1/4 Small Red Onion, diced
• 1 Red Bell Pepper, diced
• 1 tbsp. Cumin
• 2 tsp. Chili Powder
• 1 tbsp. Smoked Paprika
• 2 tsp. Dried Oregano
• 1 tsp. Salt, or more to taste
• 1 cup Frozen Corn Kernels, thawed
• 15 ounce can Black Beans, drained
• 4 cups Cooked Brown Rice
• 1 cup Shredded Monterey Jack Cheese, split in half
• 1 cup Shredded Cheddar Cheese, split in half
• 10 ounce can Tomato Love with Double More Chilies
.
OPTIONAL, FOR GARNISH:
• Fresh Cilantro,
• Diced Green Onions
• Avocado, sliced
• Mexican Crema Drizzle
• Your Favorite Hot Sauce
.
DIRECTIONS:
1. Cook brown rice (or grain of choice) and set aside.
2. Sauté the ground beef in a large skillet over medium-high heat.
3. Once browned, add the diced shallot and bell pepper. Continue to cook until slightly softened, about 2 - 3 minutes.
4. Add all seasonings, corn kernels, black beans and cooked rice. Cover with ½ cup or Monterey Jack and ½ cup of Cheddar. Mix to combine.
5. Add the Tomato Love with Double More Chilies, mix, and top with remaining cheese. Preheat the skillet in a 400F preheated oven for 3 - 4 minutes, or until cheese has melted.
6. Serve with desired garnishes and enjoy immediately.
.
New from @redgoldtomatoes, Tomato Love begins with the finest locally grown tomatoes and are hand-tossed with perfectly ripe green chilies. It’s a combo you won’t wanna miss! (#sponsored) #tomatolove #feedfeed
Instagram post 17948239066951731 Instagram post 17948239066951731
We had such a fun weekend. Had some adult time (ad We had such a fun weekend. Had some adult time (adios kiddos, aunt Brie is in charge) and experienced a date night @sullivanssteakhouse. We attended their “Summer Side of Bourbon” dinner and it was soooo fun. We had drawing contests in-between courses and laughed more than we had in years. The food was excellent and the service was top notch ☺️
Take your Summer Peach & Tomato Salad up a notch b Take your Summer Peach & Tomato Salad up a notch by stuffing it into a baguette with bacon, feta, balsamic drizzle, basil, peppers, and pistachios!
.
BLOG —> https://sliceofjess.com/summer-peach-tomato-salad-sandwich-with-bacon/
.
FOR THE SHERRY MAYO-RICOTTA:
• 2 tbsp. Ricotta
• 2 tbsp. Mayonnaise
• 1 tbsp. Sherry Vinegar
• ½ Shallot, minced
• 1 tsp. Honey
• Salt, to taste
.
FOR THE SANDWICH:
• ½ French Baguette
• 1 Peach, sliced
• 1 Tomato, sliced
• 5 Bacon Strips, twirled & cooked
• 1 oz. Crumbled Feta
• 2 tbsp. Crushed Pistachios
• ¼ cup Fresh Basil
• 3 - 4 Whole Calabrian Chili Peppers, sliced
• Aged Balsamic Vinegar, garnish
.
DIRECTIONS:
1. Mix together all of the ingredients for the Sherry Mayo-Ricotta in a small bowl and set aside.
2. Cut the baguette in half and toast until lightly browned.
3. Slather each inner-side of the baguette with Sherry Mayo-Ricotta. Add the slice peaches, sliced tomato, bacon curls, and feta to one side. Then add the crushed pistachios, basil and Calabrian chili peppers to the other side. Drizzle both halves with aged balsamic vinegar.
4. Fold together, cut in half, and enjoy immediately!
Smothered saucy chili and melty cheese, there’s Smothered saucy chili and melty cheese, there’s a reason that chili fries are undeniably delicious. Let’s make it into pizza!
.
BLOG —> https://sliceofjess.com/how-to-make-chili-fries-into-pizza/
.
FOR THE PIZZA
* Pizza Dough (Store Bought or Homemade)
* 4 oz. Cheddar Cheese, shredded
* 8 oz. Mozzarella Cheese, shredded
* 20 oz. Frozen Waffle Fries
* 2 Jalapeños, sliced
* 2-3 Green Onions, sliced
* 1 cup Fritos
* Ranch Dressing, optional side
.
FOR QUICK PICKLED RED ONIONS
* ½ Red Onion, sliced thin
* ¾ cup Apple Cider Vinegar
* ¼ cup Water
* 1 tsp Maple Syrup
* Dash of Salt

Instructions
1. Make my Easy Chili Recipe for Grilling Season and set aside. Can be made up to 48 hours in advance.
2. Make pickled red onions by thinly slicing onion and adding to a jar with remaining ingredients. Let sit for 30 minutes.
3. Cook fries in oven according to package directions (timing will vary based on brand). Set aside.
4. Preheat grill to medium high-heat.
5. Roll out pizza dough until about ¼ inch thick.
6. Spray dough with cooking oil on both sides and place pizza dough directly on grill grates. Cook for 2-3 minutes until slightly charred.
7. Flip and top with ⅔ of the chili, cheese, fries, and then remaining ⅓ of chili. Finish with sliced jalapeños and cook for additional 4-5 minutes, lid closed, or until cheese is melty.
8. Remove from grill and top with pickled onions, green onions, and lots of Fritos.
This bagel sandwich is a necessity for weekday bru This bagel sandwich is a necessity for weekday brunch! Stuffed with crunchy veggies and spicy cream cheese, this beast of a sandwich has it all!
.
BLOG —> https://sliceofjess.com/eat-the-rainbow-bagel-sandwich/
Skip the jar and make your next batch of Tomatillo Skip the jar and make your next batch of Tomatillo Salsa Verde at home! Super fresh, tangy, spicy, and creamy with the addition of avocado!
.
BLOG —> https://sliceofjess.com/creamy-tomatillo-salsa-verde-with-avocado/
.
FOR THE SALSA VERDE:
• 6 Tomatillos
• 1 Avocado
• Juice of 1 Lime
• 1 Jalapeño, stemmed
• ½ cup Cilantro
• ¼ Green Bell Pepper, seeded
• ¼ White Onion
• ¼ cup Water
• Salt, to taste
.
SERVE WITH:
• Tajin, to rim the bowl
• Tortilla or Plantain Chips
.
DIRECTIONS:
1. Remove the husks from the tomatillos and discard. Rinse them under cool water to remove any sticky parts on their skin.
2. Place all ingredients in the food processor and puree until smooth.
3. Season, taste, and serve! Enjoy.
I learned how to make Chimichurri Peruvian Rice fr I learned how to make Chimichurri Peruvian Rice from my mom’s flash card cookbook I found in archives. It’s dear to my heart and I know you’ll love it, too!
.
BLOG —> https://sliceofjess.com/how-to-make-chimichurri-peruvian-rice/
.
FOR THE CHIMICHURRI:
• ¾ cup Parsley Leaves
• ½ cup Cilantro
• 4 Garlic Cloves
• 1 tsp. Red Chili Flakes
• 1 tsp. Dried Oregano
• ⅓ cup Extra Virgin Olive Oil
• 2 tbsp. Red Wne Vinegar
• 1 tsp. Kosher Salt, or more to taste
• ½ tsp. Black Pepper, or more to taste
FOR THE CHIMICHURRI RICE:
• 1 tbsp. Olive Oil
• 1 tbsp. Butter
• 1 Shallot, diced
• ½ tsp. Grated Ginger
• 1 Garlic Clove, minced
• ½ clamshell Cherry Tomatoes, diced
• 1 cup Peas, thawed
• Chimichurri Sauce (recipe above)
• 2 tbsp. Aji Amarillo Paste
• 6 cups Cooked White Rice (2 cups uncooked rice)
• Salt, to taste
• Limes, for garnish
• Chopped Parsley and Cilantro, to garnish
.
DIRECTIONS:
1. Cook rice 1-minute less than it's packaged directions. Pour onto a plate and set aside to cool.
2. Place diced shallots in olive oil and sauté until softened. Add ginger, garlic and then tomatoes. Sauté until the tomatoes have released their juices and the shallots are translucent. About 5 minutes. Then add the peas and cook together for a few minutes.
3. Next you'll add the rice, chimichurri sauce and aji amarillo paste. Stir to combine. Cook on low for 5 - 8 minutes, until all ingredients have heated through.
4. Scoop onto a platter and squeeze lime juice over the top, taste, and add salt if needed.
5. Sprinkle with fresh Italian parsley, cilantro, and enjoy immediately.
Hooray for tomato season in NC! Roasting them in t Hooray for tomato season in NC! Roasting them in the air fryer couldn’t be easier (and so incredibly flavorful!)
.
BLOG —> https://sliceofjess.com/air-fryer-roasted-cherry-tomatoes-with-shallots/
.
INGREDIENTS:
• 2 cups Cherry Tomatoes, cut in half
• 1 tbsp. Sherry Vinegar
• 1 tbsp. Olive Oil
• ½ tsp. Garlic Powder
• ½ tsp. Dried Oregano
• 1 tsp. Red Pepper Flakes
• ¼ tsp. Kosher Salt
• Black Pepper, to taste (optional)
.
DIRECTIONS:
1. Cut tomatoes in half and slice the shallot. Place them in an oven-safe bowl that will fit in your air fryer.
2. Pour over the vinegar, olive oil, seasonings and mix together.
3. Preheat the air fryer to 400F and cook for 10 minutes. Allow to cool slightly and serve!
I’m continuing my ramen adventures with this Bro I’m continuing my ramen adventures with this Browned Butter Skillet Chicken smothered in Creamy Mushroom Sauce over noods. Seriously, mind blowing.
.
BLOG —> https://sliceofjess.com/creamy-mushroom-ramen-with-brown-butter-chicken/
.
CREAMY MUSHROOM SAUCE:
• 2 tbsp. Unsalted Butter
• 1 tsp. Olive Oil
• 6oz Sliced Mushrooms
• ½ Sweet Yellow Onion, diced
• 2 Garlic Cloves, minced
• ¼ White Wine
• ¼ cup Chicken Bone Broth
• 4 oz. Cream Cheese
• ½ tbsp. Dijon Mustard
• Salt + Pepper, to taste
.
FOR THE RAMEN + CHICKEN:
• 3 Packages Ramen Noodles, cooked & drained
• 2 tbsp. Butter
• 1 lb. Chicken Breasts, cut into chunks
• Salt + Pepper, to taste
• Creamy Mushroom Sauce (recipe above)
.
OPTIONAL GARNISHES:
• Gremolata Breadcrumbs
• Fresh Parsley
• Grated Parmesan Cheese
.
DIRECTIONS:
1. MAKE THE MUSHROOM SAUCE: Melt the butter and add a splash of olive oil in a large skillet. Sauté the mushrooms and yellow onion over medium high heat for 5 - 7 minutes, or until the mushrooms start to brown. Then add the garlic and stir until fragrant, about 1 minutes. Deglaze the pan with white wine and chicken broth. Add the cream cheese and Dijon mustard, stirring constantly until incorporated. Season with salt and pepper.
2. COOK THE NOODLES: Bring a pot of water to a rapid boil. Cook noodles according to the package directions. Drain in a strainer and leave there until you're ready to enjoy.
3. FOR THE BROWN BUTTER CHICKEN: Add butter to a separate large skillet, melt and continue to heat until brown bits form. Once nutty smelling, add the chicken and sear until slightly crispy on the outside and fully cooked in the center. About 10 minutes.
4. TO PLATE THE MEAL: Add the ramen noodles to a serving platter, then top with the brown butter chicken and creamy mushroom sauce. Garnish with Gremolata Breadcrumbs, chopped parsley and grated parmesan. Enjoy immediately.
French Onion Soup is 100% the best way to end a gl French Onion Soup is 100% the best way to end a gloomy, rainy day. Don’t you agree? Mmmmmm!
.
BLOG —> https://sliceofjess.com/seriously-the-best-french-onion-soup-recipe/
.

INGREDIENTS:
• 6 Large Yellow Onions, peeled & thinly sliced
• 4 tbsp. Butter
• ½ cup Dry White Wine
• 3 Garlic Cloves, minced
• 3 tbsp All-Purpose Flour
• 6 cups Beef Bone Broth
• ½ tsp. Dried Thyme
• 2 Bay Leaves
• 1 tsp. Worcestershire
• 1 tbsp. Sherry Vinegar
• 1 tsp. Sugar, to taste
• Salt + Pepper, to taste
• 6 Slices Toasted Sourdough
• 2 cups Shredded Cheese
• Chopped Parsley, for garnish
.
DIRECTIONS:
1. Thinly slice 6 large yellow onions and set aside. Melt a half stick of butter in a large Dutch oven and then add the sliced onions. Sauté over medium heat, stirring occasionally, until caramelized. Add a splash of white wine here and there to deglaze the bottom of the pot.
2. Add the minced garlic and stir. Continue to sauté for a minute or so and then add the flour. Stir until well combined. Pour in the beef stock and then add the thyme, bay leaves, Worcestershire and sherry vinegar. Season with salt + pepper, taste, and add sugar if needed. Bring the pot to a simmer and continue to cook for 20 minutes.
3. While the soup is simmering, toast the bread and shred the cheese.
4. Ladle your desired amount of soup into an oven-safe bowl. Top each bowl with toasted bread and a big handful of cheese. Place them on a baking sheet and broil for 3 - 5 minutes, or until the cheese is melted, brown and bubbly.
5. Serve immediately with a sprinkle of fresh parsley.
Ramen. A staple. We’ve all grown up noshing on i Ramen. A staple. We’ve all grown up noshing on it. Would you like a series of recipes on different ways to use it? Let me know! I’m honestly thinking of ramen birria tacos, cacio e pepe ramen, perhaps something with a runny egg?? Yum. Is this a series you’d like? Different staples each week? Love ya’ll, thanks for being here.
.
FOR THE DRESSING:
• 1/4 cup Rice Vinegar
• 1/4 cup Avocado Oil
• 1 tsp. Toasted Sesame Oil
• 2 tbsp. Liquid Aminos
• 1 Garlic Clove, minced
• 1 tbsp. Honey 
• 1 tsp. Maple Syrup
• Salt + Pepper, to taste
.
FOR THE SALAD:
• 16 oz. Bag of Coleslaw
• 1/2 cup Slivered Almonds, toasted optional
• 3/4 lb. Chicken Chunks, cooked and chopped (14 pieces)
• 15 oz. Can Mandarin Oranges, drained
• 1 pack of Ramen Noodles, crushed
• 1/2 cup Sliced Green Onions
• 2 tbsp. Freshly Chopped Cilantro
• 1 tbsp. Black Sesame Seeds
Need a recipe to use up those lonely leftover hot Need a recipe to use up those lonely leftover hot dogs from the holiday weekend? These cheesy, dill pickle stuffed corn dog bites will have your tastebuds smitten.
.
INGREDIENTS:
• 1 box Jiffy Cornbread Mix
• 1 Egg
• 2 tbsp. Butter
• 1/3 cup Milk
• 2 tbsp. Heavy Cream
• 4 oz. Monterey Jack Cheese, shredded
• 2 tbsp. Dry Ranch Packet
• 24 Dill Pickle Chips, minced
• 8 Hot Dogs, cut into 6ths
•Ketchup + Mustard for dipping
.
DIRECTIONS:
1. Pour the cornbread mix, egg, butter, milk, cheese, ranch seasoning and minced pickle chips into a large bowl. Mix together well. 
2. Grease a mini muffin tin and spoon cheesy cornbread mixture into each hole (about halfway). 
3. Cut each hot dog into 6 chunks and press four into the middle of each muffin prior to baking. 
4. Bake at 400 for 10 minutes. Serve immediately with ketchup and mustard for dippin’.
Hooray! It’s #NationalFriedChickenDay! Let’s m Hooray! It’s #NationalFriedChickenDay! Let’s make some sandwiches!
.
BLOG + FULL VIDEO —> https://sliceofjess.com/pickle-juice-crispy-fried-chicken-sandwich/
.
FOR THE BRINE:
• 1 cup Pickle Juice
• 1 cup Buttermilk
• 4 Chicken Breasts
.
BREADING:
• 1.5 cups All Purpose Flour
• ½ cup Powdered Sugar
• 1 tbsp. Garlic Powder
• 1 tbsp. Smoked Paprika
• 1 tsp. Kosher Salt
• 1 tbsp. Freshly Cracked Black Pepper
• 2 Eggs
• ¼ cup Pickle Juice
• Vegetable Oil, for frying
.
BUTTERMILK SPICY COLESLAW:
• ¼ cup Pickle Juice
• ½ cup Buttermilk
• 4 cups Coleslaw Mix
• ¼ small Red Onion
• 1 Jalapeño, seeded and sliced
• ¼ cup loosely packed Parsley Leaves, chopped
• Salt, to taste
.
HABANERO-GARLIC AIOLI:
• 1 cup Mayonnaise
• 2 cloves Garlic, minced
• 1.5 tbsp. - 2 tbsp. Habanero Hot Sauce
.
FOR THE SANDWICH:
• 4 Brioche Hamburger Buns
 • Pickles, for garnish
.
DIRECTIONS —> on my blog!🙃
Want to revamp your pasta salad game? This version Want to revamp your pasta salad game? This version has lemon caper sauce. It’s tangy, savory and topped with fresh mozzarella and breadcrumbs!
.
BLOG —> https://sliceofjess.com/pasta-salad-with-lemon-caper-sauce/
.
INGREDIENTS:
• 16 oz. Spiral Pasta (Rotini)
• 4 tbsp. Butter
• 1 tbsp. Olive Oil
• 2 Shallots, thinly sliced
• 4 Garlic Cloves, minced
• 2 cups Dry White Wine
• 4 tbsp. Capers
• Juice of 1 Lemon, or more to taste
• 8 oz. Mozzarella Pearls
• 1 cup Panko Breadcrumbs
• ½ cup Grated Parmesan Cheese
• Red Pepper Flakes, to taste
• Italian Parsley, to taste
.
DIRECTIONS:
1. Cook the pasta according to packaged directions for al dente.
2. While the pasta is cooking, heat butter and olive oil in a large skillet over medium heat. Add shallots and cook until translucent. Then add garlic and sauté for 1 minute, or until fragrant.
3. Deglaze pan with white wine and then add the capers and lemon juice. Simmer until the sauce has reduced and thickened. About 15 minutes.
4. While the sauce cooks, add breadcrumbs and parmesan cheese to a sauté pan with a dab of butter. Constantly stir until breadcrumbs are browning. Remove and set aside.
5. Add a splash of heavy cream and simmer for another 5 minutes. Pour over the cooked pasta into the lemon-caper sauce and toss until combined. Serve immediately with a sprinkle of breadcrumbs, red pepper flakes and Italian parsley.
July 4th + an easy chili recipe go hand-n-hand. Sl July 4th + an easy chili recipe go hand-n-hand. Slather this no-bean version on burgers, hot dogs, swirled into mac & cheese and so much more!
.
BLOG —> https://sliceofjess.com/easy-chili-recipe-for-grilling-season/
.
FOR THE CHILI SEASONING:
• 2 tbsp. Chili Powder
• 1 tsp. Cumin
• ½ tsp. Paprika
• 1 tsp. Garlic Powder
• ½ tsp. Onion Powder
• 1 tsp. Mustard Powder
• 1 tsp. Oregano
• 2 tsp. Brown Sugar, or more to taste
• ½ tsp. Salt
• 1 tsp. Red Chili Flakes
.
FOR THE CHILI:
• 1 lb. Ground Beef
• 2 tbsp. Tomato Paste
• 14.5 oz can Crushed Tomatoes
• ½ cup Chicken Broth
.
DIRECTIONS:
1. Mix together all spices for the chili seasoning and set aside.
2. Add the ground beef to a large sauté pan and cook over medium heat until browned, making sure to crumble the beef as much as you can. Drain and return the meat to the sauté pan.
3. Add the chili seasoning to the ground beef and mix together. Then add the tomato paste, crushed tomatoes, and chicken broth.
4. Simmer for 10 - 15 minutes, or until most of the liquid has thickened.
5. Serve immediately over your favorite grilled items! Enjoy!
We're headed into the holiday weekend, so make sur We're headed into the holiday weekend, so make sure to whip up a batch of my Sheet Pan Roasted Corn Salsa for all your chip-dippin' munching!
.
BLOG --> https://sliceofjess.com/easy-sheet-pan-roasted-corn-salsa/
.
INGREDIENTS:
* 2 cups Corn Kernels
* 2 tbsp. Olive Oil
* 1 Red Bell Pepper, chopped
* ⅓ Red Onion, chopped
* ¼ cup Fresh Cilantro, chopped
* 1 Jalapeño, seeded and chopped
* Juice of ½ Lime (or more, if preferred)
* ½ tsp. Salt, or more to taste
.
DIRECTIONS:
1. Cut corn off the cob and mix with olive oil in a large bowl.
2. Preheat oven to 450F and chop all remaining ingredients while you wait for the oven to come to temperature.
3. Spread corn evenly on a sheet pan and roast for 10 minutes, flipping halfway through. If you'd like some extra color, turn on the broiler for a minute or two at the end.
4. Mix corn with all remaining ingredients and refrigerate for at least an hour.
5. Serve with your favorite tortilla chips and store any leftovers in an airtight container in the refrigerator. Consume leftovers within 3 days.
Load More... Follow on Instagram

Footer

Popular Posts

Apple Streusel
Fried Jalapenos
Midwood Smokehouse
Hendersonville NC
Hot Crab Dip
Philly Cheesesteak
Copyright Slice of Jess ©2021