• Skip to primary navigation
  • Skip to main content
  • Skip to primary sidebar
  • Skip to footer

Slice of Jess

Changing the way you eat, one slice at a time.

  • About
  • Press
  • Recipes
  • Travel & Dining
  • Collaborate
    • Collaborate
    • Recipe Development
    • Photography
    • MEDIA KIT
    • Privacy Policies
  • Contact Us

Eggs in Purgatory Skillet

October 28, 2017 By Jessica 1 Comment

This Eggs in Purgatory recipe is sponsored by Dietz & Watson, all opinions are mine alone and I will never promote a product I don’t enjoy myself.

Eggs in Purgatory

Greetings, friend. How is your week going? Things in my realm have changed quite drastically this past month (in a good way) and I can proudly say that I now write, photograph and travel as my full time career. 🙂

A little background: I started my blog in 2014 after we made the cross-country move to North Carolina. It originally served as my own little corner of the web where I shared a few simple photos along with recipes for my family still living in California. Fast forward three years later and it’s morphed into my own food & travel blog where I get to cook, dine, photograph and share my experiences through this platform. Needless to say, I feel very lucky and pinch myself often. Thank you for all your support, this has allowed me to spend more time with our son and do what I truly love as a living. 

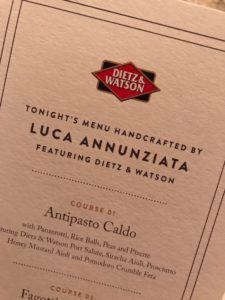
Now back to the good stuff: I had the opportunity to work with Dietz & Watson in creating a recipe using their signature meats and artisan cheeses. For inspiration, I attended their very first #ChooseTheTable event in Charlotte. This family-style dinner was held at Luca Modern Italian Kitchen where I enjoyed a five-course exclusive tasting with Executive Chef Luca Annunziata and five other food & lifestyle writers.

Everyone immediately connected with one another, gabbing about our latest and greatest recipes and travel adventures. The evening was a complete success, and I even made a new friend! I had the pleasure of sitting next to Emily Fee and her husband Myles, recent Charlotte transplants and toddler parents. We had a lot in common and got along smashingly. Make sure to check out her blog to read about her #ChooseTheTable experience.

I’m a big Spaghetti Squash fan. HUGE.

So naturally I find myself pretty excited that fall season coincides with squash season. The end of each year is filled with family gatherings and celebrations, so it’s great to have a recipe handy that you can share with everyone over a glass of bubbly and good conversation.

Eggs in Purgatory

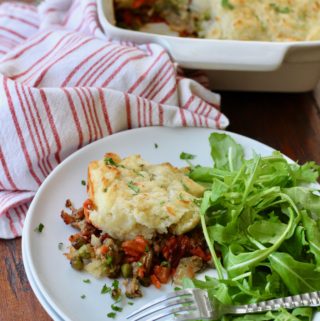
Eggs in Purgatory is one of those classic recipes that we often enjoy as a lazy breakfast, easy lunch or cozy supper.

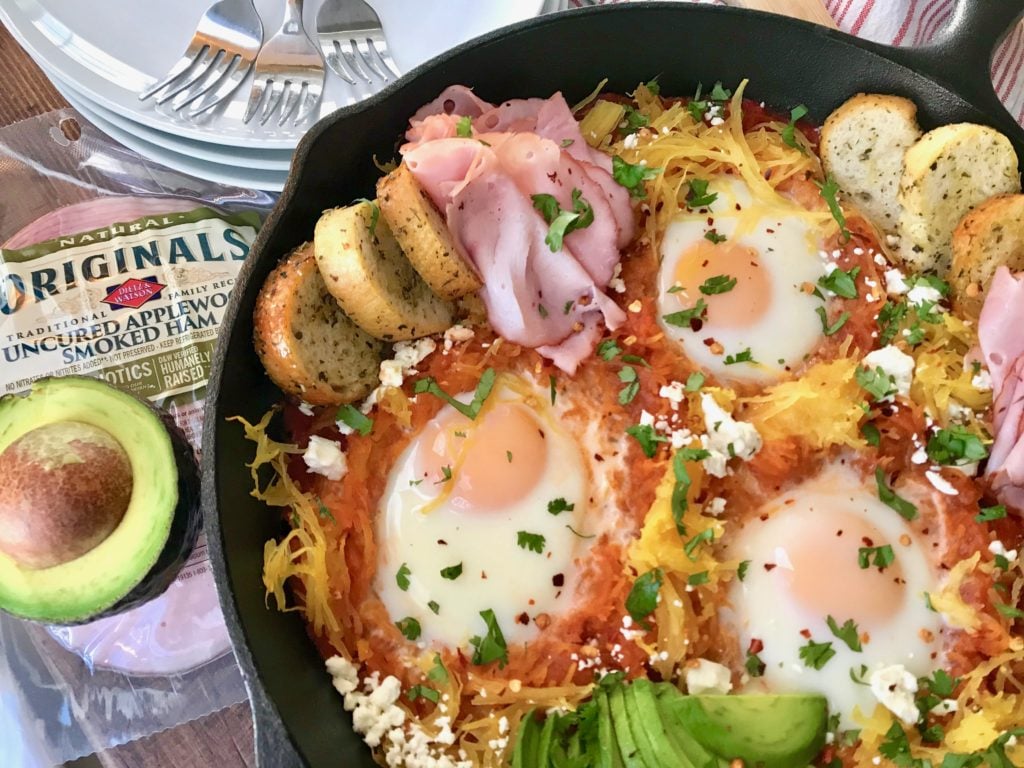
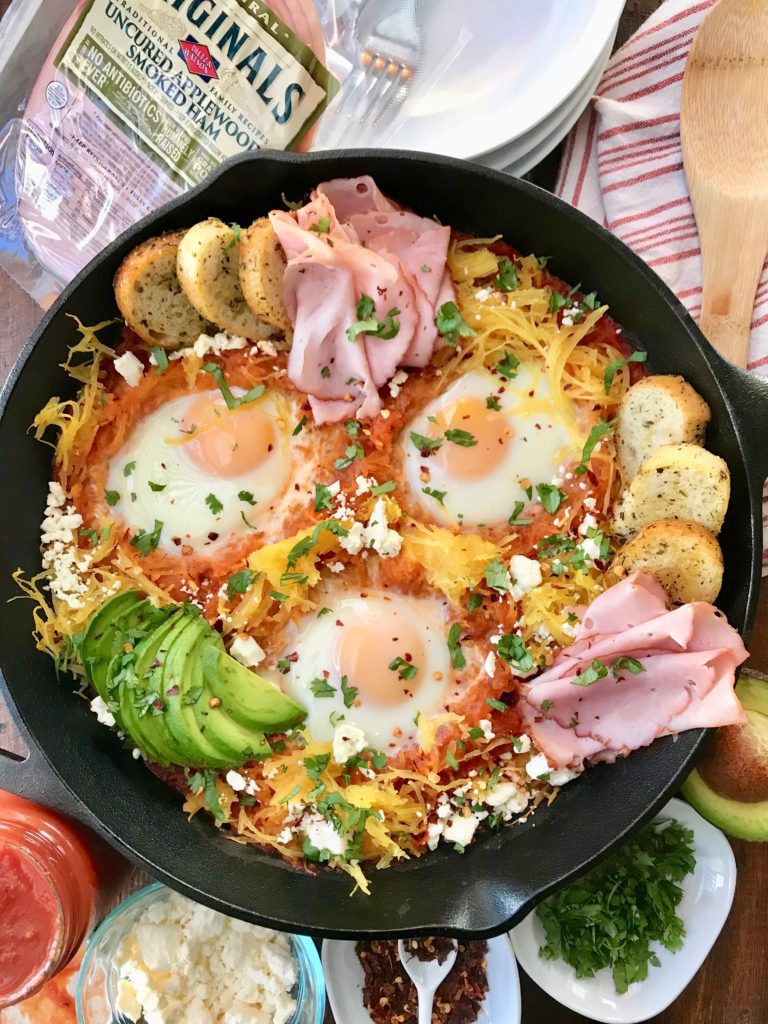
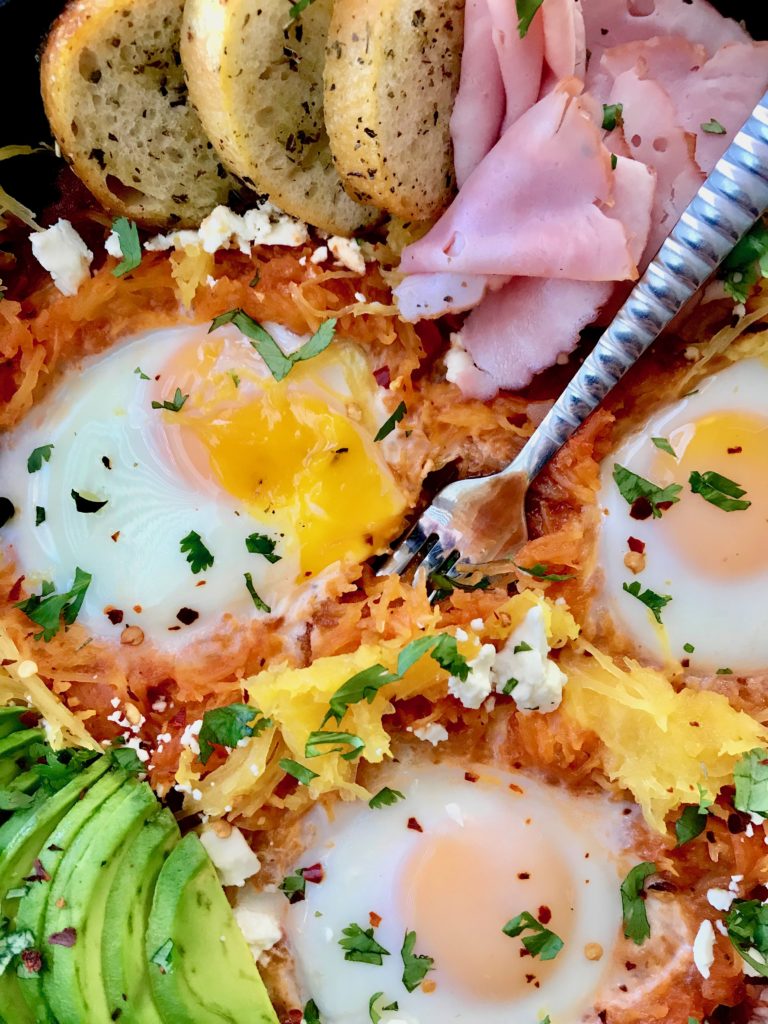
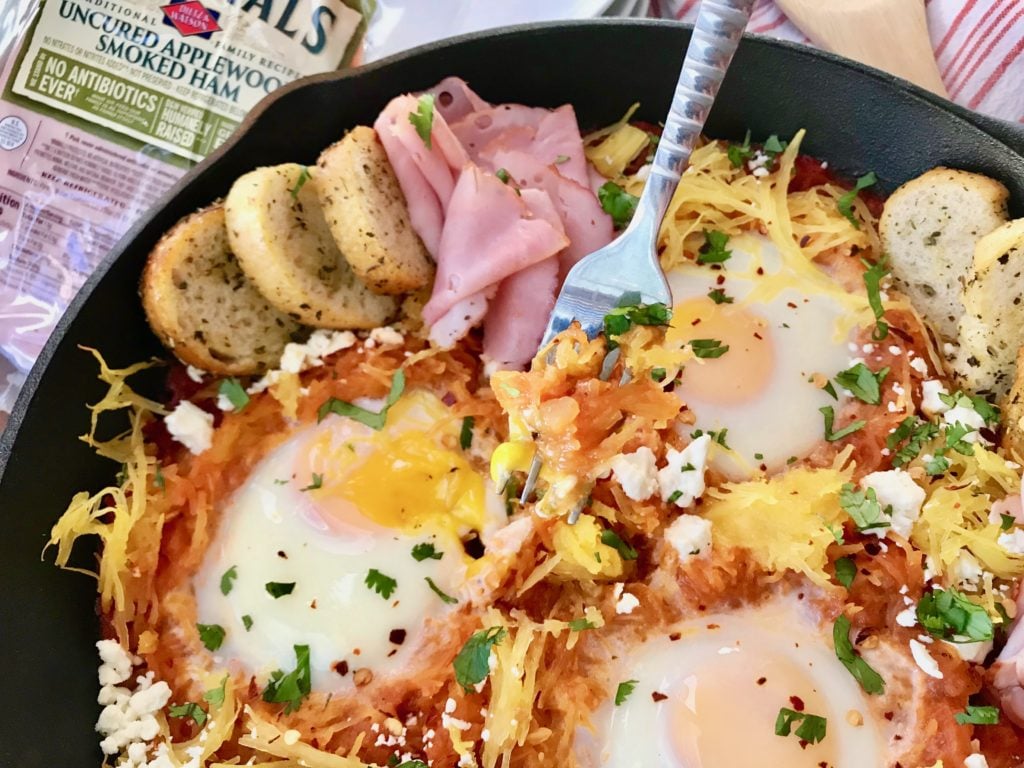
In today’s feature, I veered a little from the traditional recipe and incorporated spaghetti squash, thin slices of applewood smoked ham, sliced avocado, feta, toasted bread and fresh herbs into the mix. Adding these elements makes this skillet a show stopping conversation piece! Serve it alongside a cheese platter and wine at your next party… then watch it quickly disappear before your eyes.

Eggs in Purgatory

I partnered with Dietz & Watson for their #ChooseTheTable campaign because eating together as a family is very important to me.

I make a scratch-made meal just about every night of the week. We gather around our dining table and share our moments from the day, enjoying a little laughter and creating more memories as a family. If I’m out at an event during the evening hours, I make sure to have leftovers in our freezer so my husband and son can still enjoy a home-cooked meal together when I’m away. Dietz & Watson shares this concept, encouraging everyone to “come together over distinct flavors and an unforgettable experience”.

Oh, and did I mention how much I love Dietz & Watson’s Originals Uncured collection? Insider tip: I often ask for the butcher to cut my slices of meat paper thin so I can use them in several types of recipes.

Eggs in Purgatory

5.0 from 1 reviews
Eggs in Purgatory Skillet
 
Print
Prep time
10 mins
Cook time
25 mins
Total time
35 mins
 
My Eggs in Purgatory Skillet is a dish that's created to share with those whom you call family. I hope you enjoy it as much as we do.
Serves: 3
Ingredients
  • 1 large Spaghetti Squash
  • 1 cup of your favorite Pasta Sauce
  • 3 large Eggs
  • 8-10 slices of Dietz & Watson Uncured Applewood Smoked Ham
  • 1 tsp. Chili Flakes
  • ¼ cup Dietz & Watson Feta Cheese
  • 1 Avocado
  • Chopped Parsley
  • Toasted Baguette for serving
Instructions
  1. Cook Spaghetti Squash: You can either cook the Spaghetti Squash in the oven or microwave. To make the best use of my time, I often microwave mine. Cut in half, scrape out the seeds and place upside-down on a microwave safe plate. Cover with plastic wrap and cook on high for 10-12 minutes, until fork tender.
  2. Heat up the Pasta Sauce: While the Spaghetti Squash cooks, bring Pasta Sauce to a simmer in a large oven-proof skillet.
  3. Preheat the oven: warm to 350F.
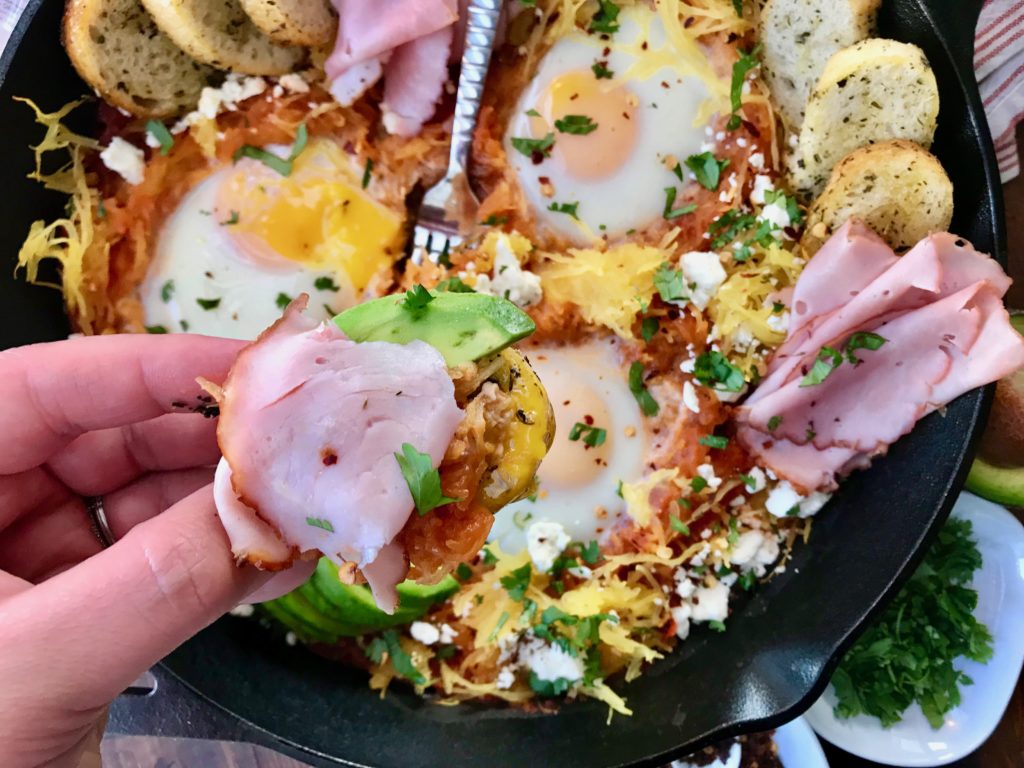
  4. Assemble the skillet: remove Spaghetti Squash threads from their shell and add to the tomato sauce. Create 3 wells in the mixture and crack an egg into each well. Place pan into the oven and let cook for 6-10 minutes, keeping a close watch so you do not overcook the eggs. Cook to your personal egg preference, but I do recommend serving this dish with over-easy eggs so you can mix the yolk into the sauce.
  5. Garnish & Enjoy: Sprinkle with Chili Flakes, Feta Cheese and Chopped Parsley. Then tuck Ham Slices, Avocado and Toasted Baguette around the edges. Eat immediately.
3.5.3251
 

Eggs in Purgatory


PIN THIS RECIPE FOR LATER:


Filed Under: Appetizers & Sides, Beef & Pork, Breakfast & Brunch, Main Dishes

Previous Post: « Midwood Smokehouse: Charlotte’s Premier BBQ Bar
Next Post: Mezcal Taberna Mexicana: Authentic Tapas Style Cuisine In The Heart of Spartanburg »

Reader Interactions

Did you make this recipe?

Tag @sliceofjess on Instagram & hashtag #sliceofjess.

Share this...
Share on facebook
Facebook
Share on pinterest
Pinterest
Share on twitter
Twitter
Share on linkedin
Linkedin

Comments

  1. Emily

    November 2, 2017 at 7:21 am

    Tried this recipe yesterday! It was amazing Jess!

    Reply

Leave a Reply Cancel reply

Your email address will not be published. Required fields are marked *

Rate this recipe:  

Primary Sidebar

Hey there, Jess here. Welcome to a slice of my kitchen! Here you'll find tidbits of my everyday life, home cooked meals and travel guides. Thanks for stopping by!

Join Our Email List!

Recent Posts

  • Unique Dining at Daniel San in Cornelius June 6, 2023
  • Golden Caramelized Mushroom Toast with Arugula June 5, 2023
  • Open-Faced Chicken Caprese Sandwich June 1, 2023
  • Skillet Gochujang Chicken Thighs May 23, 2023
  • Scratch-Made Air Fryer Chicken Nuggets May 16, 2023

Check Out My Insta :)

sliceofjess

🏡: San Francisco ➡️ Charlotte, NC
📬: Inquiries: Jess@SliceOfJess.com
⤵️: 100’s of Killer Home Cookin’ Meals

Jess Bentley | Recipe Gal
It’s NC Sweetpotato Eat Sweet Restaurant Week an It’s NC Sweetpotato Eat Sweet Restaurant Week and there’s restaurants participating state wide! Each has created a unique and tasty dish, utilizing @ncsweetpotatoes! 🍠 We had the pleasure of visiting @danielsan_cornelius to check out their entire menu and needless to say… we loved each and every bite!
.
Their creation was a plate of sushi sweetpotato rolls nestled on a bed of sweet potato purée. The mix of flavors and colors was absolutely perfect!
.
Other eatery participants who are offering sweetpotato specials June 2 - 11 include:
.
@coquinafishbar @laremacoffee @satorimeals @sassoolcafe @castironilm @themeccarestaurant @squareburgerral @statefarmersmarketrestaurant @bluejaybistro @asalidessertscafe @stormrhumbar @tonboramen
.
All participants are competing to win up to a $1,000 gift card. Each like, comment or share on a specific restaurant’s post counts as a point, so make sure to show some love to your favorite eatery! If you want to get in on all the action be sure to use #MakeitNCsweet during your visit on social media for a chance to win cool North Carolina sweetpotato swag! Go ahead and give @ncsweetpotatoes a follow while you’re at it!
.
BLOG —> https://sliceofjess.com/unique-dining-at-daniel-san-in-cornelius/
.
#EatSweetRestaurantWeek #NC#RestaurantWeek #ncsweetpotatoes #scspc #sweetpotatoes
Toasted sourdough topped with whipped cottage chee Toasted sourdough topped with whipped cottage cheese, golden and garlicy sautéed mushrooms, arugula, and fresh herbs is the best way to start your Monday!
.
BLOG —> https://sliceofjess.com/golden-caramelized-mushroom-toast-with-arugula/
.
INGREDIENTS:
1 tbsp. Olive Oil
1 tbsp. Butter
8 oz. Baby Bella Mushrooms, sliced
1 tbsp. Worcestershire
3 Garlic Cloves, minced
1 Sprig Fresh Thyme
¼ cup White Wine
1 cup Fresh Arugula
1 - 2 tsp. Salt, or more to taste
2 Slices of Sourdough Bread, toasted
1 cup Cottage Cheese
1 tbsp. Italian Parsley, minced
.
DIRECTIONS:
1. Add the olive oil and butter to a large skillet over medium-high heat. Once melted, add the sliced mushrooms and begin to sauté.
2. Once slightly caramelized on one side, toss to flip and add the Worcestershire, garlic cloves, and fresh thyme sprig. Continue to sauté until both sides are golden brown.
3. Deglaze the pan with white wine and continue to cook until absorbed. Once finished, fold-in the fresh arugula. It will wilt quickly. Season with salt, to taste.
4. While the mushrooms are finishing up, toast the sourdough slices and whip the cottage cheese in a food processor.
5. To assemble, place the toasted slices on a plate and top each one with half of the whipped cottage cheese, then half the mushroom mixture, and sprinkle with Italian parsley for garnish. Enjoy immediately.
If you know me at all, you’re well aware that I If you know me at all, you’re well aware that I heart sandwhiches. So when I discovered a new-to-me type of bread at my local @earthfare, I knew I had to make something yummy with it! I’m seriously in awe every time I shop there.
.
They’ve got a couple of super yummy summer kick-off events happening soon. See you there? June 3rd in Fort Mill and June 17 in Concord!
.
BLOG —> https://sliceofjess.com/open-faced-chicken-caprese-sandwich/
.
FOR THE CHICKEN:
6 oz. Grilled Chicken Breasts
1 tsp. Salt
1 tsp. Pepper
1 tsp. Paprika
1 tsp. Granulated Garlic
2 tbsp. Olive Oil
.
TO ASSEMBLE THE SANDWICHES:
2 Thick Slices of Bread, toasted
1 cup Arugula
4 oz. Burrata, cut in half
4 tbsp. Tomato Confit
2 tbsp. Aged Balsamic Drizzle
Fresh Chives, optional garnish
.
DIRECTIONS:
1. Place the chicken in a sealable bag and season with ingredients listed. Rub together until coated and allow to marinate for at least 10 minutes.
2. Toast the bread and set aside until you’re ready to assemble.
3. Cook the chicken on the stove top or grill until internal temperature reaches 165F. Allow to rest, covered in foil on a cutting board, for at least 10 minutes before slicing.
4. Assemble in the following order: 1 slice of bread, ½ cup of arugula, 2 ounces burrata, 2 tablespoons tomato confit, 1 tablespoon of aged balsamic, and a sprinkle of chives. Repeat with second sandwich and enjoy immediately.
.
#earthfare #sponsoredpost #earthfarepartner
Honestly, you can never go wrong with a tomato san Honestly, you can never go wrong with a tomato sandwich for lunch! While today’s version isn’t traditional, it sure was tasty. Freshly sliced & lightly toasted peasant bread, homemade truffle mayo (made with @dukes_mayonnaise, obviously), arugula, heirloom tomato, salt + pepper.
Happy #NationalHamburgerDay 🍔These sliders are Happy #NationalHamburgerDay 🍔These sliders are a solid mix of sweet, sour, and spicy… the ultimate trifecta!
.
BLOG—> https://sliceofjess.com/kimchi-burger-sliders-with-gochujang-chili-mayo/
.
CRUNCHY RAMEN SLAW:
6 oz. Uncooked Ramen Noodles
¼ cup Sesame Seeds
¼ cup Slivered Almonds
6-8 oz. of bagged Cabbage or Slaw Mix
1 head Green Onions, sliced
¼ cup Canola Oil
4 tbsp. Soy Sauce
¼ cup Rice Vinegar
2 tbsp. Sugar
.
SLiDER BURGERS:
1 lb. Ground Beef
1 tsp. Ground Ginger
1 tsp. Garlic Powder
½ tsp. Onion Powder
Salt + Pepper, to taste
12 Slider Buns
Kimchi, as needed for garnish
Fresh Jalapeños, to taste
.
GOCHUJANG CHILI MAYO
½ cup Mayonnaise
1½ tbsp. Gochujang Chili Sauce
.
DIRECTIONS:
.
CRUNCHY RAMEN SLAW:
1. Crush the uncooked ramen noodles and add those to a skillet with the almonds and sesame seeds. Brown in 1-2 tablespoons of canola oil over medium to low heat, making sure not to burn. Set aside.
2. In a large bowl, add slaw mix and sliced green onions.
3. In a small saucepan, add soy sauce, canola oil, sugar, and rice vinegar. Heat over low heat for several minutes until sugar is fully dissolved. Allow it to cool.
4. Add the crunchy ramen mixture to the bowl and top with dressing.
.
SLIDER BURGERS:
1. Mix ground beef with spices until well combined.
2. Form ball with 2-3 tablespoons of ground beef mixture and then flatten into burger patty.
3. Cook over medium high heat in grill pan or griddle for 3-4 minutes per side.
.
CHILI MAYO:
1. Mix the mayo and chili sauce until combined.
.
ASSEMBLE
1. Smear a nice dollop of mayo on both sides of the bun. Layer the bottom bun with your burger, a few pieces of kimchi, a few slices of jalapeños, and top with a solid heap of your ramen slaw.
Absolutely loving these Gochujang Chicken Thighs f Absolutely loving these Gochujang Chicken Thighs for summer.
.
BLOG —> https://sliceofjess.com/skillet-gochujang-chicken-thighs/
.
FOR THE CHICKEN MARINADE:
3 tbsp. Gochujang
3 tbsp. Brown Sugar
2 Garlic Cloves, minced
2 tbsp. Liquid Aminos
1 tbsp. Toasted Sesame Oil
1 tsp. Rice Vinegar
1 tsp. Onion Powder
1 tsp. Paprika
¼ tsp. Salt
2 lb. @smfchicken Chicken Thighs
1 tbsp. Butter
.
FOR GARNISH:
1 tbsp. Chopped Fresh Cilantro + Stems if desired
1 tsp. White Sesame Seeds
Fresh Jalapeño Slices, optional
.
DIRECTIONS:
1. Combine all the ingredients for the chicken marinade in a large Ziplog bag. Massage to combine and allow to marinate in the refrigerator for at least 30 minutes. This can also be marinated overnight.
3. Heat a cast iron skillet over medium-high heat. Remove the chicken thighs from the marinade, and shake off any excess sauce. Allow the butter to melt in the skillet and then add the chicken.
3. Cook the chicken for 10 - 15 minutes, making sure to flip halfway through. Be sure to check that the internal temperature is 165F before removing from heat.
4. Set the chicken on a cutting board or plate to rest for at least 5 minutes. Afterwards, slice and enjoy immediately.
#mysmfchicken #smfpartner
Have you ever made your own chicken nuggets at hom Have you ever made your own chicken nuggets at home? It couldn’t be simpler! Grab some ground @smfchicken, mix with pantry staples, and pop those babies in the air fryer. So fresh, so crunchy, so satisfying.
.
BLOG —> https://sliceofjess.com/scratch-made-air-fryer-chicken-nuggets/
.
INGREDIENTS:
1 Bread Slice
3 tbsp. Heavy Cream
1 tsp. Garlic Powder
2 tsp. Dried Minced Onion
1 tsp. Paprika
2 tsp. Salt
1 lb. @smfchicken Ground Chicken
1 Egg
1 cup Crushed Cornflakes
¼ cup Grated Parmesan
3 tbsp. Melted Butter
Fresh Parsley, optional for garnish
.
DIRECTIONS:
1. Preheat air fryer to 400F.
2. Add the bread, heavy cream, garlic powder, dried minced onion, paprika, and 1 teaspoon of salt to a large mixing bowl. Allow to soak for 1 - 2 minutes, or until the bread has absorbed the liquid.
3. Gently combine the soaked bread with the ground chicken.
4. Crush the cornflakes and mix together with the parmesan cheese in a large bowl. Whisk the egg in a separate bowl and set aside.
5. Form the chicken into nuggets and coat with the egg first, then the cornflake mixture.
6. Place the nuggets in the air fryer and brush the top of each one with melted butter. Air fry at 400F for 8 - 10 minutes, flipping halfway through. Nuggets are done when internal temp is 165F.
7. Garnish with fresh parsley, if desired, and serve with your preferred dipping sauce.
.
#mySMFchicken #SMFpartner
Do you see the rice dancing in the skillet? Crispy Do you see the rice dancing in the skillet? Crispy Sushi Rice is one of my favorite things! Crunchy, chewy, sweet, and savory. All the things!
.
BLOG —> https://sliceofjess.com/crispy-sushi-rice-with-sunny-eggs/
.
INGREDIENTS:
1 tbsp. Toasted Sesame Oil
1 cup Leftover Sushi Rice
2 Eggs
1 tbsp. Gochujang Hot Sauce (or favorite hot sauce)
2 tbsp. Sliced Scallions
½ Fresh Jalapeño, sliced
2 tsp. White Sesame Seeds
Salt, to taste
*See notes on how to make Sushi Rice in the blog
.
DIRECTIONS:
1. Pour the sesame oil in a large skillet over medium-high heat. Add the rice and stir to coat.
2. Let the rice to sit, unstirred, for 4 - 5 minutes to allow it to crisp on the bottom. Then toss and create two wells for the eggs.
3. Crack the eggs into the wells and cover for 2 - 3 minutes, or until the whites are set but the yolks are still runny.
4. Top with gochujang hot sauce, scallions, jalapeño slices, sesame seeds, and a touch of salt. Enjoy immediately.
It’s officially salad season! Here’s an oldie It’s officially salad season! Here’s an oldie but goodie… give my Spicy Chickpea Cucumber version a try.
.
BLOG —> https://sliceofjess.com/spicy-chickpea-cucumber-salad-recipe/
.
INGREDIENTS:
1 can Chickpeas, drained & rinsed
½ Large English Cucumber, thinly sliced
1 Fresh Jalapeño, seeded & sliced
½ small Red Onion, thinly sliced
1 clove Garlic, minced
2 tbsp. minced Fresh Cilantro
2 tbsp. chopped Fresh Dill
3 tbsp. Olive Oil
2 tbsp. White Wine Vinegar
½ tsp. Paprika
½ tsp. Cayenne
1 tsp. Kosher Salt
¼ tsp. Freshly Cracked Black Pepper
Pinch of Chili Flakes, optional garnish
(See blog for Pita Chips recipe)
.
DIRECTIONS:
1. Toss all ingredients in a large mixing bowl until well combined.
2. Refrigerate for at least an hour to let flavors blend.
3. Garnish with additional cilantro, dill and red pepper flakes, if desired before serving.
4. Store leftovers in a sealed container, refrigerated, for up to 3 days.
Heart me a delicious and easy Focaccia recipe. I d Heart me a delicious and easy Focaccia recipe. I don’t bake very often these days, but this sheet pan masterpiece might change that fact.
.
BLOG —> https://sliceofjess.com/homemade-focaccia-bread-recipe/
.
INGREDIENTS:
1¾ Warm Water
1 package Active Dry Yeast
1 tbsp. Maple Syrup
5 cups Bread Flour
2 tbsp. Course Sea Salt
1 cup Extra Virgin Olive Oil
1 tbsp. Chopped Rosemary
1 tbsp. Chopped Thyme
.
DIRECTIONS:
1. Whisk together the warm water, yeast, and maple syrup in a bowl. Set aside at room temperature for 15 minutes.
2. Add the flour, 1 tablespoon of course sea salt, ½ cup olive oil, and the yeast mixture to a stand alone mixer (KitchenAid) fitted with a dough hook. Mix on a low speed until a dough forms, about 5 minutes. Scrape down the sides, if needed.
3. Lightly coat a large mixing bowl with olive oil. Transfer the dough and cover with plastic wrap. Set the bowl in a warm place for 1 hour. The dough should double in size.
4. Drizzle a sheet pan with ¼ cup olive oil. Transfer the dough and cover with plastic wrap. Set it back in the warm place for another hour. It should double in size again.
5. Preheat the oven to 425F. Using your fingers, press the dough out to evenly fit the sheet pan. Pop any large bubbles and create holes through the dough with your fingertips.
6. Sprinkle with freshly chopped rosemary, thyme, 1 tablespoon of course sea salt, and drizzle with remaining olive oil.
7. Bake for 25 minutes, or until golden brown. Allow to cool slightly, then cut into portions and serve.
Can never go wrong with a classic… . BLOG —> h Can never go wrong with a classic…
.
BLOG —> https://sliceofjess.com/how-to-make-spanish-rice-at-home/
.
INGREDIENTS:
¼ cup Vegetable Oil
2 cups Long Grain Rice
4 Garlic Cloves, minced
3 cups Chicken Stock
15 oz. Tomato Sauce
1 tbsp. Chicken Boullion
1 tsp. Cumin
8 - 10 Cilantro Stems
1 tsp. Salt
Juice of ½ Lime
.
DIRECTIONS:
1. Add the oil to a frying pan over medium-high heat. Sauté the rice until golden brown, about 5 - 8 minutes, then transfer to a large stock pot. Add the minced garlic to the frying pan and cook for 1 minute.
2. Pour in the sautéed garlic, chicken stock, tomato sauce, chicken bouillon, cumin, and mix in the cilantro stems to the rice in the large stock pot. Simmer for 25 - 30 minutes, or until the liquid has absorbed.
3. Remove the cilantro stems and season with salt and lime juice. Add more to taste, if needed. Serve immediately.
Delicious weekend vibes with these Korean Ground C Delicious weekend vibes with these Korean Ground Chicken Nachos. That is all.
.
BLOG —> https://sliceofjess.com/korean-ground-chicken-nachos/
.
FOR THE CHICKEN:
2 tbsp. Sesame Oil
4 Garlic Cloves, minced
1 tbsp. Brown Sugar
2 tbsp. Liquid Aminos
¼ tsp. Ground Ginger
1 lb. @smfchicken Ground Chicken
.
SPICY DRIZZLE:
2 tsp. Sriracha
2 tsp. Mayonnaise
1 tsp. Lime Juice
.
TO ASSEMBLE THE NACHOS:
4 cups Tortilla Chips
8 oz. Monterey Jack, shredded
1 cup Kimchi
Fresh Cilantro, as desired
1 tbsp. White Sesame Seeds
1 tbsp. Red Pepper Flakes, optional
.
DIRECTIONS:
1. Add the ingredients for the chicken to a large skillet. Break apart the meat and sauté until browned and slightly crispy, about 10 - 15 minutes.
2. Meanwhile, whisk together all ingredients for the Sriracha drizzle and set aside in the refrigerator until you’re ready to serve.
3. Preheat oven to 400F. Layer half the tortilla chips, cheese, and kimchi. Repeat a second layer. Bake for 5 minutes, or until cheese has melted.
4. Top with cilantro, sesame seeds, red pepper flakes, and a drizzle of the spicy sauce. Enjoy immediatly.
#mysmfchicken @smfchicken #smfpartner
We’re hosting family for the next few days, so I We’re hosting family for the next few days, so I’ve been cooking up a storm. These Banh Mi Sliders are a fun afternoon app that feeds a crowd. Happy Weekending, friends!
.
BLOG —> https://sliceofjess.com/fully-loaded-lemongrass-banh-mi-burger-sliders/
.
FOR THE GROUND BEEF PATTIES:
• 1 lb. @verdefarms 85/15 Ground Beef
• 4 Garlic Cloves, minced
• 1 tsp. Grated Ginger
• 2 tsp. Lemongrass Purée
• 1 tbsp. Soy Sauce
• Juice + Zest of 1 Lime
• 2 tbsp. Butter
.
FOR THE SLIDERS:
• 6 French Rolls, toasted
• ½ cup Mayonnaise
• 1 tbsp. Habanero Sauce
• Pickled Carrots & Radish, as needed
• ½ English Cucumber, thinly sliced
• ¼ cup Fresh Cilantro, or more if desired
• 2 Jalapeño Peppers, thinly sliced
.
DIRECTIONS:
1. PREP THE SLIDER PATTIES: Mix the ground beef with minced garlic, grated ginger, lemongrass, soy sauce, zest and juice of 1 lime. Divide into six patties and set aside.
2. COOK THE SLIDERS: Add the beef patties to a large skillet over medium heat with a couple tabs of butter. Cook each patty for 4 - 5 minutes, flipping halfway through. I prefer mine medium-well, so the internal temperature should be between 150 - 155F. Toast the buns during this time, if desired.
3. TO ASSEMBLE: Mix the mayonnaise and habanero sauce together in a small bowl. Slather both sides of the toasted slider rolls with the spicy mayo. Then add the cooked patties to each bottom half and top each with pickled carrots, radish, fresh cucumber, cilantro, and jalapeño slices. Top each with second half of the buns and enjoy immediately.
#verdefarms #grassfedbeef #grassfed #organicbeef #thefreshmarket
You can’t live in the south without a yellow squ You can’t live in the south without a yellow squash casserole in your cooking rolodex. This one is my healthier version for spring and summer.
.
BLOG —> https://sliceofjess.com/lightened-up-yellow-squash-casserole/
.
INGREDIENTS:
½ Baguette, sliced and toasted (1 cup crumbled)
½ cup 2% Cottage Cheese
2 tbsp. Olive Oil
1 Yellow Onion, finely sliced
½ Yellow Bell Pepper, minced
2 Garlic Cloves, minced
3 Yellow Summer Squash, sliced into rounds
1 tsp. Salt
1 tsp. Red Pepper Flakes
1 Egg
⅓ cup Shredded Monterey Jack
½ cup Grated Parmesan
2 tbsp. Chopped Italian Parsley
1 tsp. Dried Basil
2 tbsp. Butter, sliced into small chunks
.
DIRECTIONS:
1. Place the toasted baguette in the food processor and pulse until crumbled. Pour out into a bowl and set aside.
2. In the same processor, add the cottage cheese. Pulse until whipped. Place in the refrigerator until you’re ready to use.
3. Add olive oil, onions, and bell pepper to a large skillet over medium-high heat. Sauté until softened, about 5 minutes. Then add the garlic and continue to cook until fragrant, about 1 minute. Remove from the pan.
4. Using the same pan, add the yellow squash rounds. Saute for 10 minutes, or until softened. Then season with salt and red pepper flakes. Mix both the onion mixture and squash in a large baking dish until well combined.
5. Place the whipped cottage cheese in a bowl and mix together with an egg, ¼ cup parmesan, fresh parsley, and dried basil.
6. Fold the cottage cheese mixture and half of the breadcrumbs with the squash in the baking dish. Top with shredded cheese, remaining breadcrumbs, and parmesan. Randomly add small chunks of butter throughout.
7. Bake in a 350F oven for 25 minutes, or until the casserole is set and the top is golden. Serve immediately with fresh parsley for garnish.
I’m a big fan of chickpeas, so finding newish wa I’m a big fan of chickpeas, so finding newish ways to serve them is super fun for me. These North African Chickpea Patties in Spicy Braai Sauce are crunchy on the outside, and have pillowy interior. So good.
.
BLOG —> https://sliceofjess.com/north-african-chickpea-patties-in-spicy-braai-sauce/
.
INGREDIENTS:
1 cup Fonio
15.5 oz. Chickpeas, drained
¼ Yellow Onion
3 Garlic Cloves
¼ cup Italian Parsley Leaves
1 tbsp. Liquid Aminos
1 Habanero Pepper
1 tbsp. Chicken Bullion
1 tsp. Paprika
½ tsp. Salt, or more to taste
Cilantro, for garnish
.
DIRECTIONS:
1. Cook the Fonio according to packaged directions and set aside.
2. Add all remaining ingredients, except for the cilantro, to a large food processor with the cooked Fonio. Pulse until smooth, scraping down the ingredients if needed. Place into the refrigerator for 10 minutes to rest and slightly harden.
3. Oil a baking sheet and form the batter into 15 patties.
4. Bake in a 450F preheated oven for 20 - 25 minutes, making sure to flip halfway through.
5. Garnish with cilantro and serve immediately with Spicy Braai Sauce.
We love this Egg and Avocado Crostini for weekend We love this Egg and Avocado Crostini for weekend brunch. They’re a low-fuss, easy-to-make combo of spring and summer flavors!
.
BLOG —> https://sliceofjess.com/how-to-make-crostini-with-egg-and-avocado/
.
INGREDIENTS: 
1 Baguette
1 tbsp. Olive Oil
3 Eggs
3 tbsp. Milk
1 tbsp. Butter
Salt + Pepper
1 Avocado
1½ tsp. Lemon Juice
½ cup Chopped Tomatoes
½ cup Shredded Parmesan
.
DIRECTIONS:
1. PREHEAT oven to 350° F. Slice baguette into about 16 slices. Lay slices on greased baking sheet; brush tops with olive oil. Bake for about 5 minutes or until lightly browned and toasted.
2. BEAT eggs and milk in bowl until blended. Melt butter in small skillet set over medium-low heat; swirling pan to coat bottom.
3. POUR egg mixture into skillet. As eggs start to cook, push, pull and fold eggs with spatula frequently until all egg is cooked and no liquid remains. Remove from heat. Season with salt and pepper.
4. MASH together avocado, lemon juice and pinch of salt in separate bowl; spoon over slices of baguette to cover most of the surface on top. Spoon scrambled eggs over avocado.
5. TOP with chopped tomatoes and sprinkle with Parmesan.
Happy #NationalGrilledCheeseDay! Happy #NationalGrilledCheeseDay!
Looking for a way to use up all those leftover #ea Looking for a way to use up all those leftover #easter eggs? Some of the BEST recipes are made with the simplest of ingredients. Perfectly boiled eggs are chopped and folded together with mayonnaise, Dijon mustard, celery, jalapeño, green onions, herbs, and spices. Serve it on a toasted waffle for the ultimate sweet & savory experience.
.
BLOG —> https://sliceofjess.com/the-most-delicious-egg-salad-sandwich-recipe/
.
FOR THE EGG SALAD:
• 8 Eggs
• 4 tbsp. Mayonnaise
• 1 tsp. Dijon Mustard
• 1 tsp. Smoked Paprika
• Dash of Garlic Powder
• ½ rib Celery, finely diced
• 1 tbsp. Chopped Green Onions (2 spears)
• ½ Jalapeño, seeded & chopped
• 1 tsp. Chopped Dill
• Salt + Pepper, to taste
.
FOR THE SANDWICH:
• 8 Toasted Waffles (or bread of choice)
• Lettuce, as needed
• Mayonnaise, if preferred
.
DIRECTIONS:
1. Add eggs to a saucepan and fill with cold water. Bring to a boil, cover and immediately turn off the heat. Allow eggs to cook for 10 - 12 minutes.
2. Take the eggs out of the water and place them in an ice bath to stop the cooking process.
3. Peel eggs and cut them in half. Separate the egg yolks and mix them with mayonnaise, dijon mustard, smoked paprika, and garlic powder.
4. Roughly chop the egg whites, jalapeño, celery, green onions and dill. Fold into the yolk mixture. Season with salt and pepper, to taste.
5. Serve egg salad on your favorite waffles or sliced bread with lettuce and additional mayonnaise, if preferred.
Happy Easter Weekend, friends! If you need a quick Happy Easter Weekend, friends! If you need a quick, festive, and easy recipe for entertaining… this is it!
.
BLOG —> https://sliceofjess.com/mini-bacon-onion-quiche-in-phyllo-shells/
.
INGREDIENTS:
30 Mini Phyllo Shells, 1 ½ inches in diameter
3 Eggs
⅓ cup Half and Half
¾ cup Shredded Cheddar Cheese
2 tbsp. Real Bacon Bits
1 tsp. Dried Minced Onion
Fresh Chives, for garnish
.
DIRECTIONS:
1. Place phyllo shells on baking sheet. In a mixing bowl, beat together eggs, half and half, cheese, bacon bits and onion.
2. Spoon 2 teaspoons of filling into each fill-o shell. Bake at 375ºF until quiches puff and turn slightly brown or about 15-20 minutes.
3. Garnish with fresh chives, if desired.
The bird is the word… Heart me some Chicken Picc The bird is the word… Heart me some Chicken Piccata. This here is my air fryer version and it’s freaking spectacular.
.
BLOG —> https://sliceofjess.com/air-fryer-lemon-chicken-piccata/
.
FOR THE CHICKEN:
2 @smfchicken Breasts, sliced in half
1 tsp. Salt
1 tsp. Black Pepper
2 Eggs
1 cup Finely Crushed Cornflakes
3 tbsp. Grated Parmesan
Cooking Spray, as needed
.
FOR THE WHITE WINE SAUCE:
¼ cup Salted Butter
3 Garlic Cloves, minced
2 tbsp. All-Purpose Flour
½ cup Dry White Wine
½ cup Chicken Broth
¼ cup Lemon Juice
3 tbsp. Capers, drained
Fresh Parsley, for garnish
.
DIRECTIONS:
1. Cut the chicken in half, lengthwise. Sprinkle all sides with salt and pepper.
2. Whisk together the eggs in a large bowl and set aside. 3. Crush the cornflakes and mix together with the parmesan in a second bowl. Dip the chicken in the eggs and then the cornflakes - making sure to press down so they’re coated well.
4. Preheat the air fryer to 375F. Spray the interior of the air fryer or the chicken directly so it doesn’t stick. Air fry for 6 - 8 minutes, turning over halfway if needed. Check to make sure the internal temp is 165F.
5. While the chicken is cooking, make the sauce. Melt butter in a sauté pan and then add the garlic. Continue to sauté until fragrant, about 1 minute. Next add the flour and whisk together with the butter until slightly browned.
Pour over the white wine and chicken broth to deglaze. Then add the lemon juice and simmer for 2 - 3 minutes. Finish with the capers and pull off the heat.
6. Plate the chicken with a heavy drizzle of the white wine sauce and garnish with fresh parsley. Enjoy immediately.
Load More... Follow on Instagram

Footer

Popular Posts

Dessert Cheeseball
Pesto Pasta Recipe
Thanksgiving Dressing
Chicken Salad
Chickpea Cucumber Salad
Copyright Slice of Jess ©2023