• Skip to primary navigation
  • Skip to main content
  • Skip to primary sidebar
  • Skip to footer

Slice of Jess

Changing the way you eat, one slice at a time.

  • About
  • Press
  • Recipes
  • Travel & Dining
  • Collaborate
    • Collaborate
    • Recipe Development
    • Photography
    • MEDIA KIT
    • Privacy Policies
  • Contact Us

Creating The Perfect Newborn Photography Session

August 31, 2018 By Jessica Leave a Comment

Welcoming a sweet, squishy baby to your growing family has to be one of life’s most precious moments. In this post, I go over five newborn photography tips on how to capture your little one’s debut with your own camera.

Newborn Photography

Our second son, Gavin, is roughly a week old… and our hearts are filled with so much joy. He seriously makes our family complete. Lifestyle and portrait photography has always been a passion of mine, so naturally I couldn’t wait to take some shots of our newborn (along with his older brother).

Newborn Photography

While many parents choose to hire a professional photographer for these sessions, I’m usually pretty excited to capture these moments on my own. I totally understand that it might be a little intimidating to be the one behind the camera… and that’s completely normal. So here are five tips to help make this experience a little less stressful and a lot more fun.

Newborn Photography

(1) UTILIZE NATURAL LIGHTING & TEXTURES:

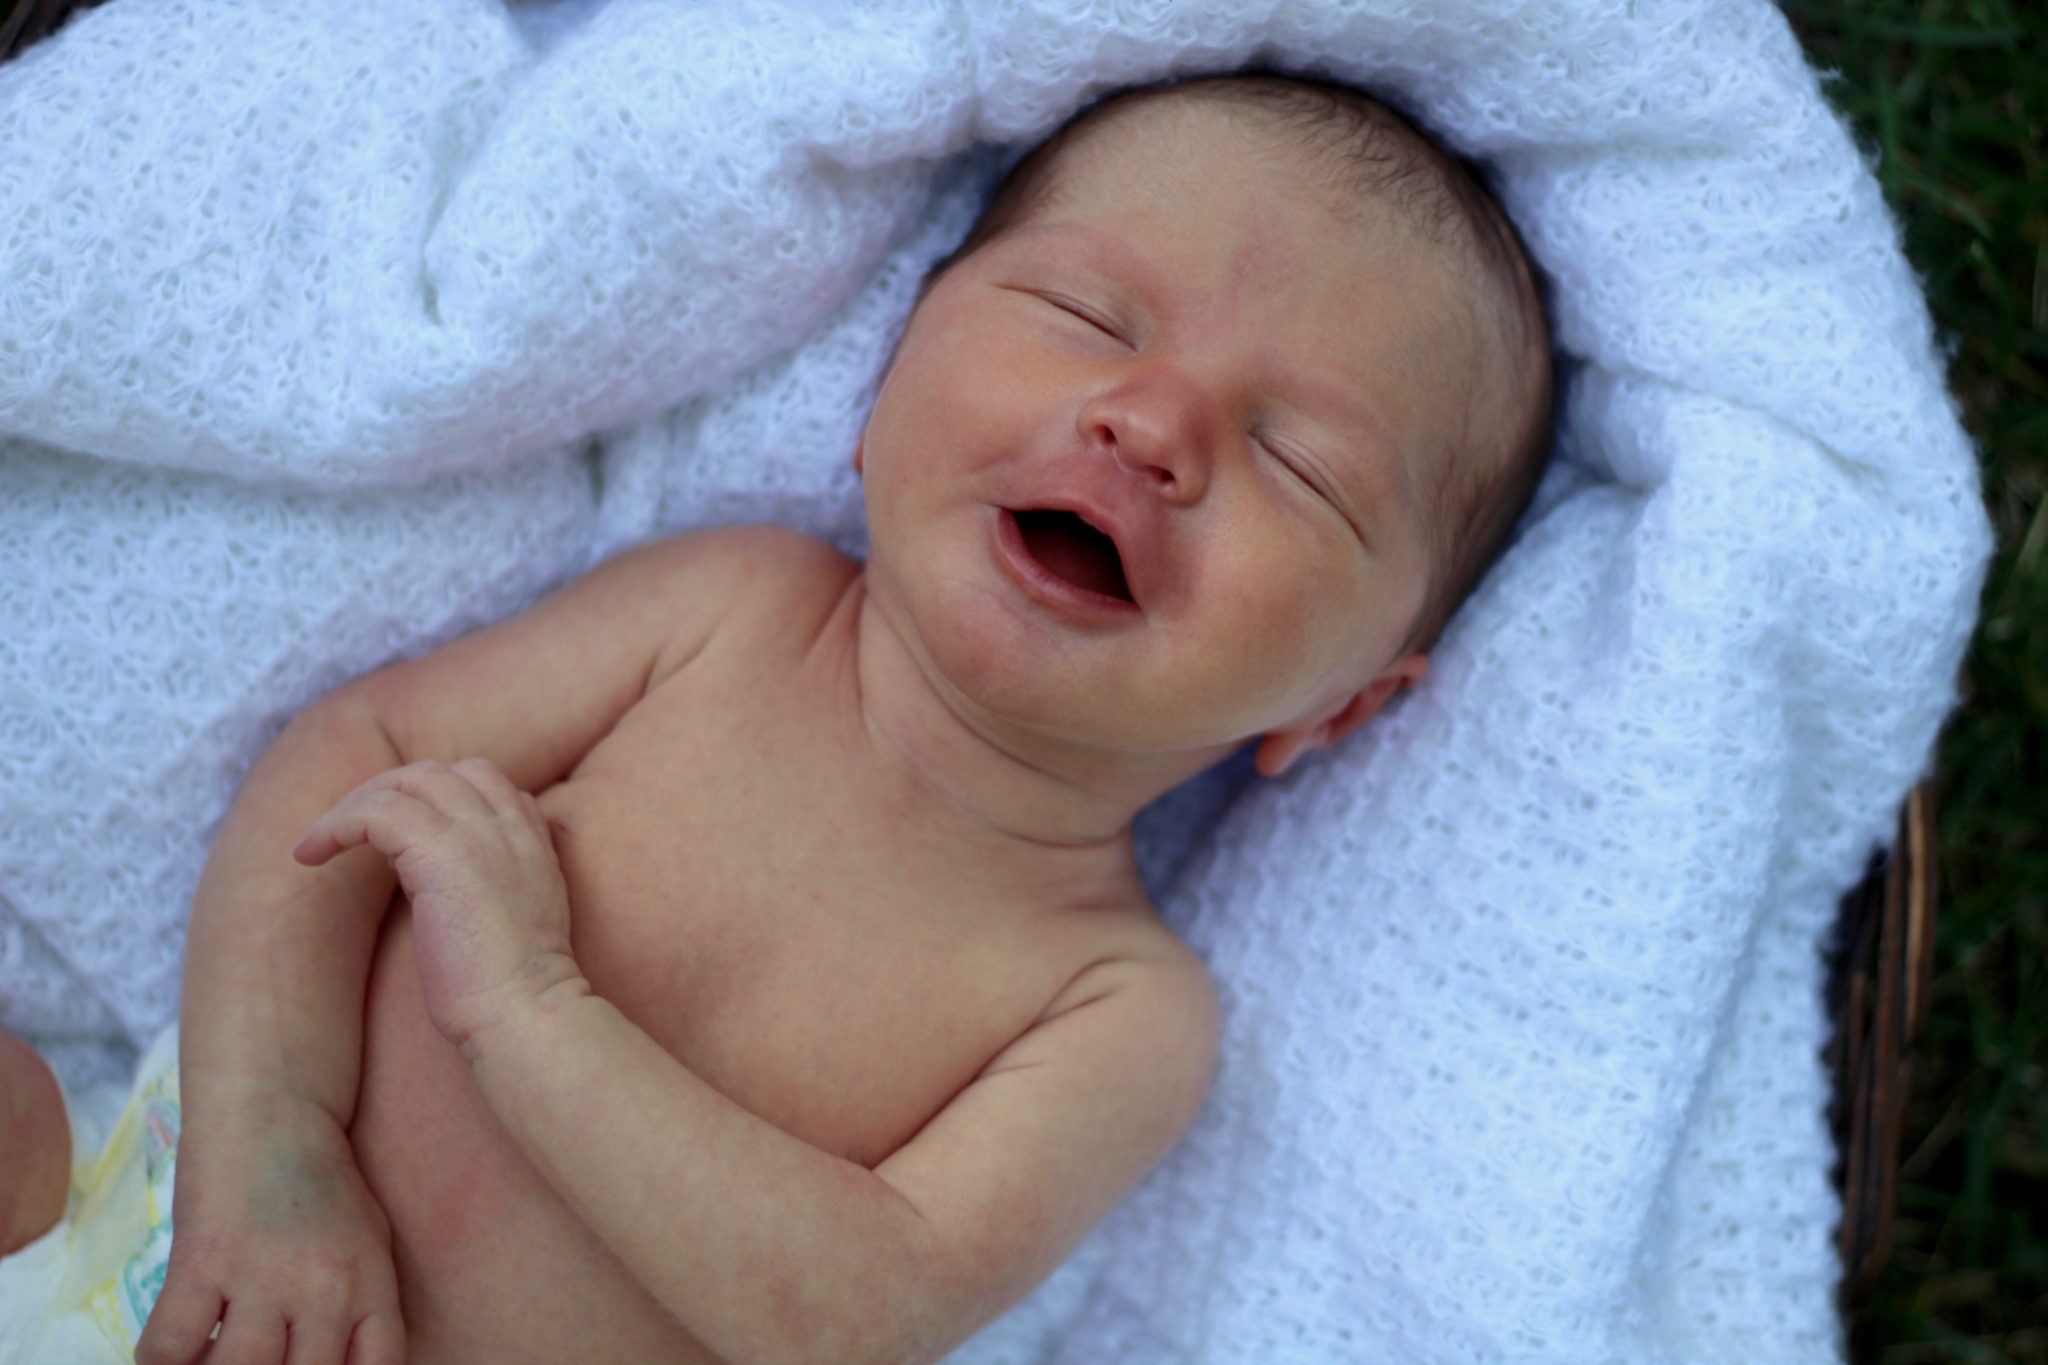
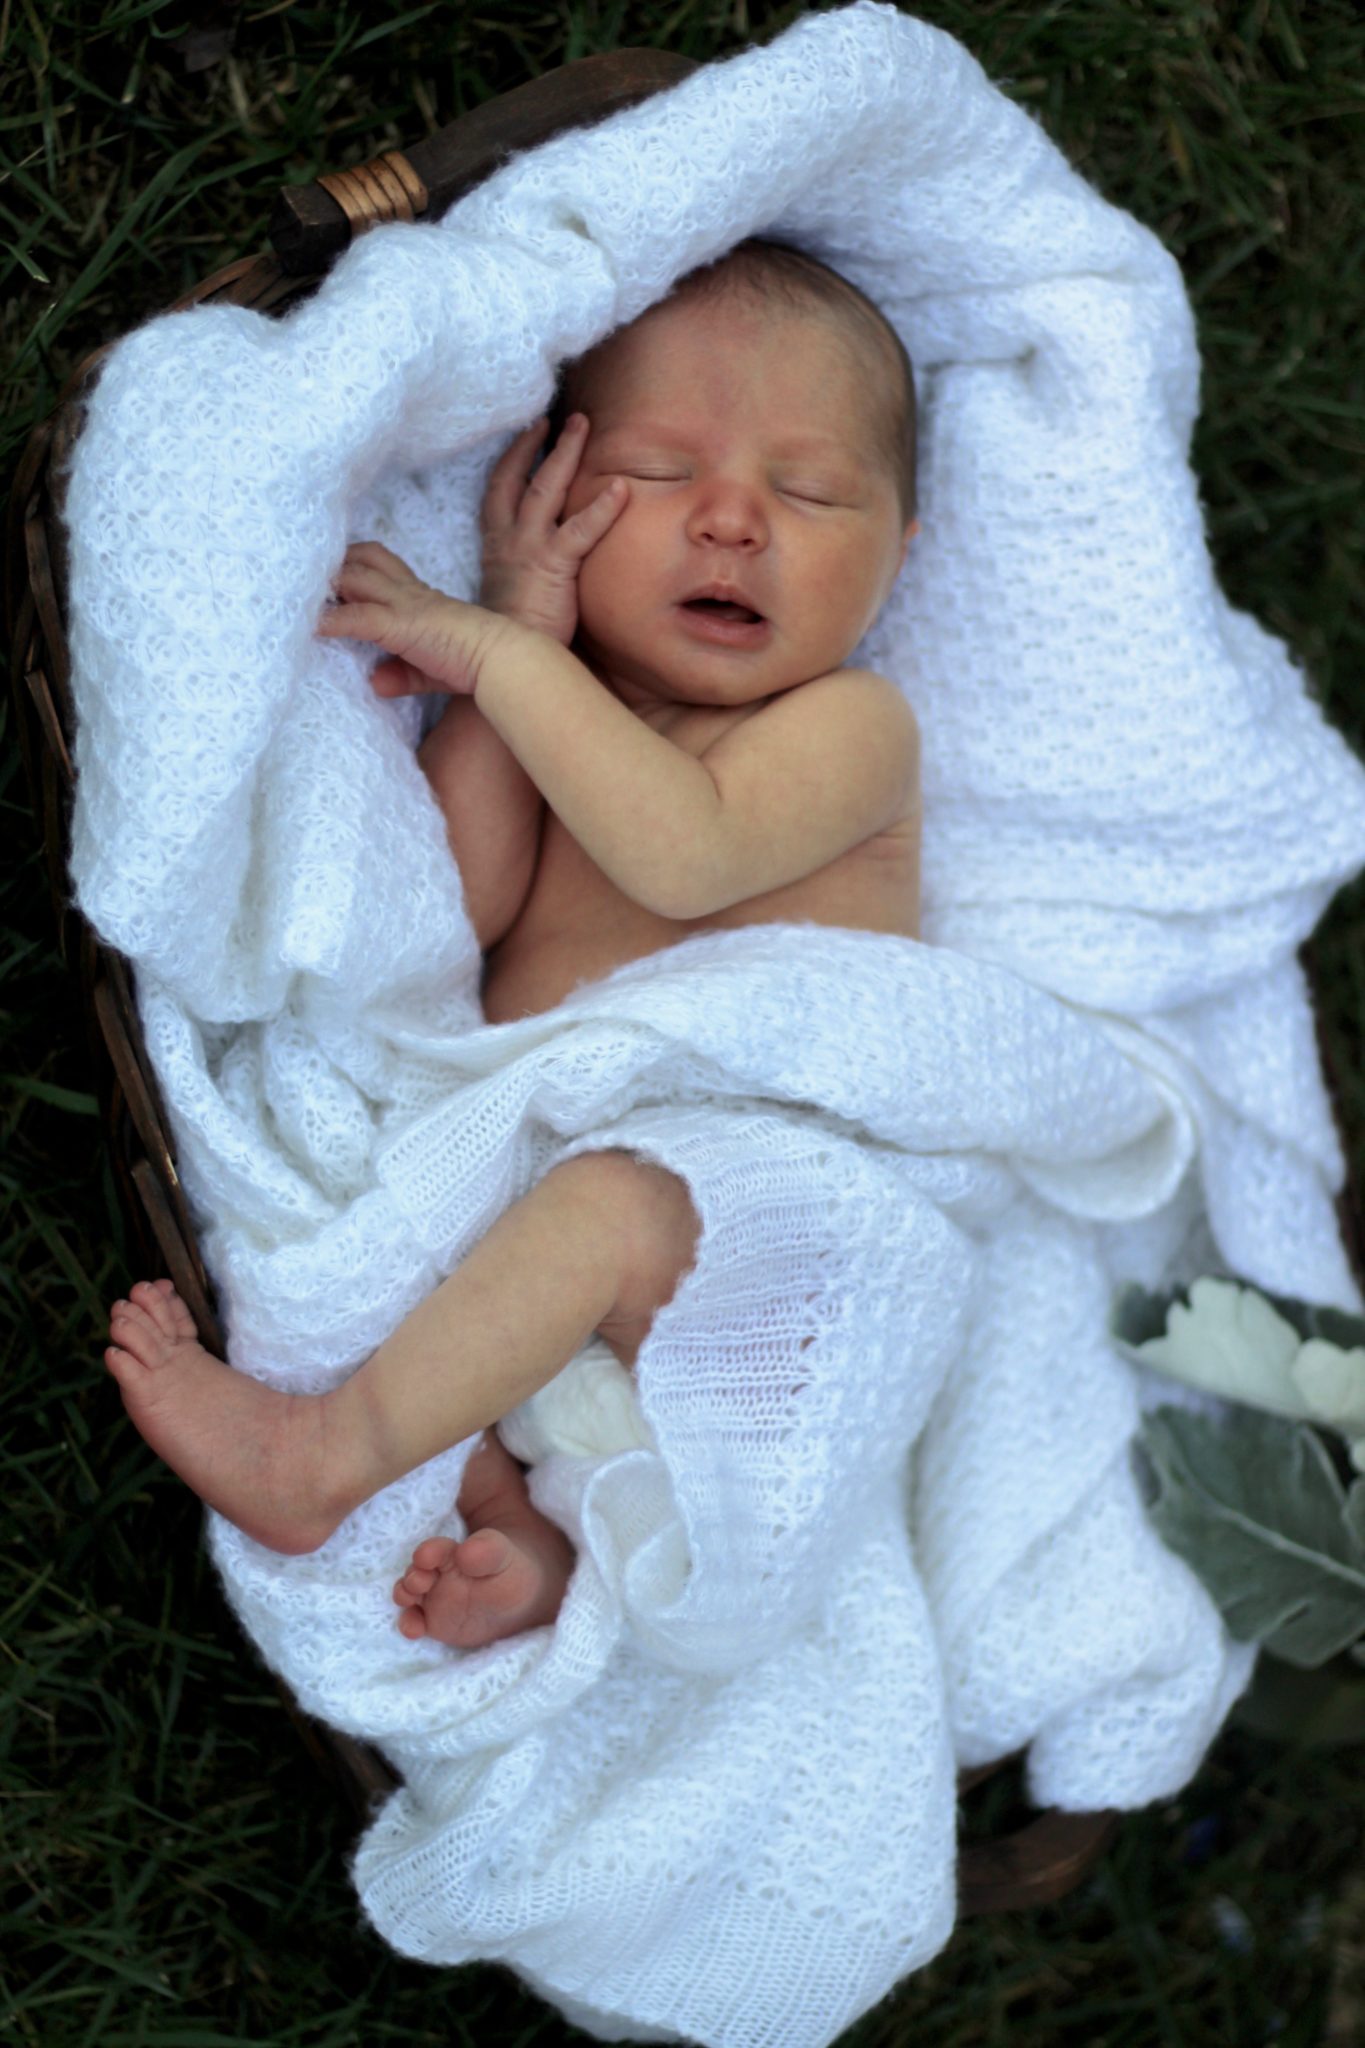
I cannot emphasize this enough, always opt for natural light when you have access to it. I took these photographs at our neighborhood park, in a slightly shaded area, around 9:30AM. You want to avoid direct sunlight, so I find that the early morning and late afternoon hours work best for outdoor photography.

Taking your own family portraits does not have to be expensive. I grabbed items we already had laying around the house, so the pictures you see here literally cost absolutely nothing. Don’t be afraid to utilize multiple textures and colors. The basket was leftover from Easter, flowers were from my mother-in-law and the white blanket usually lives on the back of our living room chair. By using what you already have on hand, I feel that it makes the end result completely priceless. For example, I will always think of these newborn moments when I cuddle on the couch with this white chunky blanket to watch a movie.

Newborn Photography

(2) PLAY WITH DIFFERENT ANGLES & FILTERS:

Instead of staying stationary for each photograph, get up and move around. Take a few pictures up close and then another from farther away. Don’t be afraid to lay down in the grass to catch a non-traditional perspective. You may end up with an entirely different photograph than planned (and absolutely love it).

Personal Note: One of my favorite things about taking my own pictures is having access to “the outtakes”. These are the shots that a professional might not include in your final package. Perhaps the angle is slightly off (pictured above), or one of your children is goofing off (pictured below). No matter what the “issue” is, I personally love having these as a part of my collection.

Newborn Photography

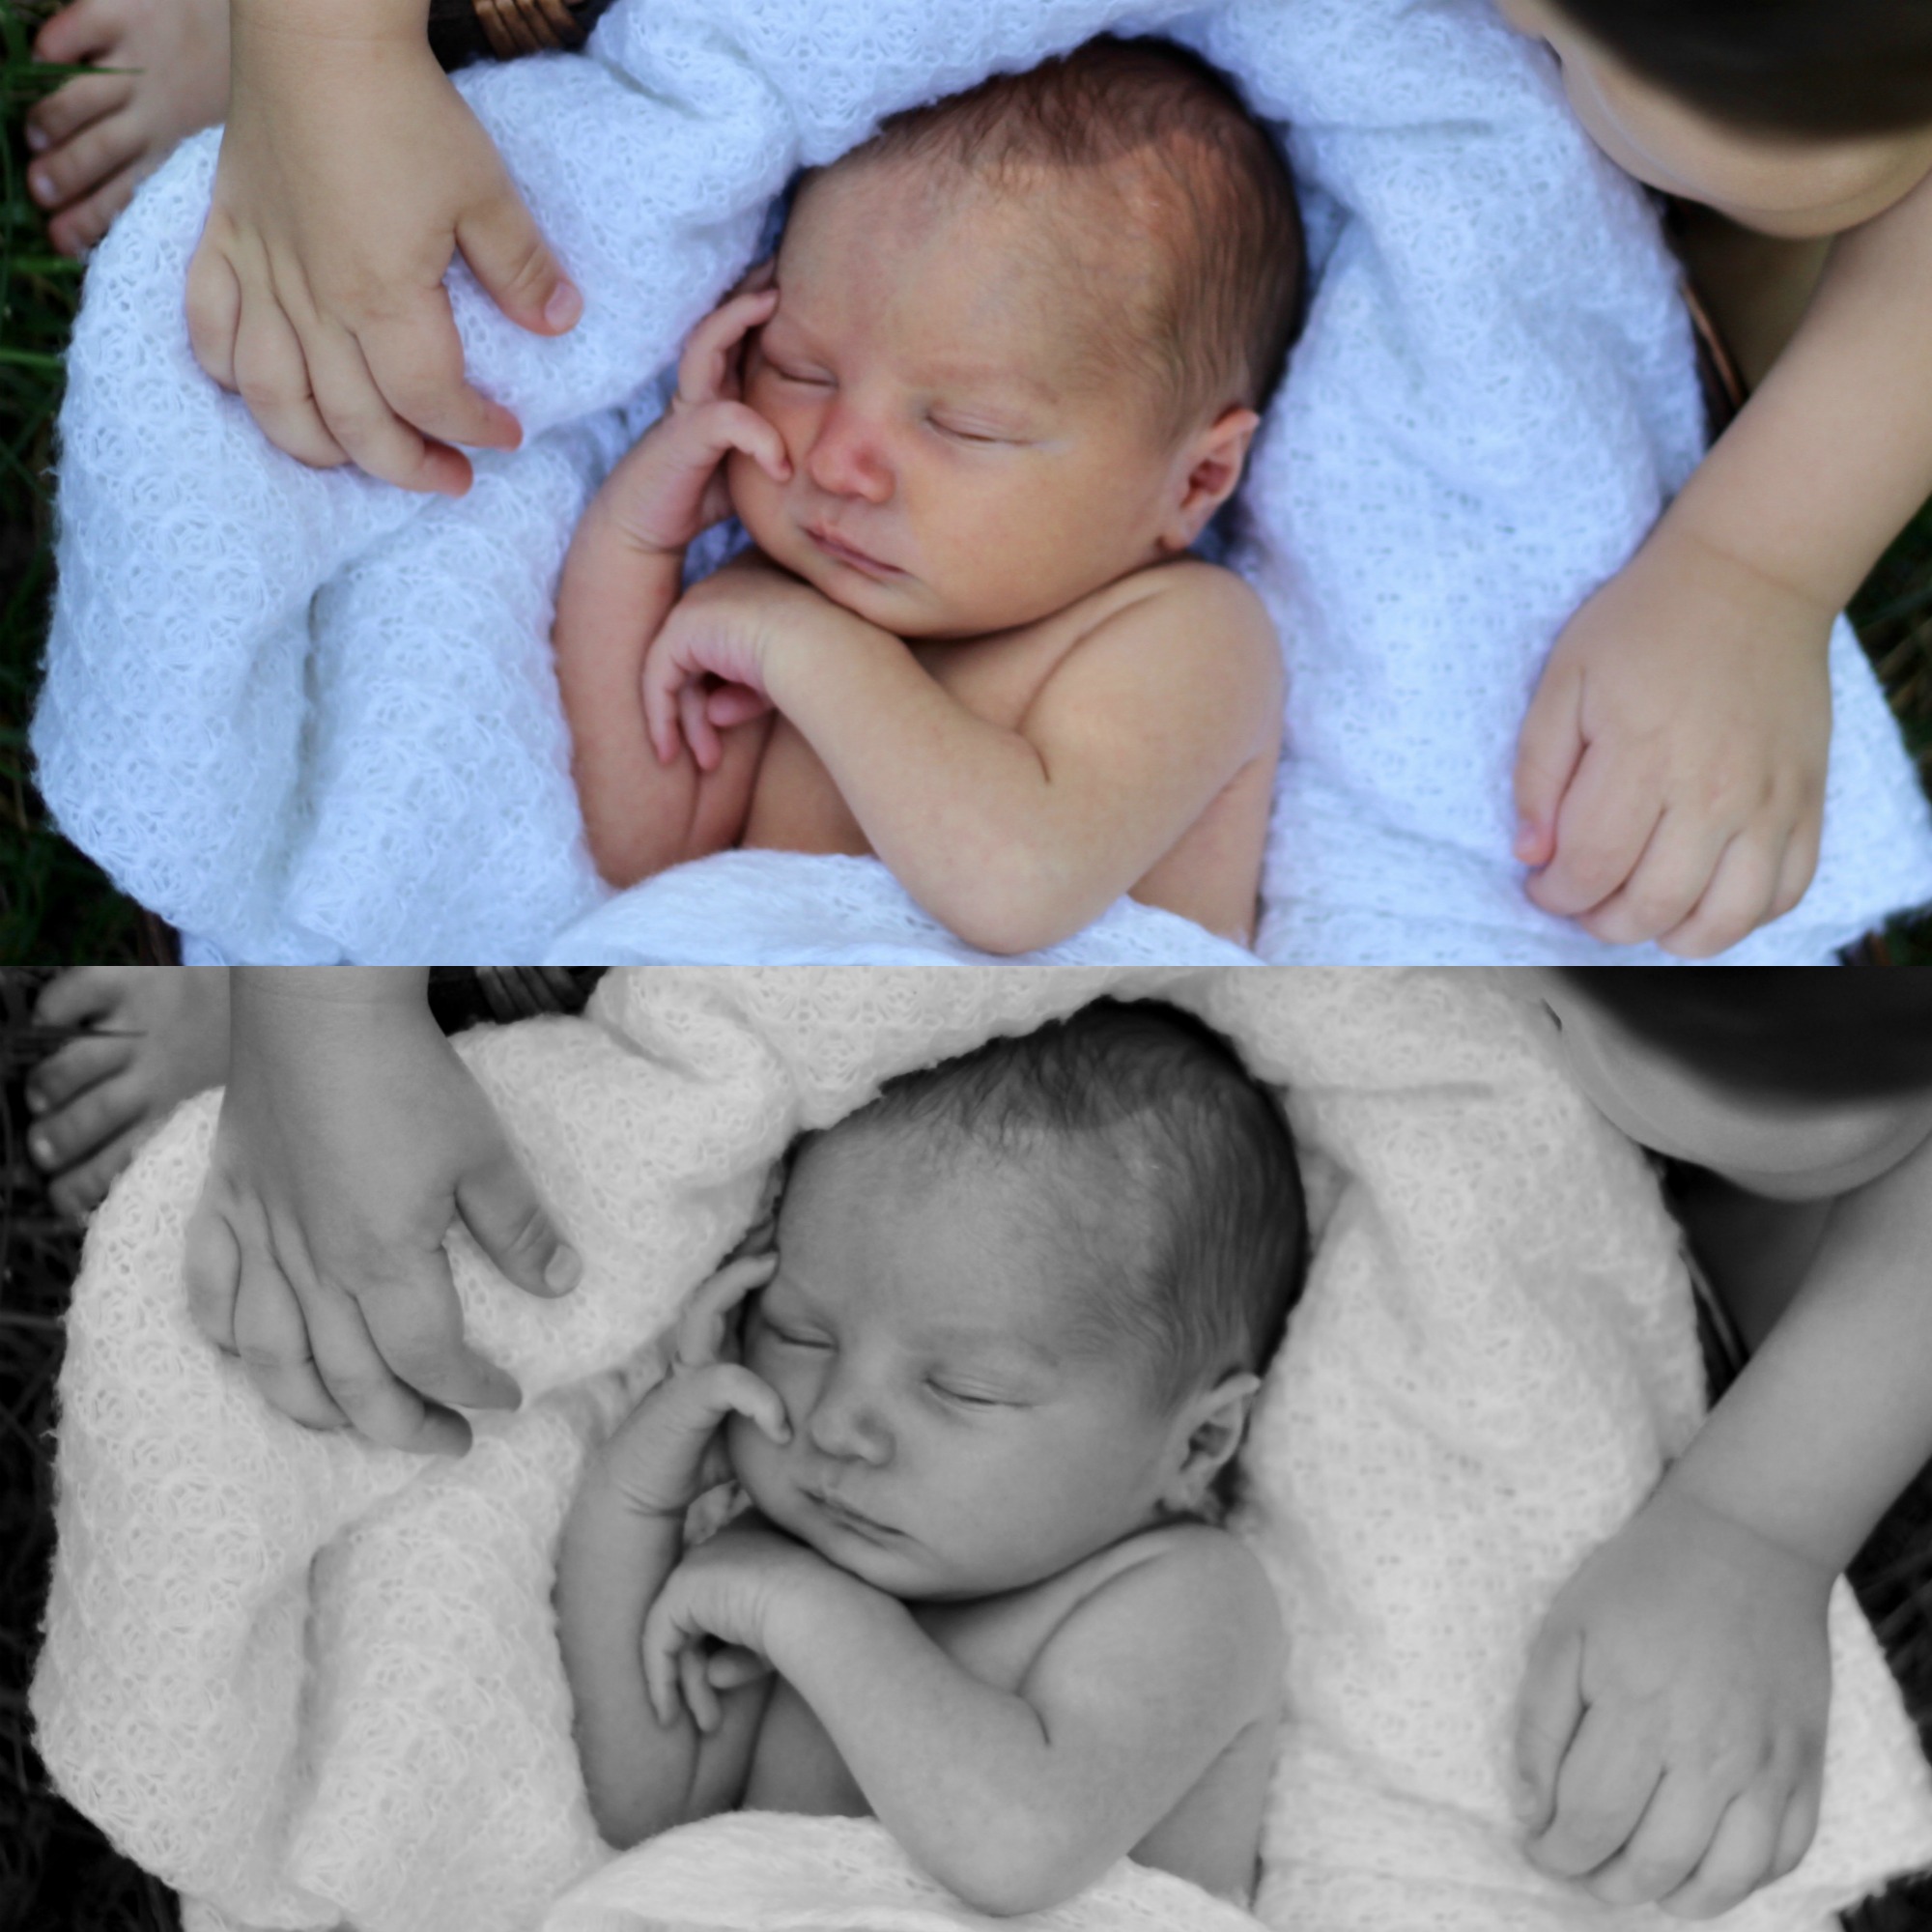
I also suggest that you play around with filters and see if you prefer the moment in another color. You can completely change the mood of a snapshot by simply switching it to black and white (or sepia). See the example below.

Newborn Photography

(3) CAPTURE ALL THOSE TINY DETAILS:

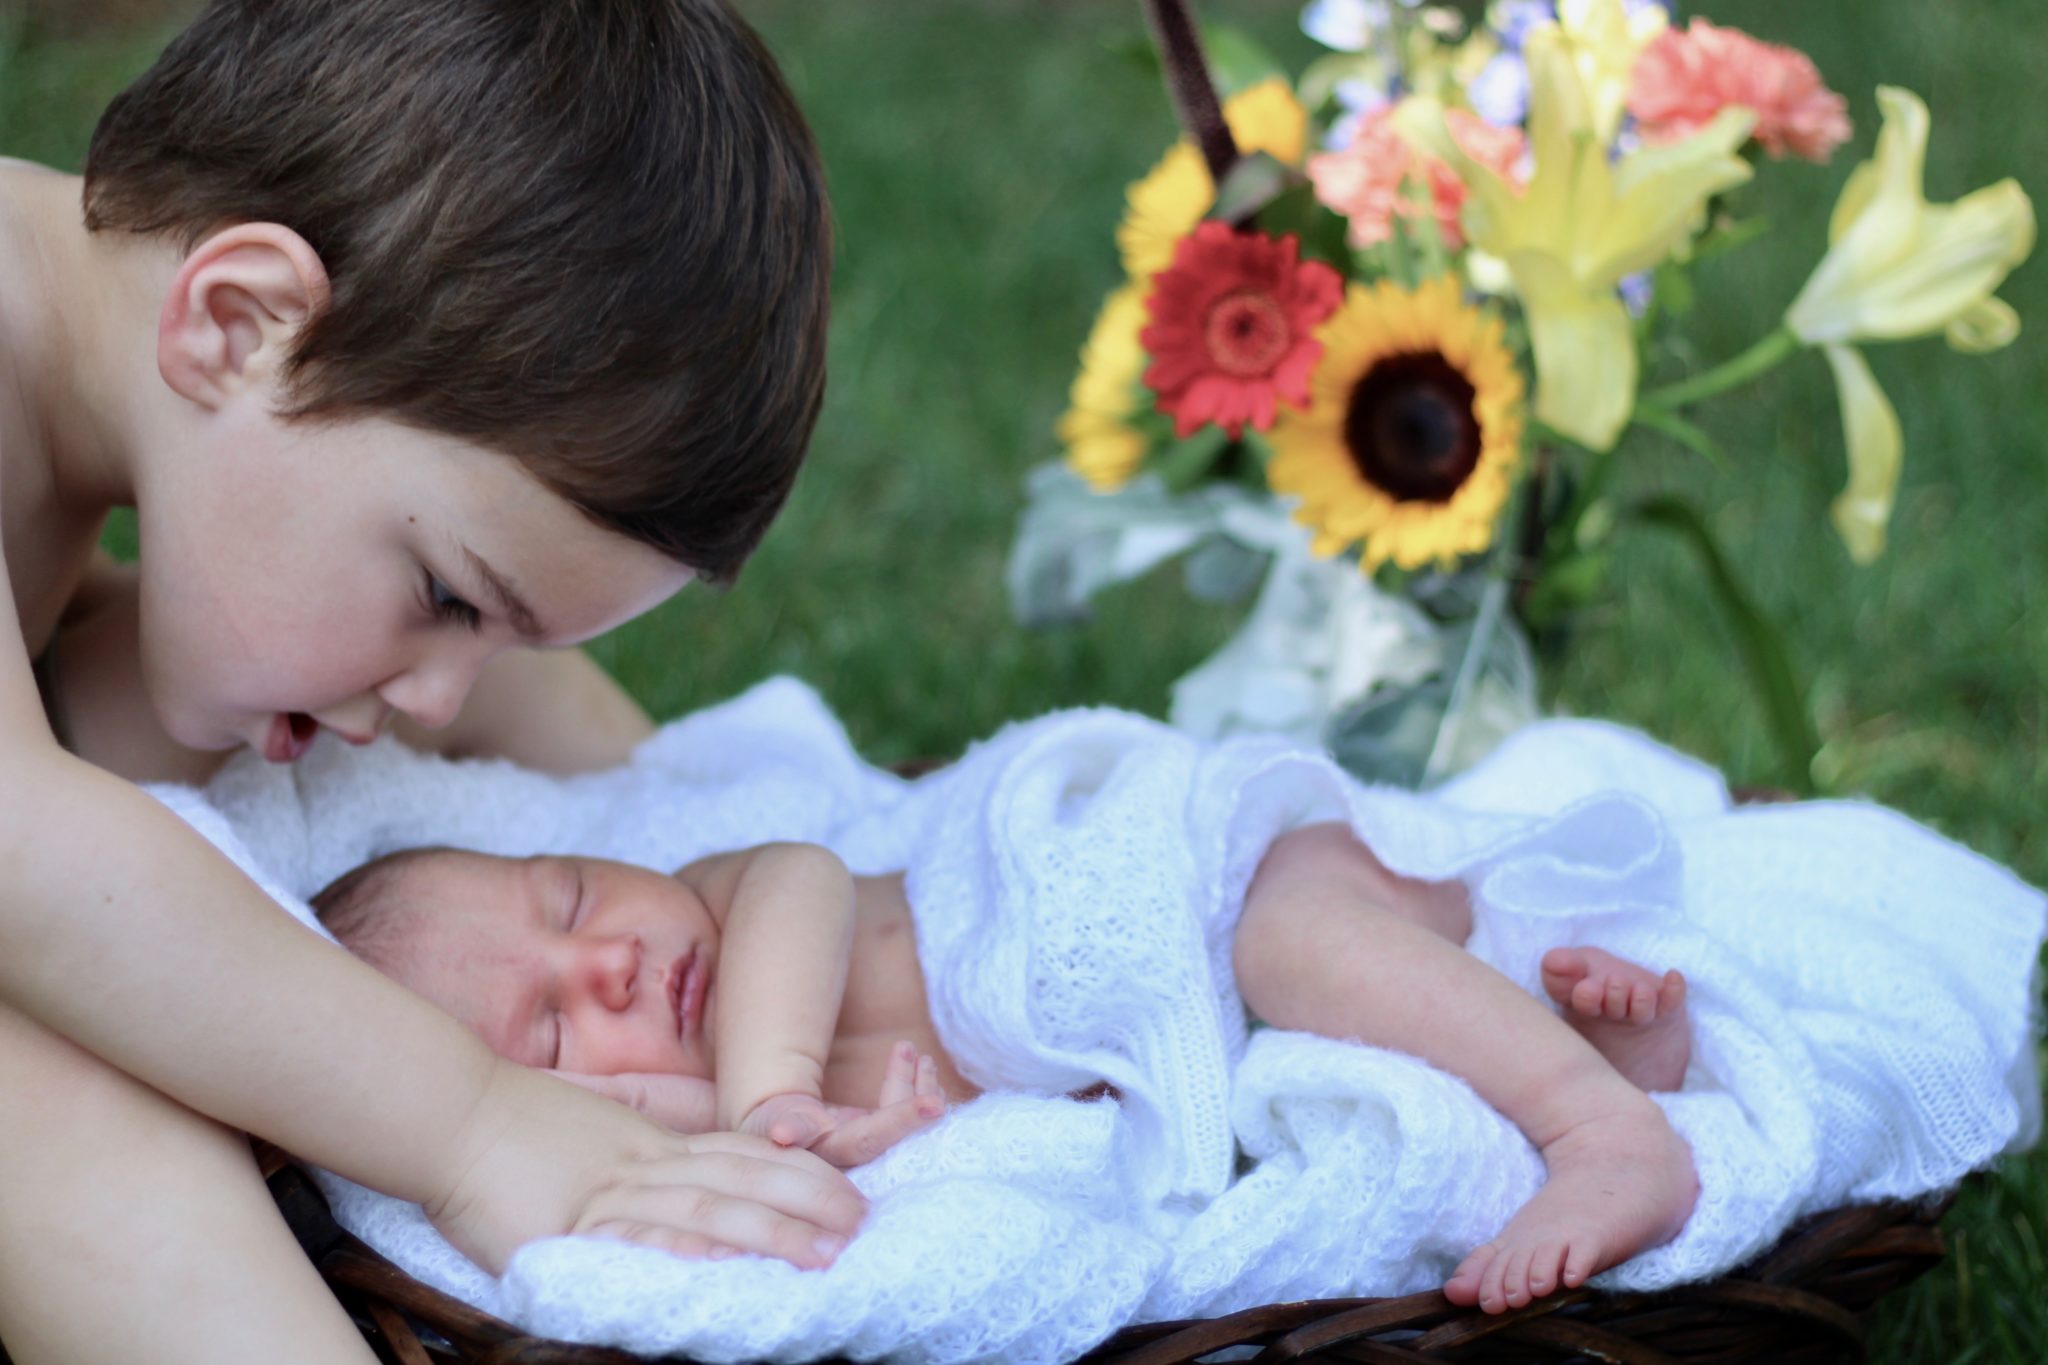
The first thing I noticed when our older son, Dylan, came to the hospital to meet Gavin was the size of his hands. I never realized how grown-up our “big boy” had become. During our shoot, I tried to focus on these tiny details so I could preserve them in a time capsule to treasure forever.

Newborn Photography

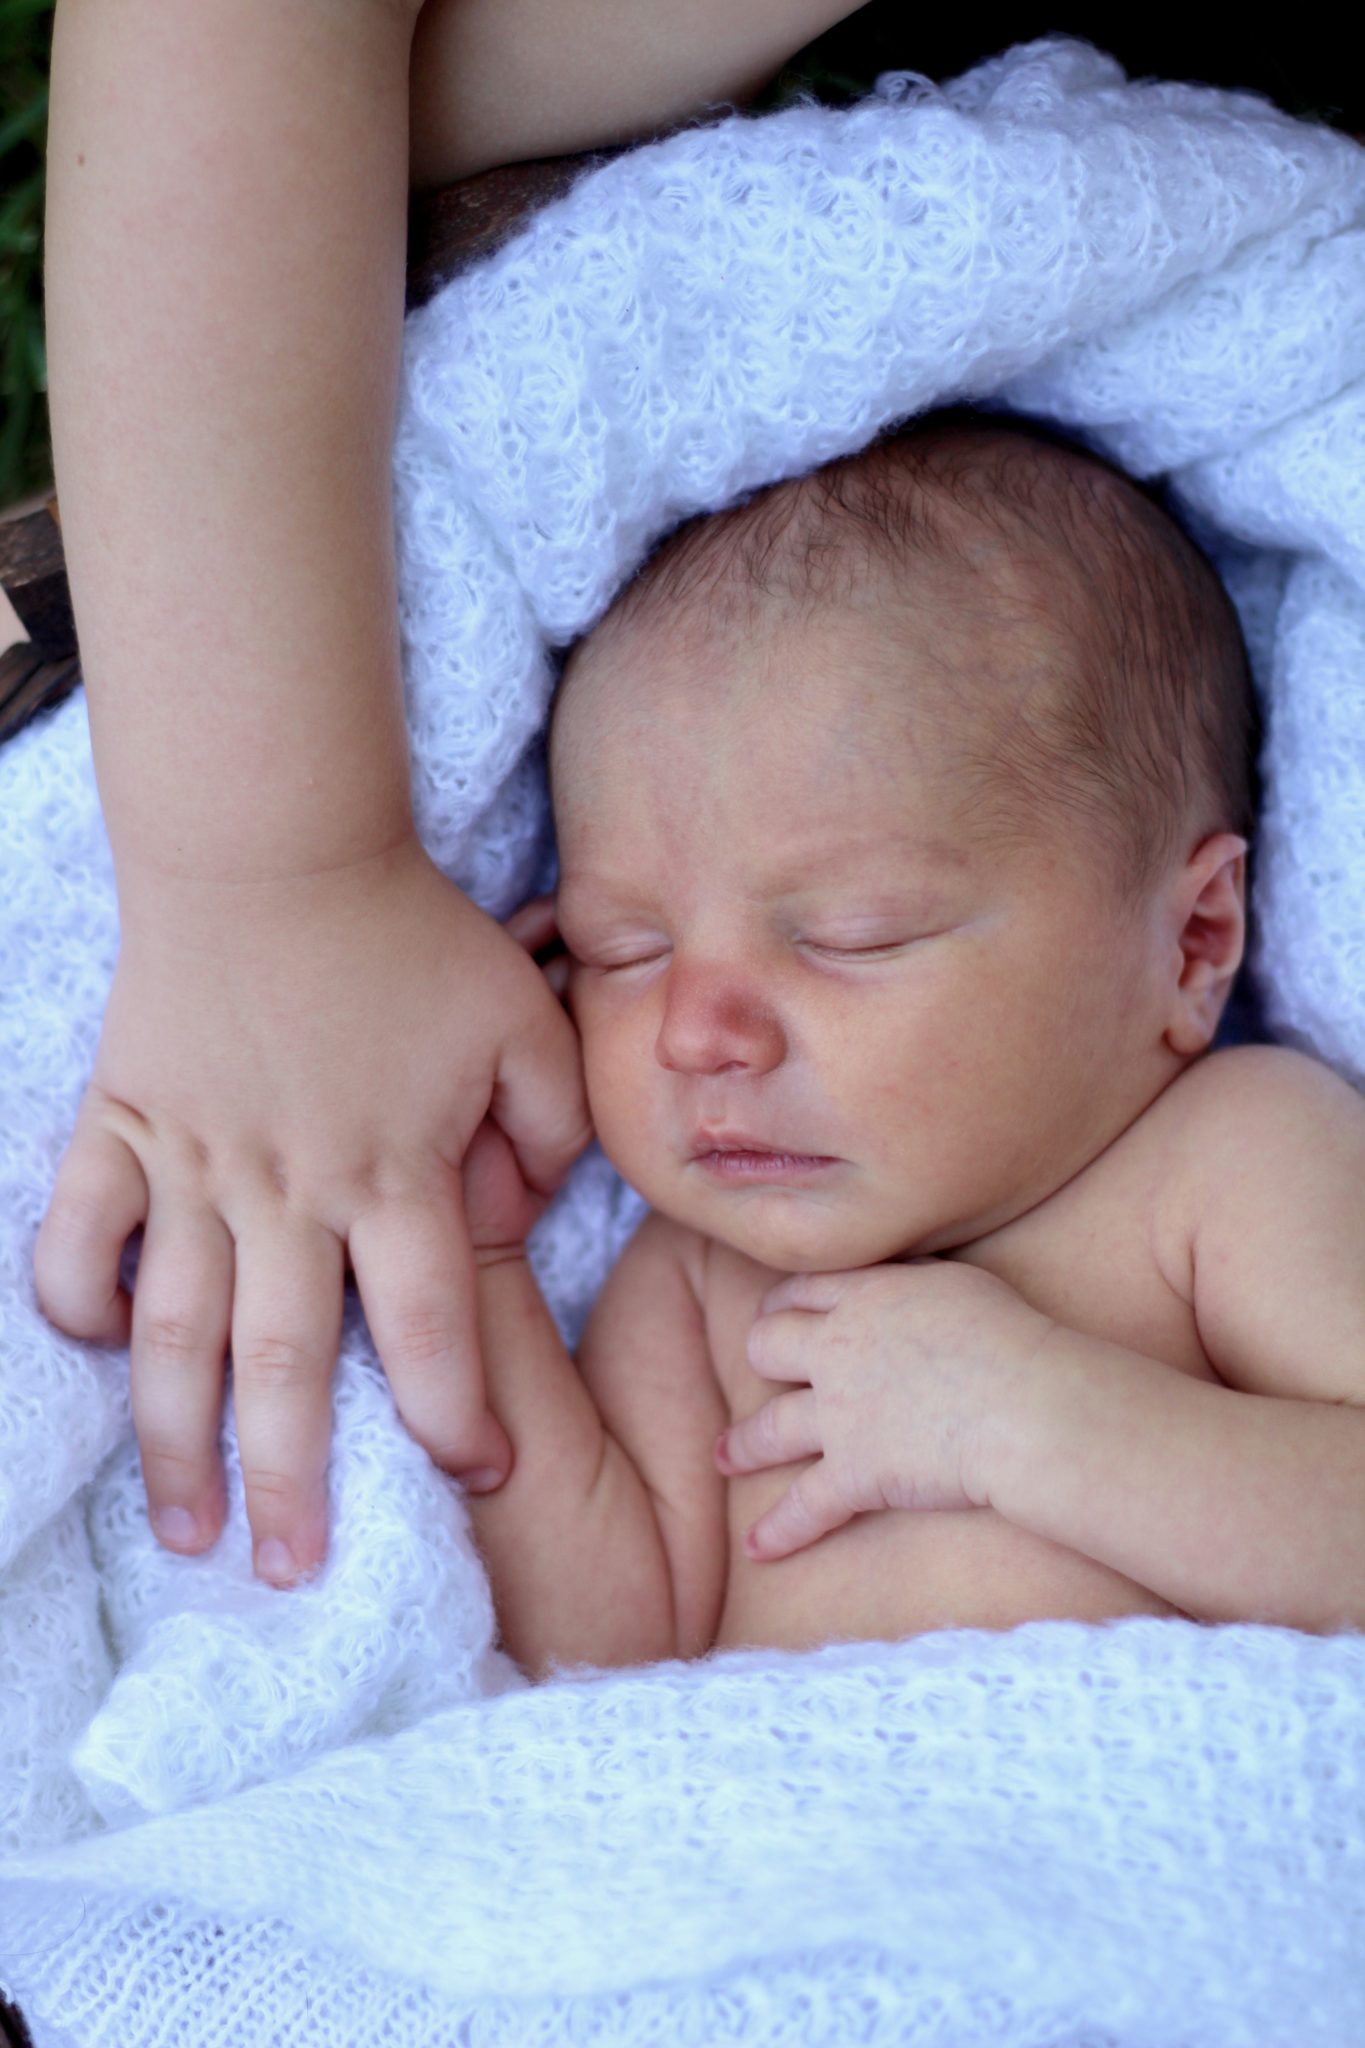
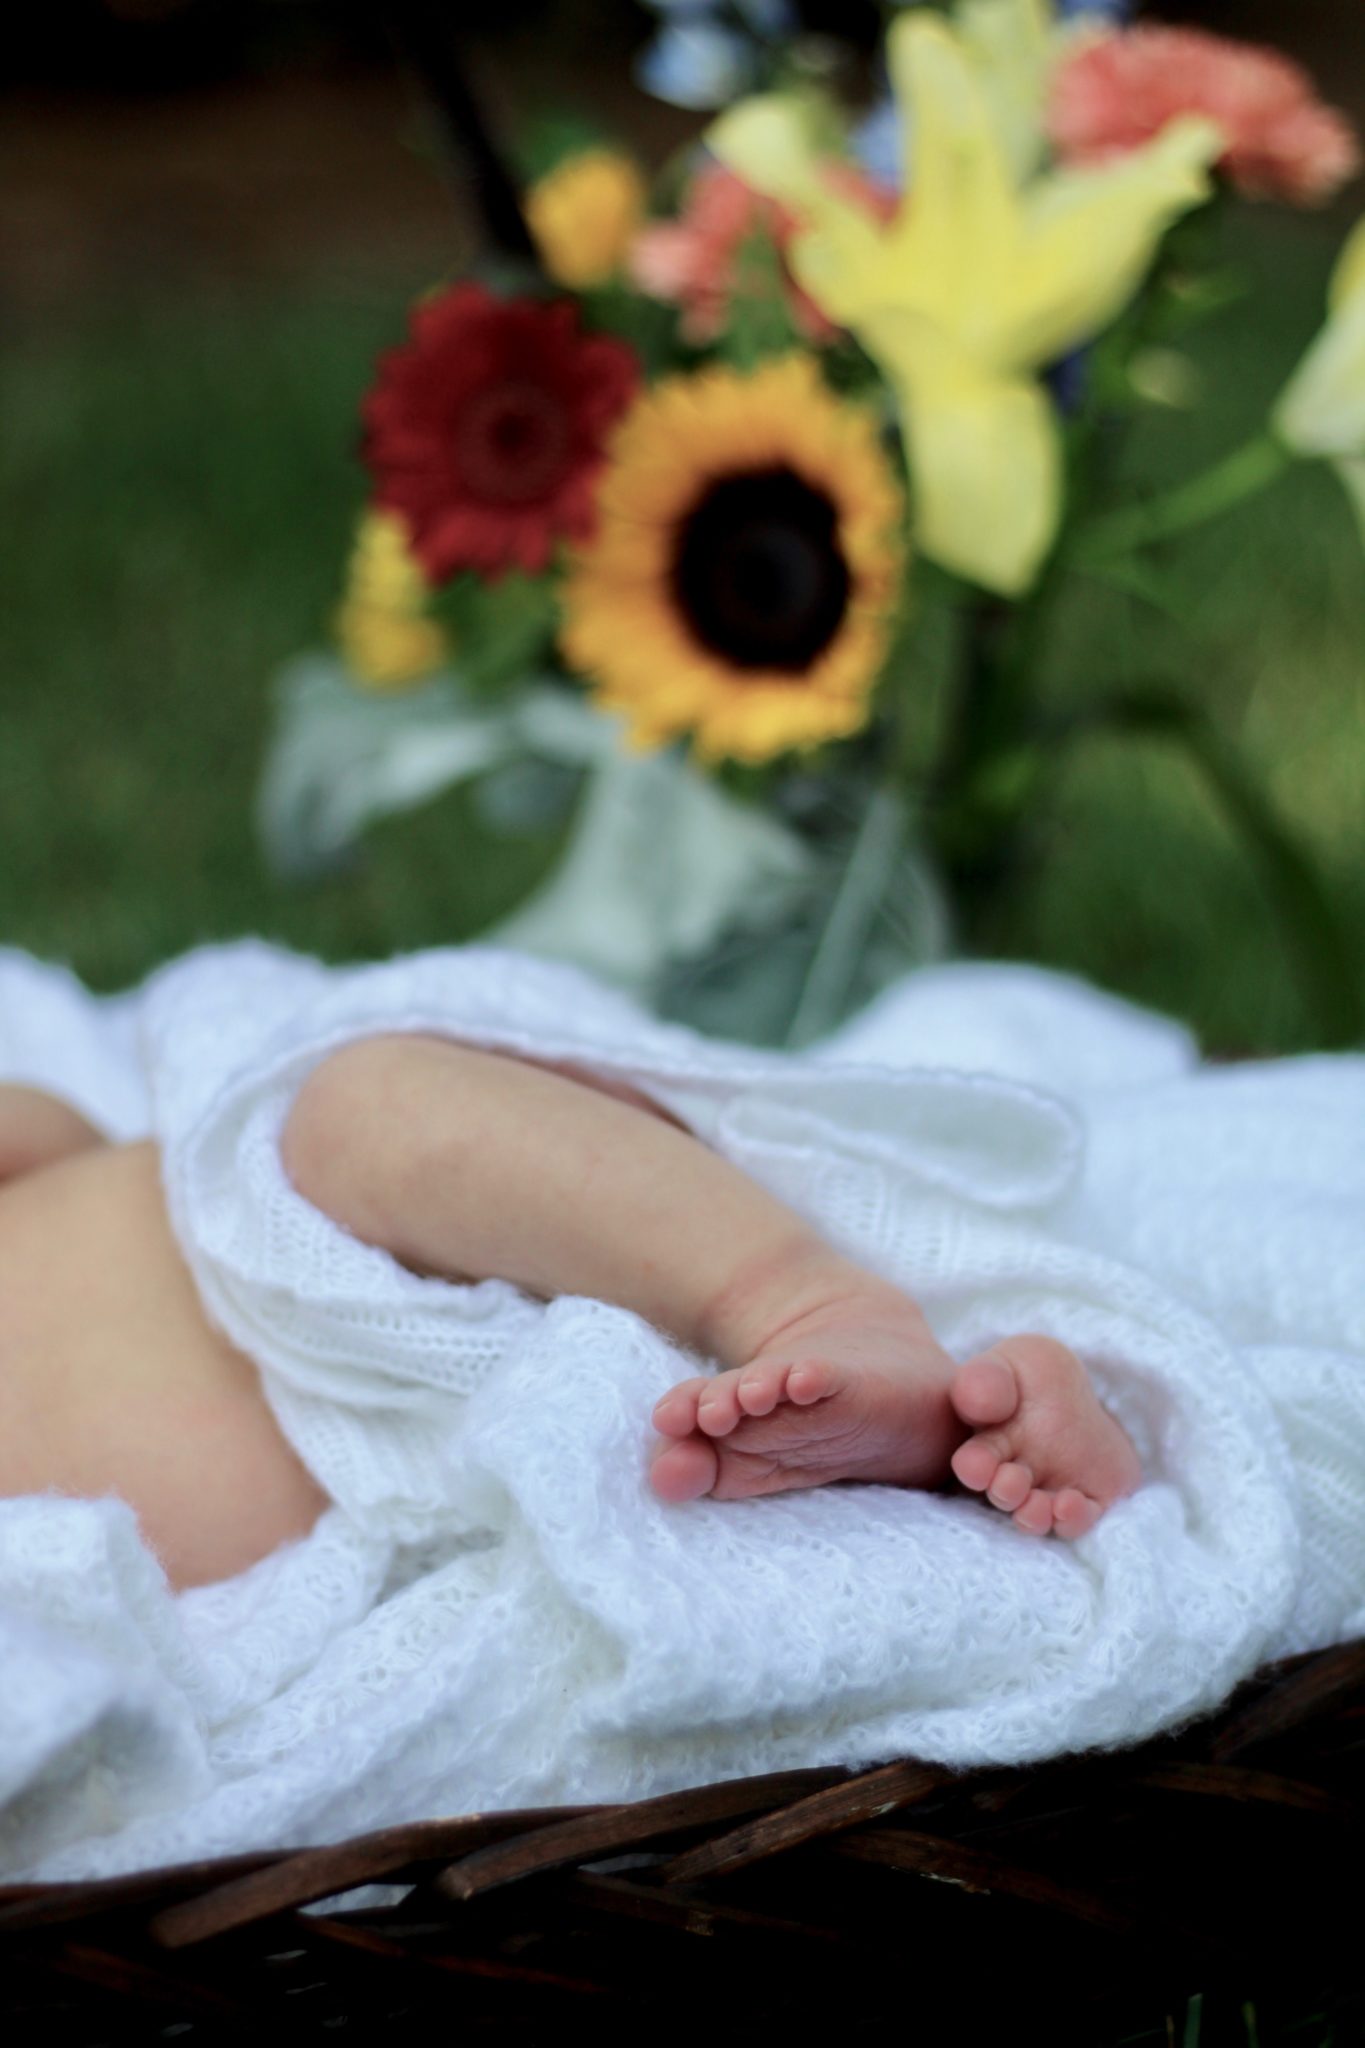
Make sure to snap a shot of their tiny toes, pouty little lips, curves of their sweet face and fragile fingers. Trust me, you will treasure these more than you think in the end.

Newborn Photography

(4) TAKE YOUR TIME & SHOOT MULTIPLE DAYS IF NECESSARY:

Most photographers will tell you that the first 10 days of life are best for photographs. While I somewhat agree with this (mainly because they sleep 20+ hours a day), I also do not want to limit myself to a specific timeframe. Perhaps you had a c-section, like me, and aren’t mobile for the first few days (or week)… and that’s OK. The beauty of taking your own pictures is the freedom of time. Don’t stress out about the clock; I truly believe anytime you set aside in the first month for these types of photos will work out perfectly.

A few other tips for each photography session:

  • I find it best to do these after a feeding. This is when your little one is extremely sleepy and “mold-able”.
  • Keep your baby warm with a space heater. I personally think that babies photograph best naked, so if you’re shooting indoors I think the heater is a good call. Since we were outdoors, the North Carolina humidity served as my heat source.
  • If you are posing your little on on top of a box, boppy pillow or above ground somehow, make sure to have a spotter with you. First and foremost, your baby’s safety is what’s important here.

Newborn Photography

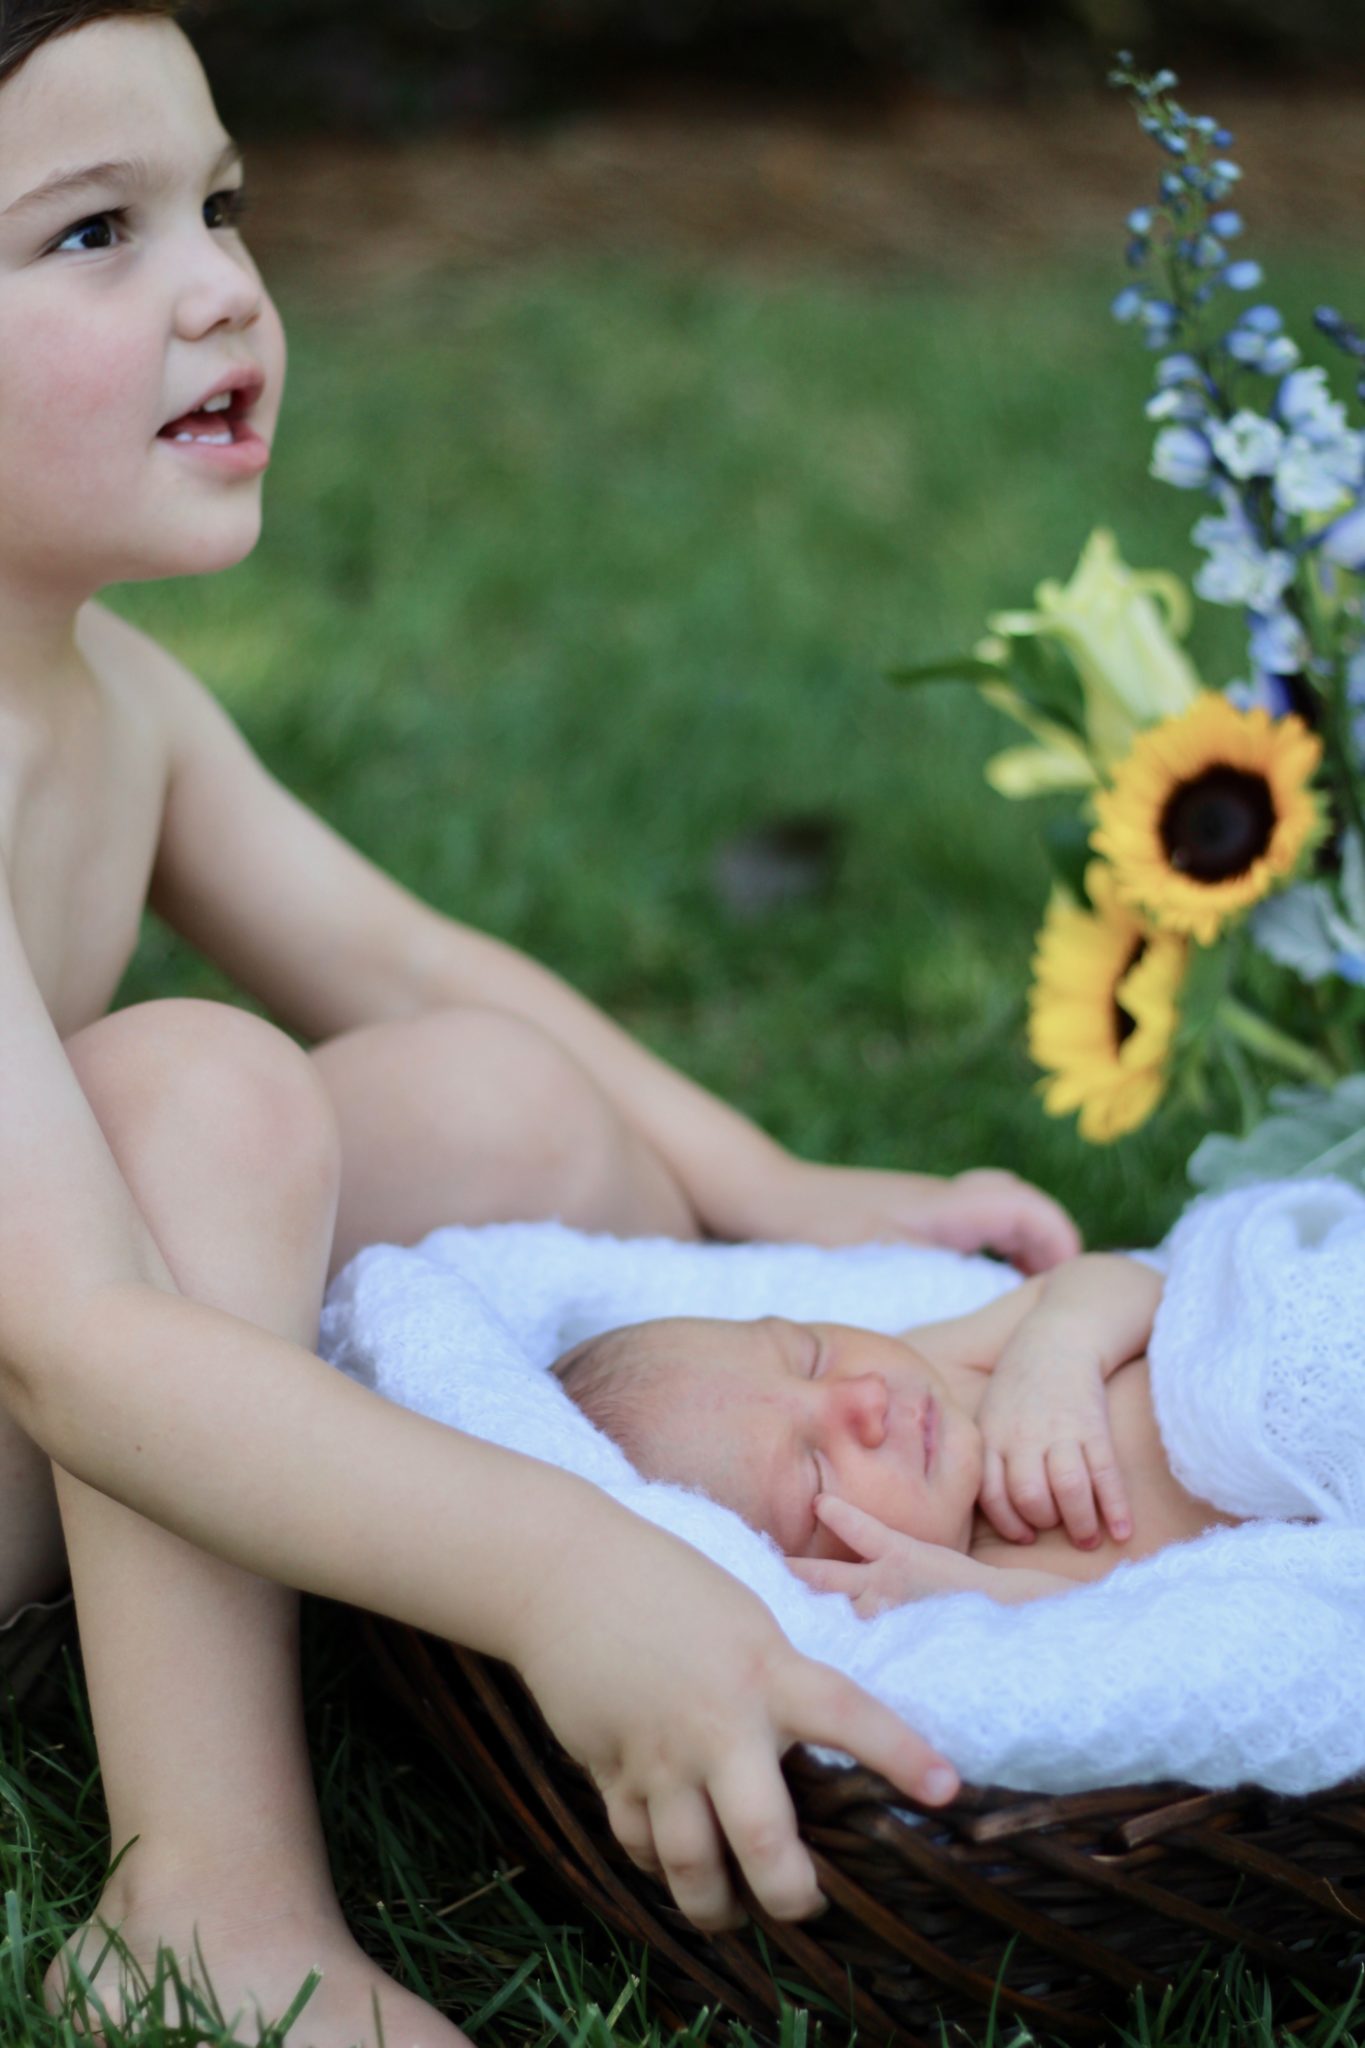
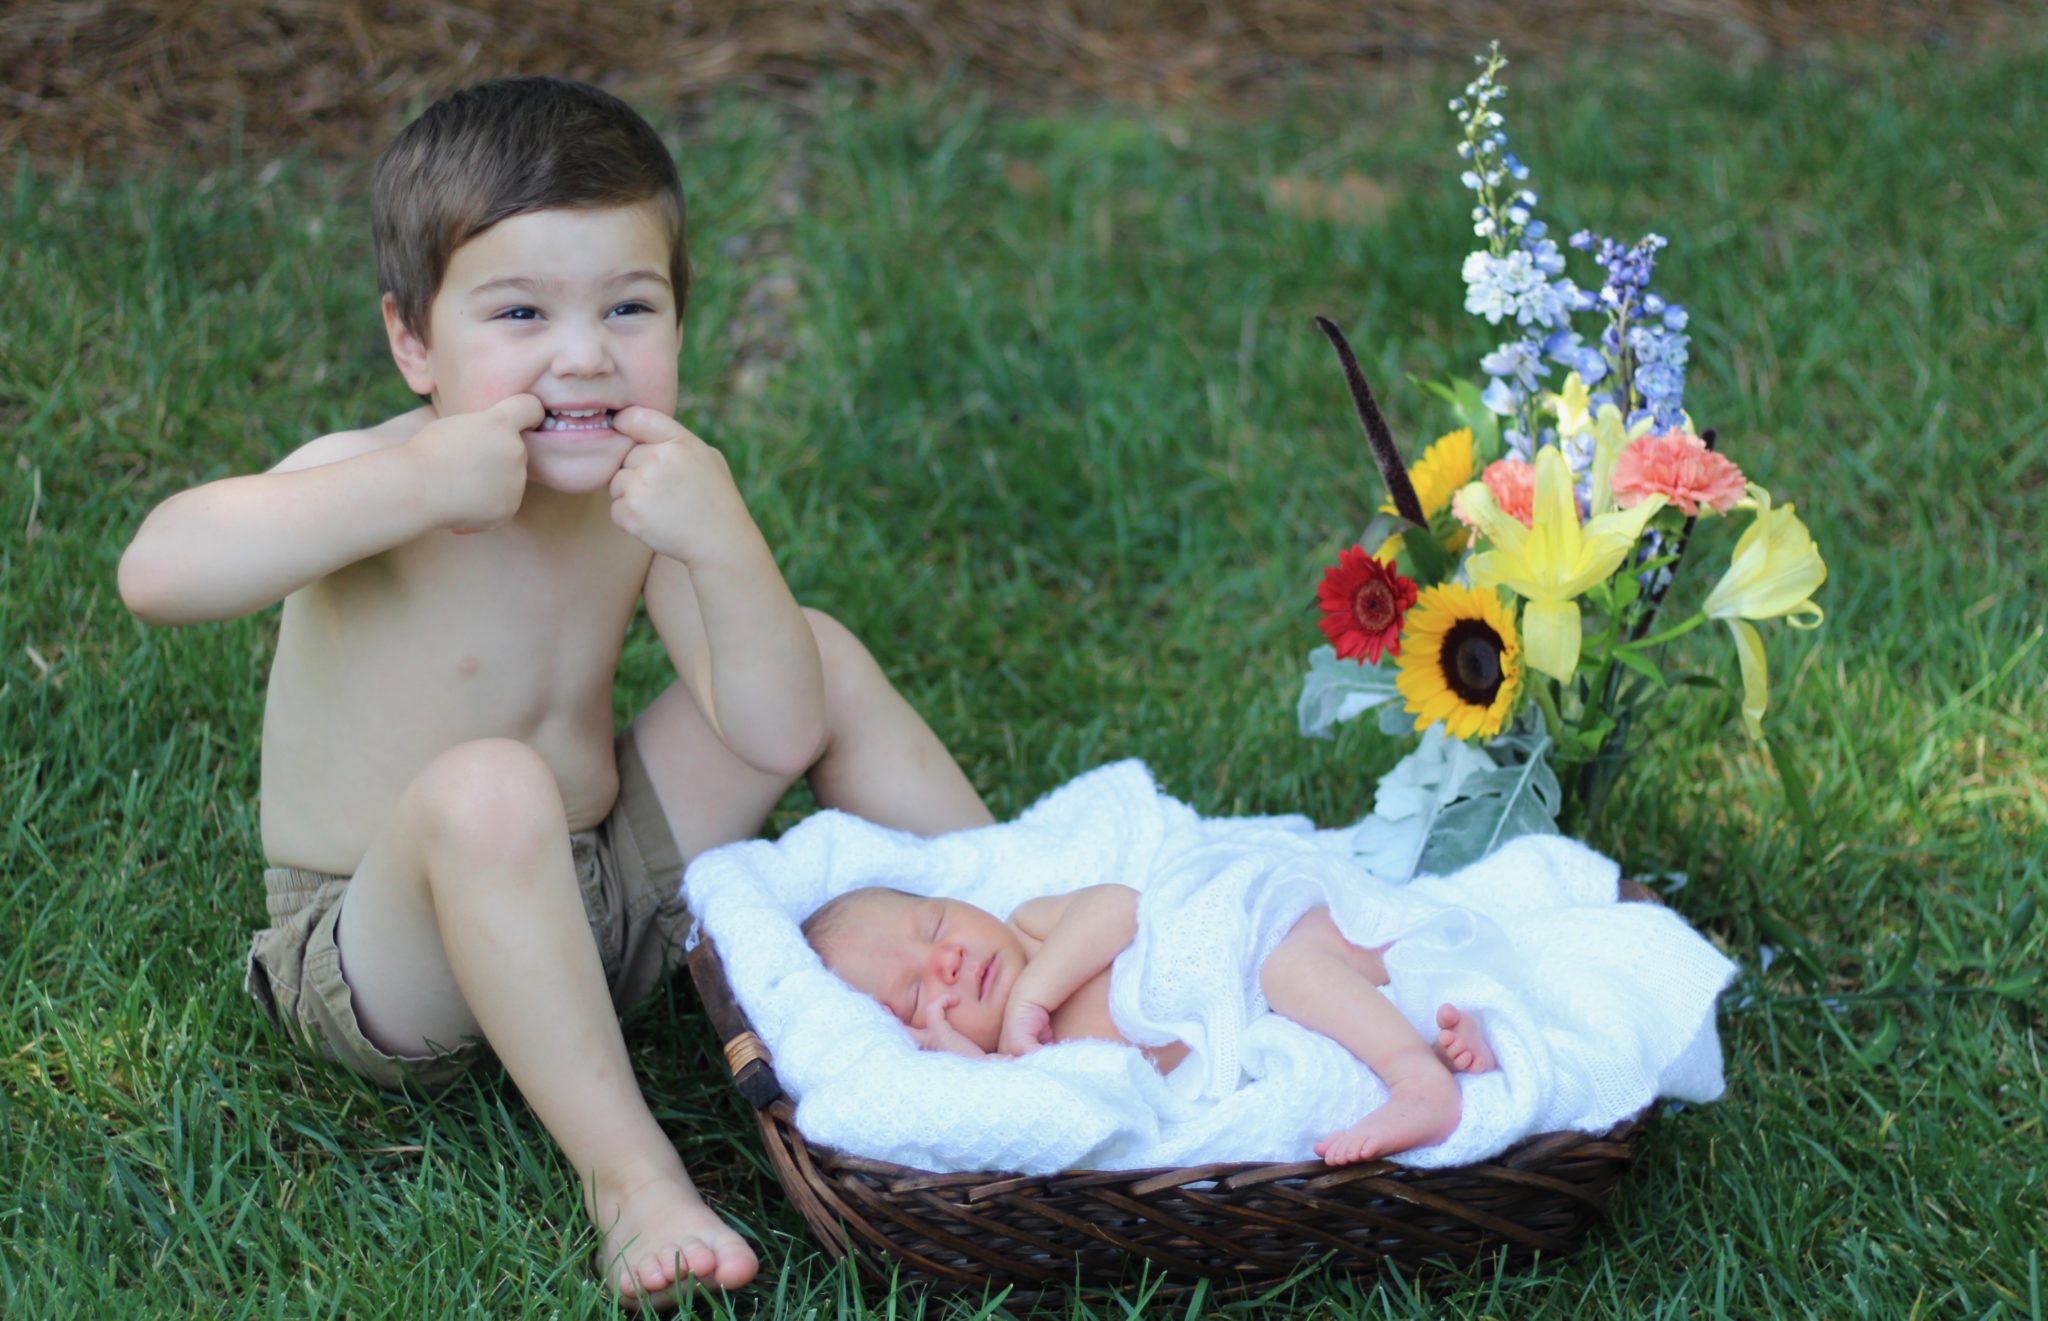
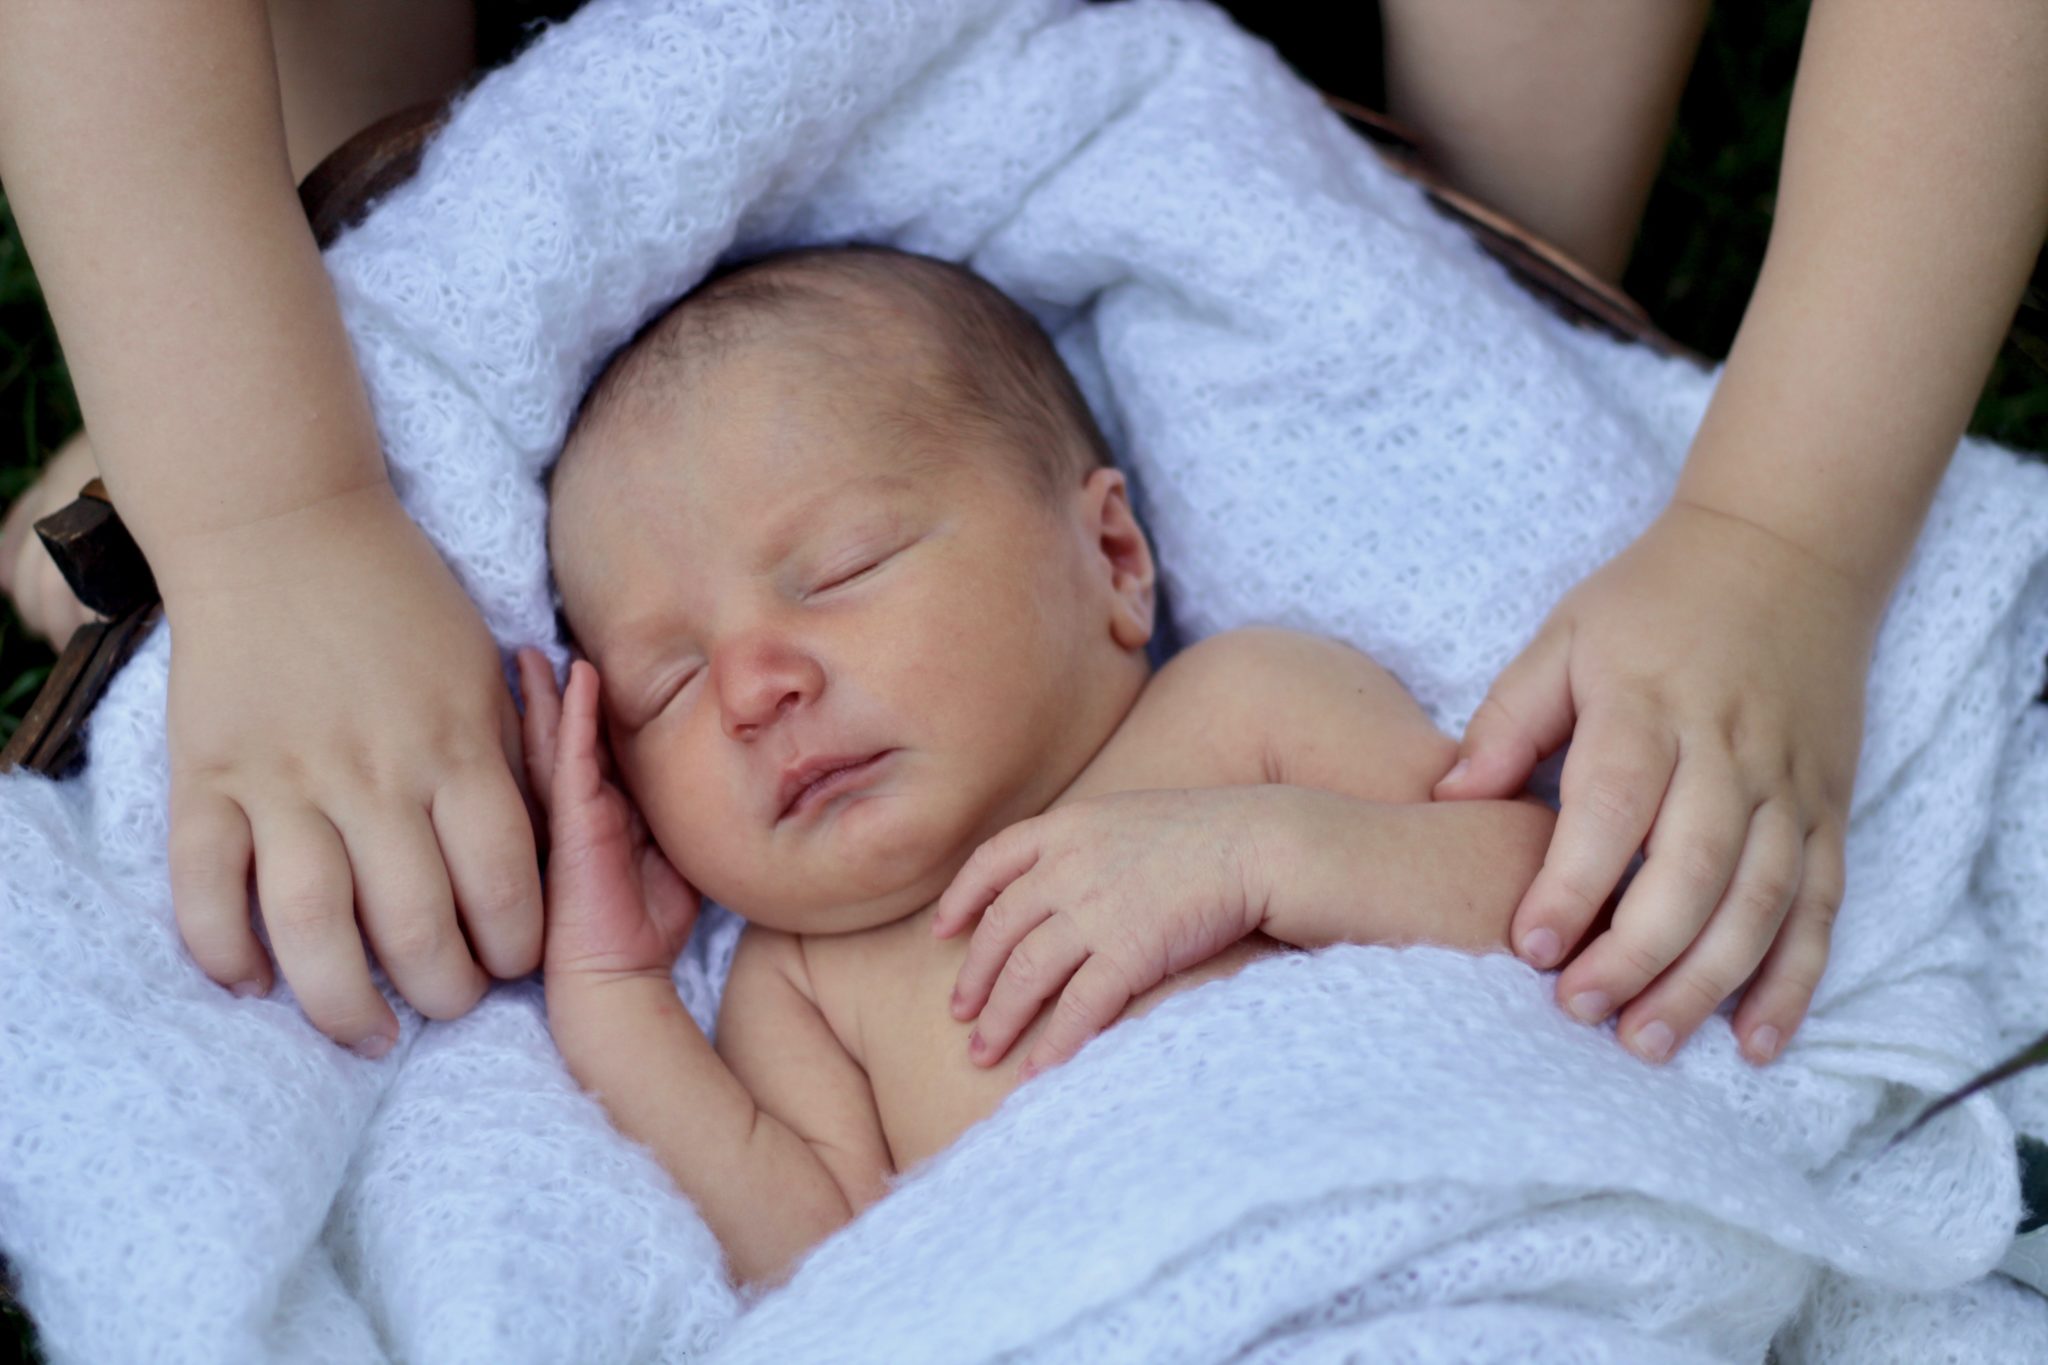
(5) INCLUDE OLDER SIBLINGS:

While you have your camera out, you might as well take some sibling shots. To be honest, these turned out to be some of my favorites (I’ve already ordered them online to be printed on canvas). Our toddler was very curious and excited about taking pictures with “his baby”, so we took our sibling photos first. I also promised him a scoop of ice cream with gummy bears if he cooperated. It worked wonders. Older siblings might be more flexible, but I still recommend taking brother and sister poses during the beginning of your photo session.

Newborn Photography

Photographing your newborn (and family) should be a joyous occasion. I hope these tips have encouraged you to grab your camera and capture some memories. They really do “grow up so fast”.

If you would still like to hire someone to capture your little one’s arrival, I’d love to help you with that! Send me an email and we can chat. 🙂

SliceOfJessBlog@gmail.com


PIN THIS FOR LATER:


Newborn Photography

Filed Under: Mom Life

Previous Post: « How To Make Overnight Oats
Next Post: BBQ Chicken Cast Iron Skillet Pizza »

Reader Interactions

Did you make this recipe?

Tag @sliceofjess on Instagram & hashtag #sliceofjess.

Share this post!
Share on Facebook
Facebook
Tweet about this on Twitter
Twitter
Pin on Pinterest
Pinterest
Email to someone
email

Leave a Reply Cancel reply

Your email address will not be published. Required fields are marked *

Recipe Rating


Primary Sidebar

Hey there, Jess here. Welcome to a slice of my kitchen! Here you'll find tidbits of my everyday life, home cooked meals and travel guides. Thanks for stopping by!

Join Our Email List!

Recent Posts

  • How To Make Confit Garlic On The Stovetop August 7, 2022
  • Creamy Mushroom Sauce for Legit Everything August 3, 2022
  • Zucchini Pasta with Peas, Herbs and Burrata August 2, 2022
  • Pan Fried Chimichurri Rice Cake Recipe July 30, 2022
  • One Pan Mexican Rice Casserole with Ground Beef July 29, 2022

Check Out My Insta :)

sliceofjess

🍔: Recipe Development | Photographer
🏡: Charlotte, NC
📬: Jess@SliceOfJess.com
⤵️: 100’s of Killer Home Cookin’ Meals

Jess Bentley | Food & Travel
If there’s a staple I’m going to make for the If there’s a staple I’m going to make for the week, it’ll be confit garlic. It’s grand on toast, inside sandwiches, with pasta… you name it!
.
BLOG —> https://sliceofjess.com/how-to-make-confit-garlic-on-the-stovetop/
.
INGREDIENTS:
• 30 Peeled Garlic Cloves
• 1 tbsp. Black Peppercorns
• 2 tsp. Red Chili Flakes
• 1 tsp.. Dried Thyme
• 2 small Bay Leaves
• 2 cups Olive Oil
• Fresh Herbs, if desired
.
DIRECTIONS:
1. Add all ingredients to a large saucepan over medium heat. Bring to a low simmer (do not boil) and cook for 30 minutes.
2. Use a slotted spoon to transfer the garlic to a mason jar. Add enough oil to cover, and store in the refrigerator for up to 2 months.
Hola, flavor town! My South American inspired rice Hola, flavor town! My South American inspired rice cake recipe is packed with fresh herbs, flavorful veggies, and spicy aji amarillo paste. Mmmmmm!
.
BLOG —> https://sliceofjess.com/pan-fried-chimichurri-rice-cake-recipe/
.
FOR THE RICE CAKES:
• 3 cups Leftover Chimichurri Rice (recipe on blog)
• 1 Egg
• 5 oz. Queso Fresco, crumbled
• 4 oz. Monterey Jack cheese, grated
• ¼ cup Italian or Plain Breadcrumbs
• 1 tbsp. Olive Oil
• I tbsp. Butter
.
FOR GARNISH:
• 1 tbsp. Fresh Cilantro, minced
• 1 tbsp. Fresh Italian Parsley, minced
• 1 Lime, cut into wedges
• Tomatillo Salsa Verde (recipe on blog)
.
DIRECTIONS:
1. Allow rice to fully cool before prepping the rice cakes.
When you're ready to make, mix the cooled rice with the egg, queso fresco, Monterey Jack cheese and the breadcrumbs.
2. Roll into 1-inch patties and pan fry in olive oil and butter for 2 - 3 minutes on each side. Allow them to cool on a stack of paper towels.
3. Enjoy immediately with fresh herbs, limes, and your favorite dipping sauce.
Hooray for the abundance of summer produce! This i Hooray for the abundance of summer produce! This is an awesome way to use up all our backyard-grown veggies. Bring on the Zucchini Pasta with Burrata!
.
BLOG —> https://sliceofjess.com/zucchini-pasta-with-peas-herbs-and-burrata/
.

FOR THE ZUCCHINI PASTA:
• 2 tbsp. Olive Oil
• 2 tbsp. Butter
• 4 cups Diced Zucchini, (3 - 4 medium sized)
• 1 Sweet Onion, thinly sliced
• 3 Garlic Cloves, minced
• 1 cup Heavy Cream, warmed
• ½ cup Fresh Oregano, stems removed
• ½ cup Fresh Italian Parsley, stems removed
• 20 Fresh Basil Leaves
• 1 tsp. Kosher Salt
• 1 tsp. Freshly Ground Black Pepper
• 1 cup Grated Parmesan Cheese
• 2 cups Frozen Peas, thawed
• 1 lb. Fusilli Pasta
• ½ - ¾ cup Reserved Pasta Water
.
FOR PLATING:
• 8 oz. Burrata
• Red Pepper Flakes, to taste
• Shredded Parmesan Cheese, as desired for garnish
• 1 Loaf Crusty Bread, for serving
.
DIRECTIONS:
1. Add the olive oil and butter to a large skillet over medium heat.
2. Once melted together, add the zucchini and onion. Cook until softened and caramelizing, about 10 minutes.
3. Add the garlic and cook for another minute or two, or until fragrant (but not browned!).
4. Warm the heavy cream and allow the softened veggies to cool for a few minutes. While the veggies cool, go ahead and cool your pasta according to packaged directions in salted water. When draining, make sure to reserve a cup of pasta water.
5. Transfer the veggies + cream to a high-speed blender along with the herbs, salt, pepper, and parmesan cheese. 6. Blend until well incorporated and smooth.
7. Add the zucchini sauce back to the skillet that you cooked it in along with a splash or two of pasta water.
Mix together and then add the cooked pasta to the same skillet. Toss together until pasta is coated.
8. Transfer the zucchini pasta to a serving platter. Nestle the burrata, cut in half, top with red pepper flakes, shredded parmesan and serve with crusty bread.
Cheesy, savory, super fulfilling and incredibly ea Cheesy, savory, super fulfilling and incredibly easy to make… I’m so excited to share my famous recipe for Mexican Rice Casserole in collaboration with @redgoldtomatoes and @thefeedfeed! Seriously, your whole family is gonna swoon at first bite 🍅!
.
BLOG —> https://sliceofjess.com/one-pan-mexican-rice-casserole-with-ground-beef/
.
FOR THE MEXICAN RICE CASSEROLE:
• 1 lb. Ground Beef
• 1/4 Small Red Onion, diced
• 1 Red Bell Pepper, diced
• 1 tbsp. Cumin
• 2 tsp. Chili Powder
• 1 tbsp. Smoked Paprika
• 2 tsp. Dried Oregano
• 1 tsp. Salt, or more to taste
• 1 cup Frozen Corn Kernels, thawed
• 15 ounce can Black Beans, drained
• 4 cups Cooked Brown Rice
• 1 cup Shredded Monterey Jack Cheese, split in half
• 1 cup Shredded Cheddar Cheese, split in half
• 10 ounce can Tomato Love with Double More Chilies
.
OPTIONAL, FOR GARNISH:
• Fresh Cilantro,
• Diced Green Onions
• Avocado, sliced
• Mexican Crema Drizzle
• Your Favorite Hot Sauce
.
DIRECTIONS:
1. Cook brown rice (or grain of choice) and set aside.
2. Sauté the ground beef in a large skillet over medium-high heat.
3. Once browned, add the diced shallot and bell pepper. Continue to cook until slightly softened, about 2 - 3 minutes.
4. Add all seasonings, corn kernels, black beans and cooked rice. Cover with ½ cup or Monterey Jack and ½ cup of Cheddar. Mix to combine.
5. Add the Tomato Love with Double More Chilies, mix, and top with remaining cheese. Preheat the skillet in a 400F preheated oven for 3 - 4 minutes, or until cheese has melted.
6. Serve with desired garnishes and enjoy immediately.
.
New from @redgoldtomatoes, Tomato Love begins with the finest locally grown tomatoes and are hand-tossed with perfectly ripe green chilies. It’s a combo you won’t wanna miss! (#sponsored) #tomatolove #feedfeed
Instagram post 17948239066951731 Instagram post 17948239066951731
We had such a fun weekend. Had some adult time (ad We had such a fun weekend. Had some adult time (adios kiddos, aunt Brie is in charge) and experienced a date night @sullivanssteakhouse. We attended their “Summer Side of Bourbon” dinner and it was soooo fun. We had drawing contests in-between courses and laughed more than we had in years. The food was excellent and the service was top notch ☺️
Take your Summer Peach & Tomato Salad up a notch b Take your Summer Peach & Tomato Salad up a notch by stuffing it into a baguette with bacon, feta, balsamic drizzle, basil, peppers, and pistachios!
.
BLOG —> https://sliceofjess.com/summer-peach-tomato-salad-sandwich-with-bacon/
.
FOR THE SHERRY MAYO-RICOTTA:
• 2 tbsp. Ricotta
• 2 tbsp. Mayonnaise
• 1 tbsp. Sherry Vinegar
• ½ Shallot, minced
• 1 tsp. Honey
• Salt, to taste
.
FOR THE SANDWICH:
• ½ French Baguette
• 1 Peach, sliced
• 1 Tomato, sliced
• 5 Bacon Strips, twirled & cooked
• 1 oz. Crumbled Feta
• 2 tbsp. Crushed Pistachios
• ¼ cup Fresh Basil
• 3 - 4 Whole Calabrian Chili Peppers, sliced
• Aged Balsamic Vinegar, garnish
.
DIRECTIONS:
1. Mix together all of the ingredients for the Sherry Mayo-Ricotta in a small bowl and set aside.
2. Cut the baguette in half and toast until lightly browned.
3. Slather each inner-side of the baguette with Sherry Mayo-Ricotta. Add the slice peaches, sliced tomato, bacon curls, and feta to one side. Then add the crushed pistachios, basil and Calabrian chili peppers to the other side. Drizzle both halves with aged balsamic vinegar.
4. Fold together, cut in half, and enjoy immediately!
Smothered saucy chili and melty cheese, there’s Smothered saucy chili and melty cheese, there’s a reason that chili fries are undeniably delicious. Let’s make it into pizza!
.
BLOG —> https://sliceofjess.com/how-to-make-chili-fries-into-pizza/
.
FOR THE PIZZA
* Pizza Dough (Store Bought or Homemade)
* 4 oz. Cheddar Cheese, shredded
* 8 oz. Mozzarella Cheese, shredded
* 20 oz. Frozen Waffle Fries
* 2 Jalapeños, sliced
* 2-3 Green Onions, sliced
* 1 cup Fritos
* Ranch Dressing, optional side
.
FOR QUICK PICKLED RED ONIONS
* ½ Red Onion, sliced thin
* ¾ cup Apple Cider Vinegar
* ¼ cup Water
* 1 tsp Maple Syrup
* Dash of Salt

Instructions
1. Make my Easy Chili Recipe for Grilling Season and set aside. Can be made up to 48 hours in advance.
2. Make pickled red onions by thinly slicing onion and adding to a jar with remaining ingredients. Let sit for 30 minutes.
3. Cook fries in oven according to package directions (timing will vary based on brand). Set aside.
4. Preheat grill to medium high-heat.
5. Roll out pizza dough until about ¼ inch thick.
6. Spray dough with cooking oil on both sides and place pizza dough directly on grill grates. Cook for 2-3 minutes until slightly charred.
7. Flip and top with ⅔ of the chili, cheese, fries, and then remaining ⅓ of chili. Finish with sliced jalapeños and cook for additional 4-5 minutes, lid closed, or until cheese is melty.
8. Remove from grill and top with pickled onions, green onions, and lots of Fritos.
This bagel sandwich is a necessity for weekday bru This bagel sandwich is a necessity for weekday brunch! Stuffed with crunchy veggies and spicy cream cheese, this beast of a sandwich has it all!
.
BLOG —> https://sliceofjess.com/eat-the-rainbow-bagel-sandwich/
Skip the jar and make your next batch of Tomatillo Skip the jar and make your next batch of Tomatillo Salsa Verde at home! Super fresh, tangy, spicy, and creamy with the addition of avocado!
.
BLOG —> https://sliceofjess.com/creamy-tomatillo-salsa-verde-with-avocado/
.
FOR THE SALSA VERDE:
• 6 Tomatillos
• 1 Avocado
• Juice of 1 Lime
• 1 Jalapeño, stemmed
• ½ cup Cilantro
• ¼ Green Bell Pepper, seeded
• ¼ White Onion
• ¼ cup Water
• Salt, to taste
.
SERVE WITH:
• Tajin, to rim the bowl
• Tortilla or Plantain Chips
.
DIRECTIONS:
1. Remove the husks from the tomatillos and discard. Rinse them under cool water to remove any sticky parts on their skin.
2. Place all ingredients in the food processor and puree until smooth.
3. Season, taste, and serve! Enjoy.
I learned how to make Chimichurri Peruvian Rice fr I learned how to make Chimichurri Peruvian Rice from my mom’s flash card cookbook I found in archives. It’s dear to my heart and I know you’ll love it, too!
.
BLOG —> https://sliceofjess.com/how-to-make-chimichurri-peruvian-rice/
.
FOR THE CHIMICHURRI:
• ¾ cup Parsley Leaves
• ½ cup Cilantro
• 4 Garlic Cloves
• 1 tsp. Red Chili Flakes
• 1 tsp. Dried Oregano
• ⅓ cup Extra Virgin Olive Oil
• 2 tbsp. Red Wne Vinegar
• 1 tsp. Kosher Salt, or more to taste
• ½ tsp. Black Pepper, or more to taste
FOR THE CHIMICHURRI RICE:
• 1 tbsp. Olive Oil
• 1 tbsp. Butter
• 1 Shallot, diced
• ½ tsp. Grated Ginger
• 1 Garlic Clove, minced
• ½ clamshell Cherry Tomatoes, diced
• 1 cup Peas, thawed
• Chimichurri Sauce (recipe above)
• 2 tbsp. Aji Amarillo Paste
• 6 cups Cooked White Rice (2 cups uncooked rice)
• Salt, to taste
• Limes, for garnish
• Chopped Parsley and Cilantro, to garnish
.
DIRECTIONS:
1. Cook rice 1-minute less than it's packaged directions. Pour onto a plate and set aside to cool.
2. Place diced shallots in olive oil and sauté until softened. Add ginger, garlic and then tomatoes. Sauté until the tomatoes have released their juices and the shallots are translucent. About 5 minutes. Then add the peas and cook together for a few minutes.
3. Next you'll add the rice, chimichurri sauce and aji amarillo paste. Stir to combine. Cook on low for 5 - 8 minutes, until all ingredients have heated through.
4. Scoop onto a platter and squeeze lime juice over the top, taste, and add salt if needed.
5. Sprinkle with fresh Italian parsley, cilantro, and enjoy immediately.
Hooray for tomato season in NC! Roasting them in t Hooray for tomato season in NC! Roasting them in the air fryer couldn’t be easier (and so incredibly flavorful!)
.
BLOG —> https://sliceofjess.com/air-fryer-roasted-cherry-tomatoes-with-shallots/
.
INGREDIENTS:
• 2 cups Cherry Tomatoes, cut in half
• 1 tbsp. Sherry Vinegar
• 1 tbsp. Olive Oil
• ½ tsp. Garlic Powder
• ½ tsp. Dried Oregano
• 1 tsp. Red Pepper Flakes
• ¼ tsp. Kosher Salt
• Black Pepper, to taste (optional)
.
DIRECTIONS:
1. Cut tomatoes in half and slice the shallot. Place them in an oven-safe bowl that will fit in your air fryer.
2. Pour over the vinegar, olive oil, seasonings and mix together.
3. Preheat the air fryer to 400F and cook for 10 minutes. Allow to cool slightly and serve!
I’m continuing my ramen adventures with this Bro I’m continuing my ramen adventures with this Browned Butter Skillet Chicken smothered in Creamy Mushroom Sauce over noods. Seriously, mind blowing.
.
BLOG —> https://sliceofjess.com/creamy-mushroom-ramen-with-brown-butter-chicken/
.
CREAMY MUSHROOM SAUCE:
• 2 tbsp. Unsalted Butter
• 1 tsp. Olive Oil
• 6oz Sliced Mushrooms
• ½ Sweet Yellow Onion, diced
• 2 Garlic Cloves, minced
• ¼ White Wine
• ¼ cup Chicken Bone Broth
• 4 oz. Cream Cheese
• ½ tbsp. Dijon Mustard
• Salt + Pepper, to taste
.
FOR THE RAMEN + CHICKEN:
• 3 Packages Ramen Noodles, cooked & drained
• 2 tbsp. Butter
• 1 lb. Chicken Breasts, cut into chunks
• Salt + Pepper, to taste
• Creamy Mushroom Sauce (recipe above)
.
OPTIONAL GARNISHES:
• Gremolata Breadcrumbs
• Fresh Parsley
• Grated Parmesan Cheese
.
DIRECTIONS:
1. MAKE THE MUSHROOM SAUCE: Melt the butter and add a splash of olive oil in a large skillet. Sauté the mushrooms and yellow onion over medium high heat for 5 - 7 minutes, or until the mushrooms start to brown. Then add the garlic and stir until fragrant, about 1 minutes. Deglaze the pan with white wine and chicken broth. Add the cream cheese and Dijon mustard, stirring constantly until incorporated. Season with salt and pepper.
2. COOK THE NOODLES: Bring a pot of water to a rapid boil. Cook noodles according to the package directions. Drain in a strainer and leave there until you're ready to enjoy.
3. FOR THE BROWN BUTTER CHICKEN: Add butter to a separate large skillet, melt and continue to heat until brown bits form. Once nutty smelling, add the chicken and sear until slightly crispy on the outside and fully cooked in the center. About 10 minutes.
4. TO PLATE THE MEAL: Add the ramen noodles to a serving platter, then top with the brown butter chicken and creamy mushroom sauce. Garnish with Gremolata Breadcrumbs, chopped parsley and grated parmesan. Enjoy immediately.
French Onion Soup is 100% the best way to end a gl French Onion Soup is 100% the best way to end a gloomy, rainy day. Don’t you agree? Mmmmmm!
.
BLOG —> https://sliceofjess.com/seriously-the-best-french-onion-soup-recipe/
.

INGREDIENTS:
• 6 Large Yellow Onions, peeled & thinly sliced
• 4 tbsp. Butter
• ½ cup Dry White Wine
• 3 Garlic Cloves, minced
• 3 tbsp All-Purpose Flour
• 6 cups Beef Bone Broth
• ½ tsp. Dried Thyme
• 2 Bay Leaves
• 1 tsp. Worcestershire
• 1 tbsp. Sherry Vinegar
• 1 tsp. Sugar, to taste
• Salt + Pepper, to taste
• 6 Slices Toasted Sourdough
• 2 cups Shredded Cheese
• Chopped Parsley, for garnish
.
DIRECTIONS:
1. Thinly slice 6 large yellow onions and set aside. Melt a half stick of butter in a large Dutch oven and then add the sliced onions. Sauté over medium heat, stirring occasionally, until caramelized. Add a splash of white wine here and there to deglaze the bottom of the pot.
2. Add the minced garlic and stir. Continue to sauté for a minute or so and then add the flour. Stir until well combined. Pour in the beef stock and then add the thyme, bay leaves, Worcestershire and sherry vinegar. Season with salt + pepper, taste, and add sugar if needed. Bring the pot to a simmer and continue to cook for 20 minutes.
3. While the soup is simmering, toast the bread and shred the cheese.
4. Ladle your desired amount of soup into an oven-safe bowl. Top each bowl with toasted bread and a big handful of cheese. Place them on a baking sheet and broil for 3 - 5 minutes, or until the cheese is melted, brown and bubbly.
5. Serve immediately with a sprinkle of fresh parsley.
Ramen. A staple. We’ve all grown up noshing on i Ramen. A staple. We’ve all grown up noshing on it. Would you like a series of recipes on different ways to use it? Let me know! I’m honestly thinking of ramen birria tacos, cacio e pepe ramen, perhaps something with a runny egg?? Yum. Is this a series you’d like? Different staples each week? Love ya’ll, thanks for being here.
.
FOR THE DRESSING:
• 1/4 cup Rice Vinegar
• 1/4 cup Avocado Oil
• 1 tsp. Toasted Sesame Oil
• 2 tbsp. Liquid Aminos
• 1 Garlic Clove, minced
• 1 tbsp. Honey 
• 1 tsp. Maple Syrup
• Salt + Pepper, to taste
.
FOR THE SALAD:
• 16 oz. Bag of Coleslaw
• 1/2 cup Slivered Almonds, toasted optional
• 3/4 lb. Chicken Chunks, cooked and chopped (14 pieces)
• 15 oz. Can Mandarin Oranges, drained
• 1 pack of Ramen Noodles, crushed
• 1/2 cup Sliced Green Onions
• 2 tbsp. Freshly Chopped Cilantro
• 1 tbsp. Black Sesame Seeds
Need a recipe to use up those lonely leftover hot Need a recipe to use up those lonely leftover hot dogs from the holiday weekend? These cheesy, dill pickle stuffed corn dog bites will have your tastebuds smitten.
.
INGREDIENTS:
• 1 box Jiffy Cornbread Mix
• 1 Egg
• 2 tbsp. Butter
• 1/3 cup Milk
• 2 tbsp. Heavy Cream
• 4 oz. Monterey Jack Cheese, shredded
• 2 tbsp. Dry Ranch Packet
• 24 Dill Pickle Chips, minced
• 8 Hot Dogs, cut into 6ths
•Ketchup + Mustard for dipping
.
DIRECTIONS:
1. Pour the cornbread mix, egg, butter, milk, cheese, ranch seasoning and minced pickle chips into a large bowl. Mix together well. 
2. Grease a mini muffin tin and spoon cheesy cornbread mixture into each hole (about halfway). 
3. Cut each hot dog into 6 chunks and press four into the middle of each muffin prior to baking. 
4. Bake at 400 for 10 minutes. Serve immediately with ketchup and mustard for dippin’.
Hooray! It’s #NationalFriedChickenDay! Let’s m Hooray! It’s #NationalFriedChickenDay! Let’s make some sandwiches!
.
BLOG + FULL VIDEO —> https://sliceofjess.com/pickle-juice-crispy-fried-chicken-sandwich/
.
FOR THE BRINE:
• 1 cup Pickle Juice
• 1 cup Buttermilk
• 4 Chicken Breasts
.
BREADING:
• 1.5 cups All Purpose Flour
• ½ cup Powdered Sugar
• 1 tbsp. Garlic Powder
• 1 tbsp. Smoked Paprika
• 1 tsp. Kosher Salt
• 1 tbsp. Freshly Cracked Black Pepper
• 2 Eggs
• ¼ cup Pickle Juice
• Vegetable Oil, for frying
.
BUTTERMILK SPICY COLESLAW:
• ¼ cup Pickle Juice
• ½ cup Buttermilk
• 4 cups Coleslaw Mix
• ¼ small Red Onion
• 1 Jalapeño, seeded and sliced
• ¼ cup loosely packed Parsley Leaves, chopped
• Salt, to taste
.
HABANERO-GARLIC AIOLI:
• 1 cup Mayonnaise
• 2 cloves Garlic, minced
• 1.5 tbsp. - 2 tbsp. Habanero Hot Sauce
.
FOR THE SANDWICH:
• 4 Brioche Hamburger Buns
 • Pickles, for garnish
.
DIRECTIONS —> on my blog!🙃
Want to revamp your pasta salad game? This version Want to revamp your pasta salad game? This version has lemon caper sauce. It’s tangy, savory and topped with fresh mozzarella and breadcrumbs!
.
BLOG —> https://sliceofjess.com/pasta-salad-with-lemon-caper-sauce/
.
INGREDIENTS:
• 16 oz. Spiral Pasta (Rotini)
• 4 tbsp. Butter
• 1 tbsp. Olive Oil
• 2 Shallots, thinly sliced
• 4 Garlic Cloves, minced
• 2 cups Dry White Wine
• 4 tbsp. Capers
• Juice of 1 Lemon, or more to taste
• 8 oz. Mozzarella Pearls
• 1 cup Panko Breadcrumbs
• ½ cup Grated Parmesan Cheese
• Red Pepper Flakes, to taste
• Italian Parsley, to taste
.
DIRECTIONS:
1. Cook the pasta according to packaged directions for al dente.
2. While the pasta is cooking, heat butter and olive oil in a large skillet over medium heat. Add shallots and cook until translucent. Then add garlic and sauté for 1 minute, or until fragrant.
3. Deglaze pan with white wine and then add the capers and lemon juice. Simmer until the sauce has reduced and thickened. About 15 minutes.
4. While the sauce cooks, add breadcrumbs and parmesan cheese to a sauté pan with a dab of butter. Constantly stir until breadcrumbs are browning. Remove and set aside.
5. Add a splash of heavy cream and simmer for another 5 minutes. Pour over the cooked pasta into the lemon-caper sauce and toss until combined. Serve immediately with a sprinkle of breadcrumbs, red pepper flakes and Italian parsley.
July 4th + an easy chili recipe go hand-n-hand. Sl July 4th + an easy chili recipe go hand-n-hand. Slather this no-bean version on burgers, hot dogs, swirled into mac & cheese and so much more!
.
BLOG —> https://sliceofjess.com/easy-chili-recipe-for-grilling-season/
.
FOR THE CHILI SEASONING:
• 2 tbsp. Chili Powder
• 1 tsp. Cumin
• ½ tsp. Paprika
• 1 tsp. Garlic Powder
• ½ tsp. Onion Powder
• 1 tsp. Mustard Powder
• 1 tsp. Oregano
• 2 tsp. Brown Sugar, or more to taste
• ½ tsp. Salt
• 1 tsp. Red Chili Flakes
.
FOR THE CHILI:
• 1 lb. Ground Beef
• 2 tbsp. Tomato Paste
• 14.5 oz can Crushed Tomatoes
• ½ cup Chicken Broth
.
DIRECTIONS:
1. Mix together all spices for the chili seasoning and set aside.
2. Add the ground beef to a large sauté pan and cook over medium heat until browned, making sure to crumble the beef as much as you can. Drain and return the meat to the sauté pan.
3. Add the chili seasoning to the ground beef and mix together. Then add the tomato paste, crushed tomatoes, and chicken broth.
4. Simmer for 10 - 15 minutes, or until most of the liquid has thickened.
5. Serve immediately over your favorite grilled items! Enjoy!
We're headed into the holiday weekend, so make sur We're headed into the holiday weekend, so make sure to whip up a batch of my Sheet Pan Roasted Corn Salsa for all your chip-dippin' munching!
.
BLOG --> https://sliceofjess.com/easy-sheet-pan-roasted-corn-salsa/
.
INGREDIENTS:
* 2 cups Corn Kernels
* 2 tbsp. Olive Oil
* 1 Red Bell Pepper, chopped
* ⅓ Red Onion, chopped
* ¼ cup Fresh Cilantro, chopped
* 1 Jalapeño, seeded and chopped
* Juice of ½ Lime (or more, if preferred)
* ½ tsp. Salt, or more to taste
.
DIRECTIONS:
1. Cut corn off the cob and mix with olive oil in a large bowl.
2. Preheat oven to 450F and chop all remaining ingredients while you wait for the oven to come to temperature.
3. Spread corn evenly on a sheet pan and roast for 10 minutes, flipping halfway through. If you'd like some extra color, turn on the broiler for a minute or two at the end.
4. Mix corn with all remaining ingredients and refrigerate for at least an hour.
5. Serve with your favorite tortilla chips and store any leftovers in an airtight container in the refrigerator. Consume leftovers within 3 days.
Load More... Follow on Instagram

Footer

Popular Posts

Easy Swedish Meatballs
Grilled Chicken Sandwich Recipe
Chicken Parmesan Pasta
Crab Rangoon Dip
Copyright Slice of Jess ©2021